Tag: Taco

  • Black Bean Taco Casserole

    Black Bean Taco Casserole

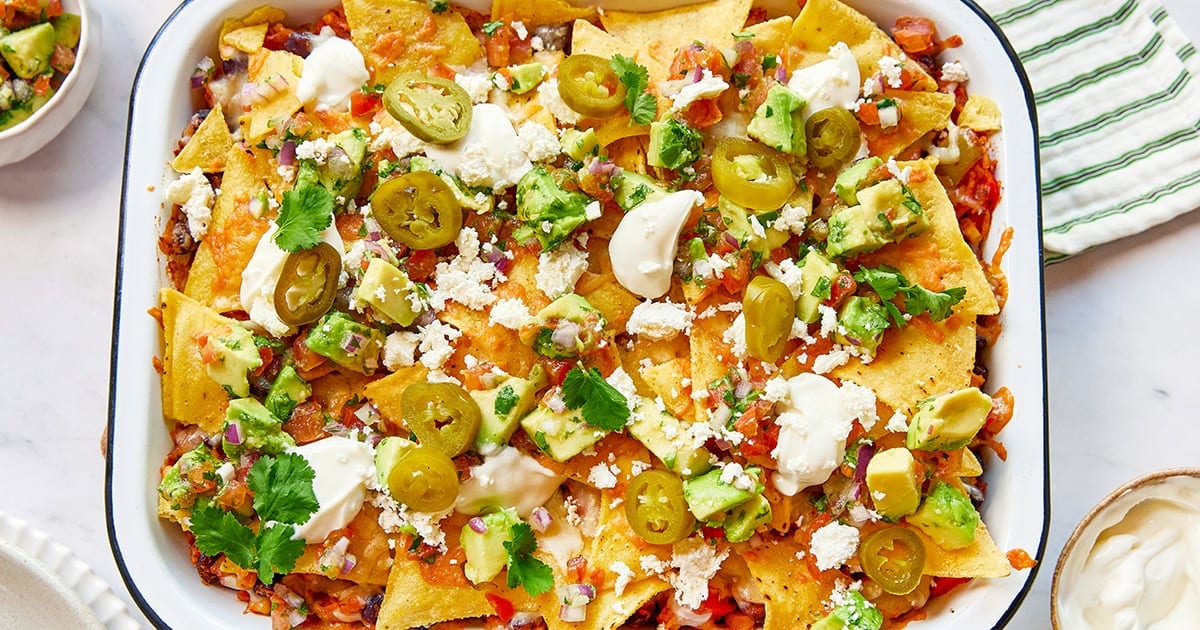
    This black bean taco casserole is the kind of weeknight dinner that gets everyone at the table fast — layers of spiced black beans, rice, and veggies, topped with melty cheese and crunchy corn chips that bake up just like nachos.


    Jump to: ℹ️ Overview | 🛒 Ingredients | 📷 How To Make | 📹 Watch The Video | 👩‍🍳 Recipe Tips | 🥗 Serving Suggestions | 📝Full Recipe Card | 🍽 More Bean Recipes


    At A Glance

    • ⏱ Ready In: 40 minutes
    • 🍽 Serves: 6–8
    • 🌱 Diet: Vegetarian, gluten-free (check corn chip label), nut-free
    • 💪 Nutrition Highlights: High in plant-based protein and fiber from black beans; good source of vitamins C and A from the bell peppers
    • 🥕 Main Ingredients: Black beans, rice, salsa, bell peppers, corn, Cheddar cheese, corn chips
    • 🔥 Flavor Profile: Smoky, warmly spiced, savory, cheesy with a fresh and zesty avocado salsa topping
    • 🧊 Meal-Prep Friendly: Keeps 4 days in the fridge; filling can be made ahead and assembled just before baking
    • Best Served With: Fresh avocado salsa, sour cream, crumbled feta or queso fresco

    This black bean taco casserole or bake is one of those vegetarian dinners I make when I want something that feels a little fun and indulgent but is actually packed with good stuff.

    The filling is a deeply flavored mix of sautéed onion and bell peppers, smoked paprika, cumin, garlic, tomato paste, salsa, cooked rice, black beans, and corn — basically all your taco night favorites cooked down into one hearty, saucy base. Then it gets layered into a baking dish between two rounds of corn chips and a generous amount of shredded cheddar, and baked until it’s bubbly, melty, and golden — honestly, it looks like a giant nachos situation in the best possible way. The crispy chip topping is something I am very enthusiastic about.

    Top each portion with a fresh, bright avocado salsa and a dollop of sour cream, and you’ve got a complete dinner that feels festive enough for a weekend but easy enough for a Tuesday. It’s a great one to bring to a gathering or serve to a crowd, too — the 9×13 dish stretches easily to 8 portions.

    👩‍🍳 You might also like these Tex-Mex recipes: Mexican chicken rice casserole, Mexican ground beef casserole, sweet potato and black bean tacos, Mexican stuffed sweet potatoes, Mexican salad with corn & black beans, arroz rojo (Mexican red rice), or these best bean recipes.

    What You’ll Need

    Here is what you’ll need for this black bean taco casserole recipe. Find the full measurements in the recipe card below.

    For the filling:

    • Olive oil — for sautéing the vegetables; any neutral cooking oil works fine.
    • Onion — diced large; the sweet base of the filling. White or brown both work.
    • Red and yellow or green bell peppers (capsicum) — these add color, sweetness, and texture. Any combination of colors works; use what you have.
    • Garlic — adds savory depth to the spice base.
    • Tomato paste — just a tablespoon, but it adds richness and a deep, slightly sweet tomato note.
    • Salsa — use a mild chunky store-bought variety for ease and flavor. The chunkier the better; it adds texture to the filling. You can go medium if you’d like a bit more heat.
    • Cooked rice — white or brown both work well. This is a brilliant way to use up leftover rice from earlier in the week.
    • Black beans — rinsed and drained from a can; these bring plant-based protein and fiber, plus that classic taco flavor. You could swap for pinto beans in a pinch.
    • Corn kernels — frozen corn defrosted in boiling water, or canned and drained. Either works perfectly here.
    • Spices: ground cumin, smoked paprika, ground coriander, dried oregano, and optional mild chili powder or cayenne. This blend gives the filling its warm, smoky, Mexican-inspired depth — don’t skip the smoked paprika, it makes a real difference.
    • Salt — season as you go at each stage.

    For the topping:

    • Corn chips — about 150 grams / 4–5 oz. They go in two layers: under the filling and over the cheese, so they get crispy on top like nachos. I usually crush a small handful to scatter on top for extra crunch.
    • Shredded cheddar or Mexican blend cheese — use a good melting cheese. Mexican blend is especially good here if you can find it.

    For the avocado salsa:

    • Avocado — diced; adds creaminess and freshness to cut through the richness of the bake.
    • Tomato — diced small; adds juiciness and a little acidity.
    • Red onion — very finely diced; punchy and fresh.
    • Lime juice — brightens everything up and keeps the avocado from browning.
    • Fresh cilantro (coriander) — adds herby freshness. If you’re not a cilantro fan, flat-leaf parsley works instead.
    • Salt — to taste.
    • Optional for serving: sour cream, crumbled feta or queso fresco, pickled jalapeños.

    How To Make Black Bean Taco Casserole

    Find the full recipe and nutritional information below. Here are some handy step-by-step photos for how to make this black bean taco bake.

    • Heat olive oil in a large skillet or pan over medium heat. Add the diced onion and peppers with a little salt, and cook for 5–7 minutes until softened and lightly golden. Add the garlic and cook for another 30 seconds.
    • Stir in the tomato paste and all the spices, adding the remaining salt. Cook for 30–60 seconds, stirring constantly, until the mixture smells fragrant and the paste darkens slightly.
    • Add the salsa, cooked rice, black beans, and corn. Stir everything together well and let it simmer for a couple of minutes so the filling thickens slightly and absorbs all those flavors. Taste and adjust salt or add a pinch of sugar if needed. The mixture should be moist but not watery.
    • Preheat your oven to 180°C / 350°F. In a 9×13 baking dish, spread half the corn chips across the bottom. Spoon the filling over the chips and spread evenly. Scatter about 1 cup of shredded cheese over the filling. Add the remaining corn chips as the next layer, then top with the rest of the cheese, letting it nestle between and over the chips. Crush a small handful of chips over the top if you like extra crunch.
    • Bake for 15–20 minutes until the cheese is melted and bubbly and the top chips are golden and crisp like nachos. Rest for 5 minutes before serving — this helps the casserole set a little.
    • While it bakes, toss together the avocado salsa: combine the diced avocado, tomato, red onion, lime juice, cilantro, and salt.
    • Spoon the avocado salsa generously over each serving (or over the whole dish). Top with sour cream and crumbled feta if desired.

    Watch The Video

    Recipe Tips

    • Make it vegan: Use a dairy-free cheese alternative (many melt well these days) and swap the sour cream for coconut yogurt or a vegan sour cream.
    • Make it spicier: Add more cayenne to the spice blend, use medium salsa, or serve with pickled jalapeños or hot sauce on the side.
    • Add more protein: Stir a drained can of pinto beans or kidney beans into the filling along with the black beans, or add some cooked lentils.
    • Leftover rice is perfect here: This recipe was made for using up day-old cooked rice. It absorbs the filling flavors beautifully and is much better than fresh-cooked rice straight from the pot. Just make sure the rice is no older than 1 day!
    • Filling can be made ahead: Cook the filling up to 2 days ahead and refrigerate. Assemble with chips and cheese just before baking.
    • Storage: Leftovers keep well in the fridge for up to 4 days. Reheat in the oven at 160°C / 325°F for best results so the chips crisp back up, or in the microwave (chips will soften). The filling on its own freezes well for up to 3 months — freeze before assembling with chips and cheese.
    • Don’t assemble too far ahead: Once the chips go in, they soften as they sit, so bake it relatively soon after assembling for the crispiest result.
    • Cheese swap: Monterey Jack, pepper jack, or any good melting cheese works in place of cheddar.
    • Gluten-free: This recipe is naturally gluten-free as long as your corn chips are certified gluten-free — just check the label.

    Serving Suggestions

    This black bean taco casserole is a full meal on its own, especially once you’ve added the avocado salsa and a dollop of sour cream. If you want to stretch it to a bigger crowd or round out the table, a simple green salad or my Mexican Salad With Corn & Black Beans alongside it is a lovely match. Arroz Rojo is another great option if you want to serve it more like a traditional Tex-Mex spread. For drinks, it’s great with an iced lime agua fresca, a cold beer, or sparkling water with a wedge of lime.

    💬 If you’ve tried this black bean taco casserole or any other recipe on the blog then don’t forget to rate the recipe and let me know how you got on in the comments below, I love hearing from you! You can also FOLLOW ME on Instagram, Facebook, Pinterest, YouTube, and or sign up to my Newsletter to see more of my delicious food.

    Want to Save This Recipe?

    Enter your email & I’ll send it to your inbox. Plus, get great new recipes from me every week!

    By submitting this form, you consent to receive emails from Cooked & Loved

    A hearty, cheesy black bean taco bake loaded with spiced black beans, rice, corn, and bell peppers, topped with crunchy corn chips and melted cheese. Vegetarian, crowd-pleasing, and ready in 40 minutes. Find step-by-step photos and more recipe tips above.

    • Heat the olive oil in a large skillet or frying pan over medium heat. Add the diced onion and bell peppers with ½ teaspoon salt. Cook for 5–7 minutes, stirring occasionally, until softened and lightly golden. Add the garlic and cook for 30 seconds more.

    • Stir in the tomato paste, all the spices, and the remaining ½ teaspoon salt. Cook for 30–60 seconds, stirring constantly, until the paste darkens and the spices smell fragrant.

    • Add the salsa, cooked rice, black beans, and corn. Stir well to combine and simmer for 2–3 minutes until everything is coated and the mixture has thickened slightly. It should be moist but not watery. Taste and adjust seasoning — add more salt or a small pinch of sugar if needed.

    • Preheat oven to 180°C (350°F). In a 9×13-inch (23x33cm) baking dish, spread half the corn chips across the bottom in an even layer.

    • Spoon the filling evenly over the chips. Scatter about 1 cup of shredded cheese over the filling. Add the remaining corn chips on top of the cheese layer, then finish with the rest of the cheese, spreading it over and between the chips. For extra crunch, crush a small handful of chips and scatter over the top.

    • Bake for 15–20 minutes until the cheese is melted and bubbling and the top chips are golden and crispy. Rest for 5 minutes before serving.

    • While the casserole bakes, make the avocado salsa: combine the diced avocado, tomato, red onion, lime juice, cilantro, and salt. Toss gently to combine.

    • Serve portions topped generously with avocado salsa, sour cream, and crumbled feta if desired.

    Important Ingredient Tips: Use a chunky salsa rather than a smooth or thin one — it adds better texture to the filling. Smoked paprika is key to the flavor; regular paprika won’t give you the same depth. Leftover cooked rice (cold from the fridge) works especially well in this recipe.
    Key Recipe Tips: Don’t skip resting the casserole for 5 minutes after baking — this helps it set so portions hold together better. If you want a maximum crunch on the chips, assemble and bake right away rather than letting it sit. You can crush a handful of chips to scatter on top for extra texture.
    Storage Tips: Leftovers keep well in the fridge in an airtight container for up to 4 days. Reheat in the oven at 160°C (325°F) for about 10 minutes for crispier chips, or microwave (chips will soften but it still tastes great).
    Make-Ahead Tips: The filling can be made up to 2 days ahead and stored in the fridge. When ready to eat, assemble with the corn chips and cheese and bake straight away. The filling also freezes well (without the chips and cheese) for up to 3 months — thaw overnight in the fridge, then assemble and bake.
    FAQs:
    Can I use canned salsa instead of homemade? Yes, absolutely — this recipe is designed for a good quality store-bought chunky mild salsa. It saves time and adds great flavor.
    Can I make this ahead of time? You can make the filling up to 2 days ahead and refrigerate it. Assemble the casserole with the chips and cheese just before baking for the best texture and crunchiest topping.
    Can I freeze this casserole? The filling freezes beautifully on its own for up to 3 months. We don’t recommend freezing the fully assembled bake as the chips won’t hold up well after thawing. Freeze the filling only, then assemble fresh when you’re ready to bake.
    Can I add meat to this? Yes — cooked and seasoned ground beef or ground chicken stirred into the filling would work well. You could also add shredded rotisserie chicken.
    Is this recipe gluten-free? It can be — make sure your corn chips are certified gluten-free, as some brands process them in shared facilities.
    Can I use a different type of bean? Pinto beans, kidney beans, or even chickpeas (for a slightly different flavor) would all work well in place of black beans.
    What if I don’t have cooked rice? You need pre-cooked rice for this recipe. You can use a microwave rice pouch, day-old rice, or simply cook a batch ahead of time and let it cool before adding.

    Calories: 620kcal | Carbohydrates: 60g | Protein: 22g | Fat: 35g | Saturated Fat: 13g | Polyunsaturated Fat: 5g | Monounsaturated Fat: 12g | Trans Fat: 0.1g | Cholesterol: 54mg | Sodium: 1384mg | Potassium: 878mg | Fiber: 11g | Sugar: 8g | Vitamin A: 2358IU | Vitamin C: 87mg | Calcium: 444mg | Iron: 3mg
    Keywords: black bean casserole, taco casserole, taco bake, vegetarian bean bake, taco casserole with rice, taco rice casserole, black beans casserole

    More Bean Recipes


    Source link

  • Our Favorite Taco Meat Recipe

    Our Favorite Taco Meat Recipe

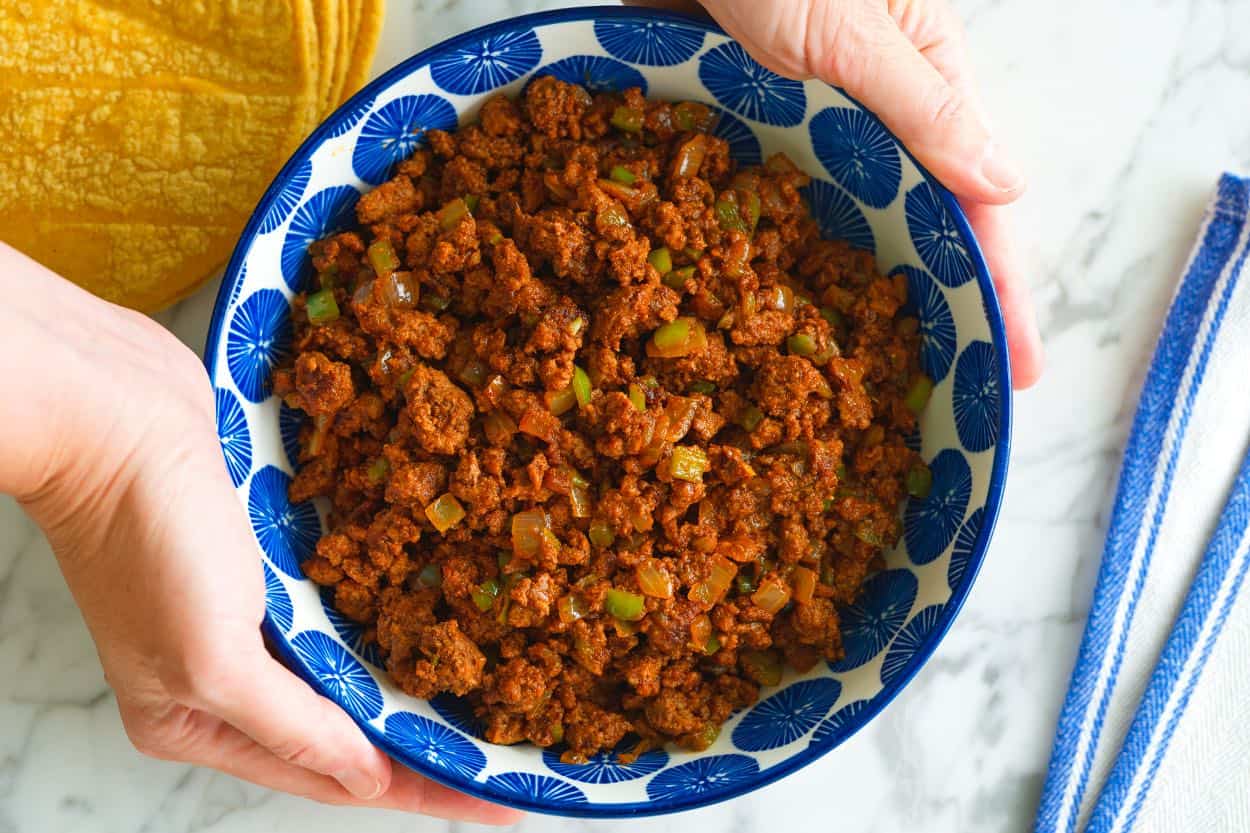
    Our favorite taco meat recipe calls for ground beef, turkey, or chicken, along with basic spices you probably already have on hand. Easy and so much better than what you can make from the packets sold at the store.

    Taco Meat

    My entire family loves this taco meat recipe, and we use it all the time for quick dinners like beef tacos, turkey tacos, taco salad, burritos, nachos, and more.

    It’s absolutely a recipe you should keep in your back pocket, because when those busy days happen (which they do!), knowing that you can make a 15-minute dinner with basic spices from your spice cabinet and a pound of ground meat helps.

    Key Ingredients

    • Taco Seasoning: I know you can buy packets at the store, but trust me, our taco spice blend is so much better. Also, I bet you already have all the spices you need to make it in your spice cabinet. You’ll combine chili powder, ground cumin, smoked paprika, garlic powder, oregano, and salt together. It’s easy and makes the taco meat extra delicious. Another option is to use this taco seasoning recipe, which makes a larger batch has a few optional ingredients for flavor.
    • Ground meat: Our photos show ground beef, but you can use ground turkey, ground chicken, ground pork, or really any ground meat you have on hand in our recipe below. We like a little fat, but not too much, or else the meat turns out greasy. Look for 7% to 10% fat.
    • Veggies: These are optional, and I don’t always add them. That said, when I have them in the fridge, I love adding chopped onion and Anaheim pepper to my skillet. It adds a bit of extra texture, and I love how they both turn out sweet once cooked.
    • Tomato Paste and Stock: These bring everything together. A little tomato paste deepens the rich flavor of the meat and spices, and the stock keeps it from drying out. I like vegetable broth, tomato broth, beef stock, or chicken stock. You only need 1/2 cup, so use whatever you have (water will work in a pinch, too).

    Find the full recipe with measurements below.

    How to Make the Best Taco Meat

    Tip 1: Make our homemade spice mix. Skip the packets at the store, our simple taco meat seasoning calls for spices I bet you already have on hand. You’ll stir together chili powder, cumin, smoked paprika, garlic powder, dried oregano, and salt. So simple!

    Tip 2: Brown the ground meat. For the best results, get a little color and crispy texture on your ground meat. I like patting it down into the skillet and leaving it for a minute so it starts to pick up some color. Add your spice mix, and then use a wooden spoon to break the meat apart into crumbles. A heavier skillet (like a cast-iron pan) is perfect.

    Browning ground beef in a skillet with taco seasoning.

    Tip 3: Add some extra veggies. I don’t always do this, but when I have them on hand, I love cooking some chopped onion and Anaheim peppers with the meat. They soften and take on a little sweetness, which is really nice with the spices.

    Adding onions and Anaheim peppers to taco meat for extra texture

    Tip 4: Finish with tomato paste and stock. Here’s where we bring everything together and make sure our taco meat stays juicy, not dried out. Stir in a bit of tomato paste, then, when it’s distributed, pour in a bit of stock. Let it simmer, and then you are good to go!

    Pouring chicken stock into a skillet with taco meat

    Serving Suggestions

    I’m betting you already have a few ideas for using your taco meat, but here are a few more suggestions. We love it tucked into homemade tortillas (try corn tortillas or flour tortillas), spooned on top of taco salad, and stuffed into burritos. The toppings and sides for this are endless. Here’s a list of our favorites:

    Taco Meat

    Our Favorite Taco Meat

    • PREP
    • COOK
    • TOTAL

    This is my family’s go-to taco meat recipe. We’ve called for lean ground beef below, but feel free to substitute ground turkey, chicken, or pork. We prefer this when made with ground meat that has a little fat (7% to 10% is perfect). Any more and it’s a bit greasy, any less and it turns out dry. The onions and pepper are optional, but they add a bit of extra texture.

    4 Servings

    You Will Need

    1 ½ teaspoons chili powder

    1 teaspoon ground cumin

    ½ teaspoon smoked paprika

    1 teaspoon garlic powder

    ¼ teaspoon dried oregano

    ¾ teaspoon fine sea salt, plus more as needed

    1 tablespoon avocado oil

    1 pound lean ground beef, 90/10 (450 g)

    ¾ cup finely chopped onion, a quarter of a medium onion, optional

    1 Anaheim pepper, deseeded and finely chopped, optional

    2 tablespoons tomato paste (35 g)

    ½ cup chicken stock or water (60 ml)

    Directions

      1Make spice mix: In a small bowl, stir together the chili powder, cumin, smoked paprika, garlic powder, dried oregano, and salt.

      2Brown the meat: Heat the avocado oil in a medium skillet over medium-high heat. Add the ground beef, pat it down into the skillet, and sprinkle the spice mixture over it. Use a wooden spoon to break up the meat as it cooks, stirring until it begins to brown.

      3Add veggies: Stir in the onions and pepper, then cook, moving them around the pan until they begin to soften and the onions smell sweet, about 3 minutes.

      4To finish: Stir in the tomato paste and cook for 2 more minutes. Add the chicken stock (or water) and simmer for a few minutes until the sauce thickens. Taste, then add more salt if you think it needs it (since this usually gets added to tacos or salads, keeping it well seasoned works really well).

    Adam and Joanne’s Tips

    • Storing: Keep leftovers in an airtight container in the fridge for up to 4 days or in the freezer for up to 3 months.
    • The nutrition facts provided are estimates.

    Nutrition Per Serving
    Serving Size
    1/4 of the recipe
    /
    Calories
    201
    /
    Total Fat
    7.5g
    /
    Saturated Fat
    2.2g
    /
    Cholesterol
    67.8mg
    /
    Sodium
    556.4mg
    /
    Carbohydrate
    6.6g
    /
    Dietary Fiber
    1.6g
    /
    Total Sugars
    2.5g
    /
    Protein
    26.6g


    AUTHOR:

    Joanne Gallagher

    Adam and Joanne of Inspired Taste

    We are Adam and Joanne Gallagher, the creators of Inspired Taste. Established in 2009, Inspired Taste grew from a childhood dream into one of the internet’s most trusted recipe sites with hundreds of reliable recipes, step-by-step videos, and expert tips.More About Us

    Source link

  • Epic Taco Salad Recipe

    Epic Taco Salad Recipe

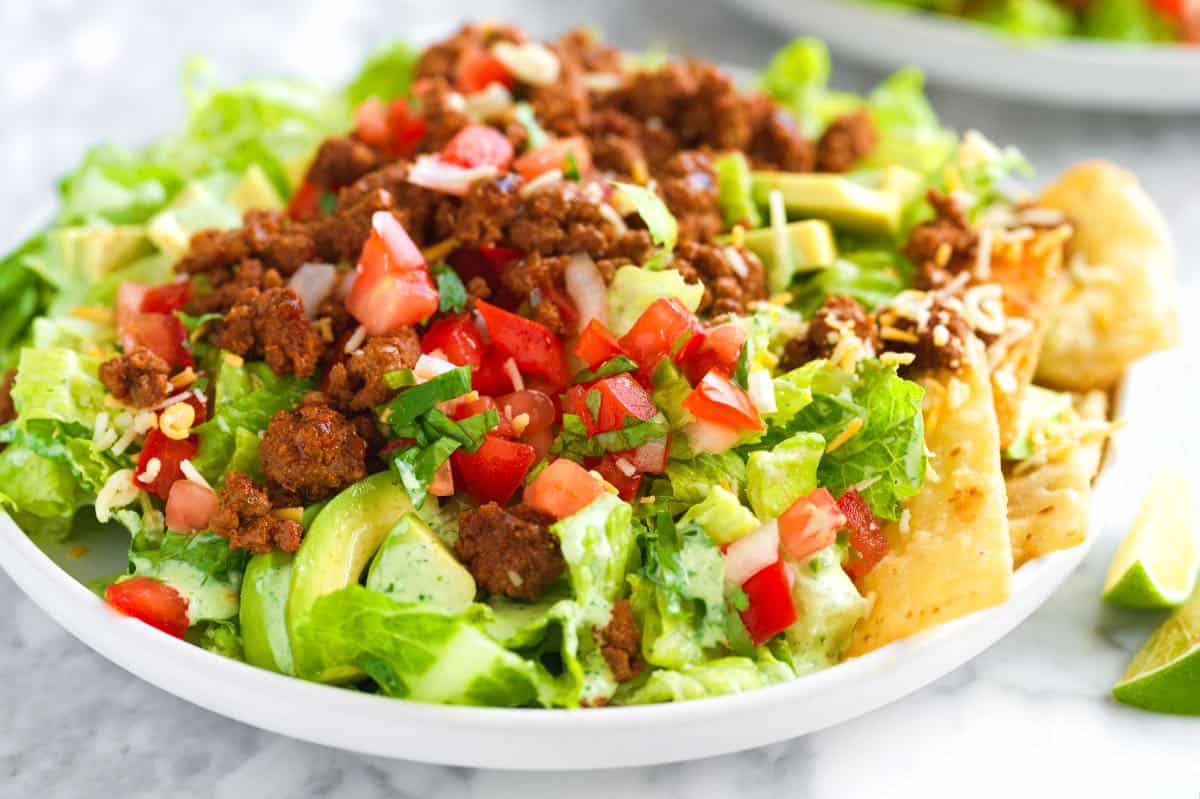
    Our favorite taco salad recipe is an easy weeknight meal with fresh lettuce, tortilla chips, seasoned ground beef, cheese, and a creamy cilantro lime dressing.

    Taco Salad

    We love tacos of all kinds (see all of our taco recipes as proof), but we really love taco salad. It’s fast, fresh, and super easy! You’ve got perfectly seasoned ground beef made with our homemade taco mix, crisp fresh lettuce, and all the best taco toppings.

    You have a lot of play with when it comes to making this taco salad recipe, but I’ll walk you our favorite way to make it! It’s healthy, but doesn’t feel that way, so it feels like a splurge. We love topping this salad with our cilantro lime dressing!

    Key Ingredients

    • Taco Meat: I’ve used lean ground beef (90/10) for my salad in the photos, but you can substitute ground turkey, ground pork, or ground chicken without any changes. Instead of using a store-bought seasoning, we make our own with chili powder, cumin, smoked paprika, garlic powder, dried oregano, and salt. When we cook the meat, we also add a couple of tablespoons of tomato paste, which helps make the meat extra tasty. You can also swap our seasoning below for our homemade taco seasoning, which is equally as delicious. (Here’s more about how to make taco meat if you are interested.)
    • Lettuce: You want crisp, crunchy lettuce for this salad, so Iceberg or Romaine is perfect.
    • All the Toppings: So this is where you get to have fun. Think of your favorite taco toppings, and then add them to this salad. I love pico de gallo, avocado or guacamole, and shredded cheese, but add your favorite toppings as you see fit!
    • Taco Salad Dressing: My favorite dressing for this is our creamy cilantro lime dressing. Still, you can substitute your favorite store-bought dressing or go with another homemade dressing like this easy ranch dressing.
    • Tortilla Chips: So these are optional and take away a little bit from the healthy angle, but I do love them! Make homemade tortilla chips or use some from your favorite store-bought bag, and add them to the top right before digging in. They add that corn tortilla flavor and lots of crunch. Some people prefer Fritos, but to be honest, I like to stick with regular chips. I’m such a fan!

    Find the full recipe with measurements below.

    Homemade Taco Salad with Ground Beef

    How to Make the Best Taco Salad

    Tip 1: Generously season the ground meat. I’m extra generous with the salt and seasonings for my taco meat. It may taste slightly too seasoned on its own, but when you scatter it all over the salad, it works! If you like spicy tacos, add a pinch or two of cayenne pepper to the spice blend.

    Tip 2: Add lots of different textures. My favorite part about this salad is the variety of textures. We want to keep the prep to a minimum since this is very likely something you are making on a weeknight, but that doesn’t mean we can’t pack in lots of goodies. Avocado is creamy, tomato or pico de gallo is fresh, and the chips add some crunch. Think about other fridge staples like sour cream, salsa, guacamole, or pickled red onions. They will all work well in this salad!

    Tip 3: Make the taco meat ahead of time. You can cook the ground beef with the spices, then keep it in an airtight container for up to 4 days. This way, it’s ready for you when you are craving this taco salad. The dressing is great for making ahead, too!

    Taco Salad

    Epic Taco Salad

    • PREP
    • COOK
    • TOTAL

    This easy taco salad recipe with ground beef is such an easy weeknight dinner. Make our recommended cilantro lime dressing recipe (which is sort of like a cilantro ranch) or skip that step and use your favorite store-bought ranch.

    4 Servings

    Watch Us Make the Recipe

    You Will Need

    For the Taco Meat

    1 ½ teaspoons chili powder

    1 teaspoon ground cumin

    ½ teaspoon smoked paprika

    1 teaspoon garlic powder

    ¼ teaspoon dried oregano

    ¾ teaspoon fine sea salt, plus more as needed

    1 ½ tablespoons avocado oil

    1 pound lean ground beef, 90/10 (450g)

    2 tablespoons tomato paste (35g)

    ½ cup chicken stock or water


    For the Taco Salad

    12 cups shredded crispy lettuce, like romaine or iceberg lettuce

    1 cup homemade pico de gallo or chopped tomatoes

    ½ cup Mexican blend shredded cheese (113g)

    1 large avocado, pitted and sliced

    1 cup tortilla chips, try homemade tortilla chips, optional

    Cilantro Lime Dressing, Homemade Ranch, or your favorite store-bought ranch

    Directions

      1Make spice mix: In a small bowl, stir together the chili powder, cumin, smoked paprika, garlic powder, dried oregano, and salt.

      2Cook the seasoned beef: Heat the avocado oil in a medium skillet over medium-high heat. Add the ground beef and sprinkle the spice mixture over it. Use a wooden spoon to break up the meat as it cooks, stirring until it begins to brown. Stir in the tomato paste and cook for 2 more minutes. Add the chicken stock (or water) and let it simmer for a few minutes until the sauce has thickened. Taste, and then add more salt if you think it needs it (since this will top a salad, keeping this well seasoned works really well with the rest of the salad.)

      3Make the salad: In a large salad bowl, toss the lettuce with 4 to 8 tablespoons of the dressing (adjust depending on how dressed you like your salad). Divide the lettuce between four bowls or plates, then top each with a generous ½ cup of the beef mixture, pico de gallo, shredded cheese, and the avocado. Sneak some tortilla chips on the side, then enjoy!

    Adam and Joanne’s Tips

    • More toppings: Feel free to add more of your favorite taco toppings like sour cream, salsa, chopped tomatoes, queso fresco, red onion, black olives, and more!
    • Seasoning: I prefer the spice blend above to your average packet of taco seasoning from the store; however, if you have a favorite, feel free to swap our blend for the packet. Of all the options I have tried, Siete Foods has the tastiest.
    • Lettuce: I usually buy the romaine hearts sold in threes at the store. For 4 servings (12 cups), you will need two 12-ounce bags of romaine hearts.
    • The nutrition facts are estimates.

    Nutrition Per Serving
    Serving Size
    1/4 of the recipe (1/2 cup beef)
    /
    Calories
    534
    /
    Total Fat
    40.7
    /
    Saturated Fat
    10.6g
    /
    Cholesterol
    95.2mg
    /
    Sodium
    1069.8mg
    /
    Carbohydrate
    14.3g
    /
    Dietary Fiber
    6.7g
    /
    Total Sugar
    5.4g
    /
    Protein
    29.7g


    AUTHOR:

    Joanne Gallagher

    Adam and Joanne of Inspired Taste

    We are Adam and Joanne Gallagher, the creators of Inspired Taste. Established in 2009, Inspired Taste grew from a childhood dream into one of the internet’s most trusted recipe sites with hundreds of reliable recipes, step-by-step videos, and expert tips.More About Us

    Source link

  • Easy Taco Soup Recipe

    Easy Taco Soup Recipe

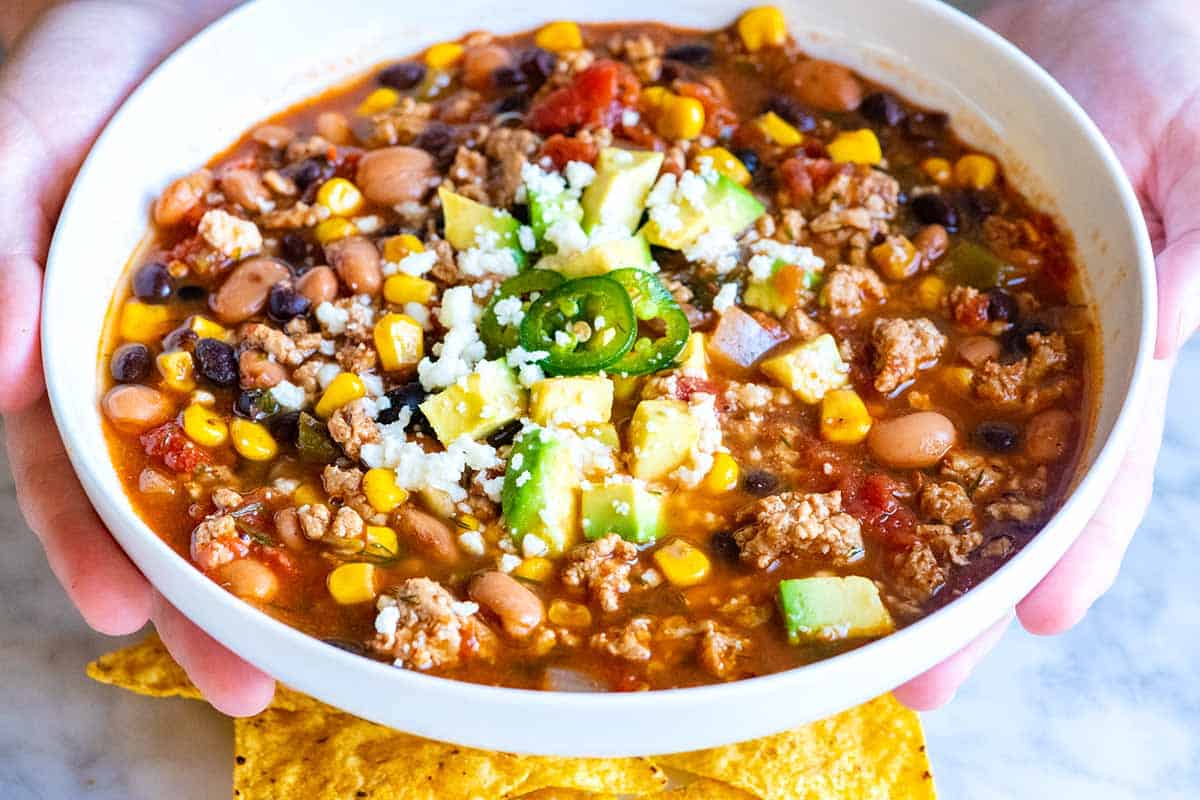
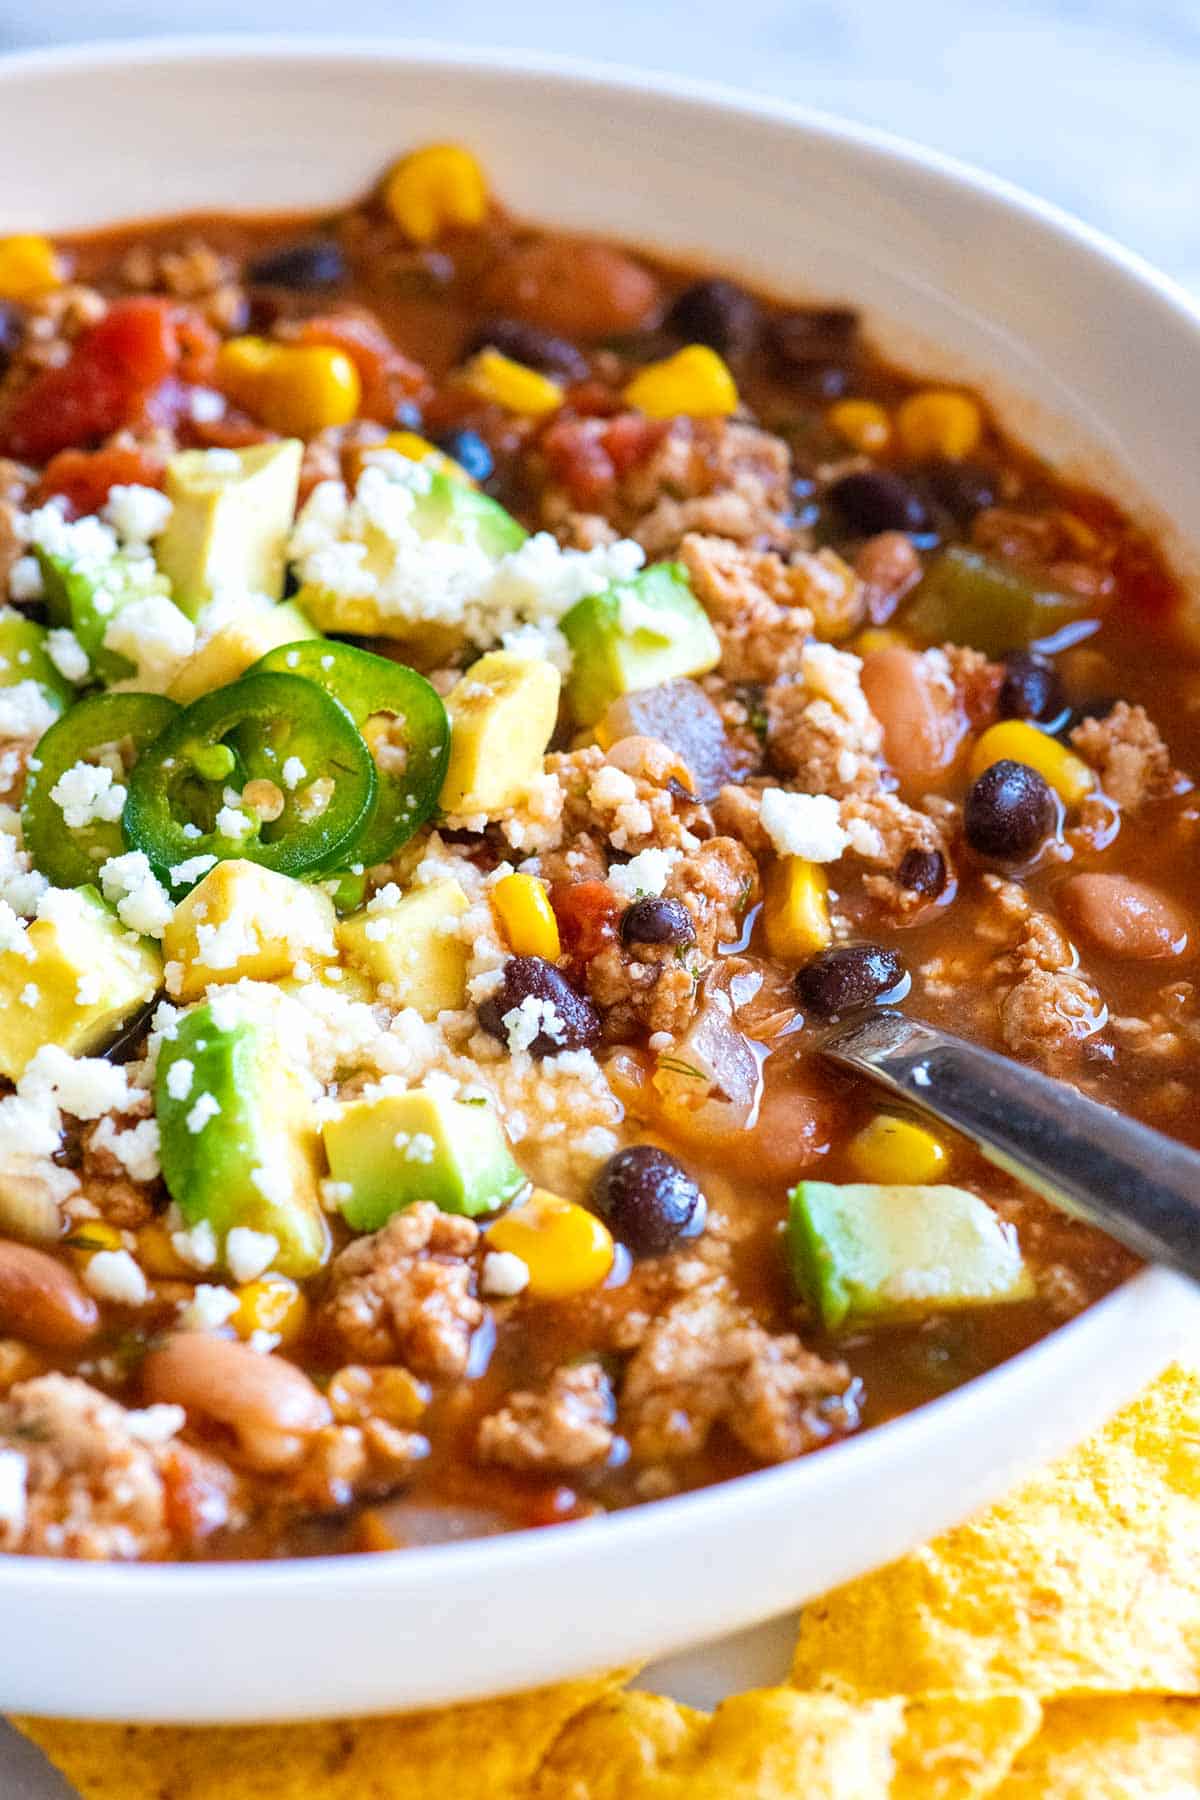
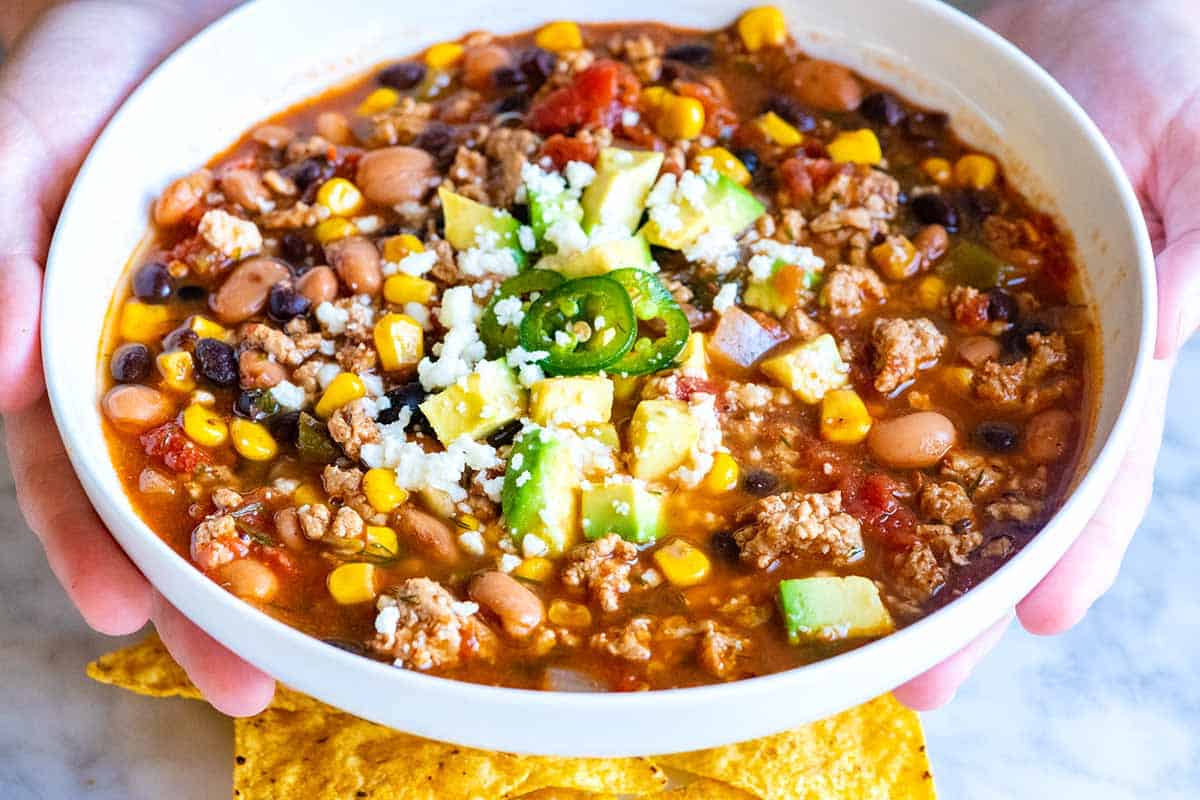
    My favorite taco soup recipe has ground beef, beans, and simple pantry staples. This easy, one-pot dinner is healthy, hearty, and tastes just like taco night.

    Easy Taco Soup

    You’re looking at about 30 minutes to make our easy taco soup on the stove. It really is one of my favorite cozy weeknight dinners! I’ve even included instructions for how to make it in a slow cooker below. My family loves tacos (see all of our taco recipes as proof), and this soup packs everything we love about taco night into one hearty, flavorful dish.

    Every time we make this taco soup, we’re blown away by how much flavor it has. I know your family will love it just as much as mine does. If you love this taco-inspired soup, check out our chicken tortilla soup and taco salad recipe next, they’re reader favorites!

    Key Ingredients

    • Ground Meat: For this soup, you can use lean ground beef, pork, chicken, or turkey. I especially love using ground pork since it reminds me of our favorite pork tacos.
    • Taco Seasoning: Use your favorite store-bought blend or try our homemade taco seasoning (it has way more flavor than the packets from the store). Making your own seasoning means you can control the salt, spice, and smokiness.
    • Veggies: I love adding onion, garlic, a can of diced green chiles (Hatch brand is my favorite), and a large can of tomatoes. When I have it in the freezer, I toss in frozen corn for extra sweetness and color.
    • Beans: Canned beans bulk up the soup beautifully. I like black beans, pinto beans, kidney beans, or a mix of all three! You can use low-sodium beans and rinse them before adding.
    • Broth: Use a flavorful chicken stock or homemade chicken broth if you have it.
    • Fresh Dill: It might sound unusual for a taco-inspired recipe, but fresh dill adds incredible flavor. Some recipes call for a packet of ranch seasoning, but fresh dill works just fine and adds that ranch flavor.
    • Toppings: Top this simple taco soup with your favorite taco or chili toppings. My family loves avocado or guacamole, sliced jalapeños (or candied jalapeños), and crumbled cotija cheese. I also love adding a bit of crunch with tortilla chips or serving warm corn tortillas on the side.

    Find the full recipe with measurements below.

    How to Make the Best Taco Soup

    Tip 1: Brown the meat first. Start by heating a little olive oil in a large soup pot or Dutch oven. Add your ground meat and cook until nicely browned. Browning adds a lot of flavor and improves the texture. If, after it browns, you notice a lot of fat rendered at the bottom of your pot, you can use a spoon to remove it. Just leave a tablespoon or so for cooking the onions and garlic.

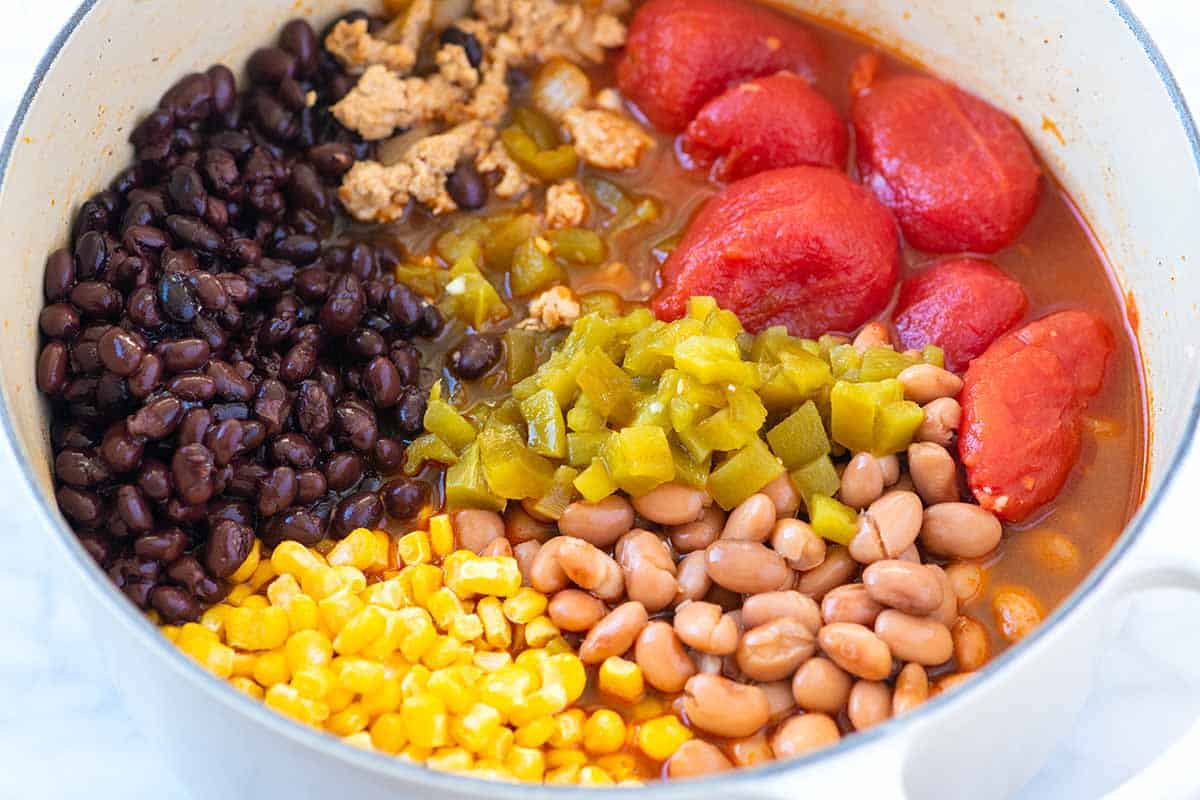
    Tip 2: Add the remaining soup ingredients. When the meat is browned, quickly sauté your onions, then add the garlic and taco seasoning. After a minute or two, the pot smells amazing, which means it’s time to add everything else: a large can of diced tomatoes, green chiles, beans, frozen corn, and your broth. Give it a good stir, and make sure that you take a moment to scrape up any browned bits from the bottom of the pot (that’s where so much flavor hides).

    Taco soup Ingredients

    Tip 3: Simmer for 20 minutes. Bring the soup to a simmer, then reduce the heat and let it bubble gently for 15 to 20 minutes. This gives all the ingredients time to meld into a rich, flavorful soup. If the soup looks too thick, add a little more stock or water until it’s just how you like it.

    Tip 4: Don’t forget the toppings. Ladle the soup into bowls and add your favorite taco toppings. Or, serve the toppings family-style on the table, and let everyone add what they love. We usually set a bowl of tortilla chips, guacamole, and pico de gallo on the table and dig in.

    Our Favorite Variations

    • Make it with chicken: For a lighter version, use ground chicken or shredded cooked chicken instead of beef or pork. If you already have rotisserie or leftover roasted chicken, add it near the end of cooking so it stays juicy. You could even start with shredded Instant Pot chicken or slow-cooker shredded chicken if you’ve made a batch ahead of time.
    • Try it in a slow cooker: To make slow cooker taco soup, brown the ground meat and onions first, then transfer everything to your slow cooker. Add the remaining ingredients and cook on LOW for 5 to 6 hours or on HIGH for 2 to 3 hours. It’s an easy, set-it-and-forget-it dinner that tastes even better the next day.
    • Make it vegetarian: Skip the ground meat and double up on the beans and veggies. We make vegetarian taco soup quite often. We swap the chicken stock for vegetable broth and toss in extra vegetables. I love to add bell peppers, zucchini, chopped sweet potatoes, and shredded cabbage. I recommend quickly sautéing the veggies before adding the stock and tomatoes for even more flavor.
    Easy Taco Soup

    Easy Taco Soup

    • PREP
    • COOK
    • TOTAL

    My family loves this taco soup made with ground meat (beef, pork, chicken, and turkey all work), veggies, and hearty beans. The dill in the recipe is a substitute for store-bought Ranch seasoning (a common ingredient in taco soup). It really does make the soup delicious!

    6 Servings

    You Will Need

    1 pound lean ground meat like beef, turkey, chicken, or pork (450g)

    1 teaspoon olive oil

    1 small onion, chopped

    2 tablespoons taco seasoning, try homemade taco seasoning

    3 cloves garlic, minced

    1 (28 ounce) can whole or diced tomatoes

    1 (4 ounce) can diced green chiles

    2 (15 ounce) cans beans like black beans, pinto beans, or kidney beans

    1 cup frozen corn

    3 cups chicken stock or vegetable broth (709ml)

    2 to 3 tablespoons chopped fresh dill, optional

    Salt and cayenne pepper or hot sauce to taste

    Optional for serving: Avocado or guacamole, diced tomatoes or pico de gallo, shredded or crumbled cheese, shredded lettuce or cabbage, sliced jalapeños, cowboy candy, sour cream, tortilla chips

    Directions

      1Brown the meat: Heat the oil in a large soup pot (or Dutch oven) over medium-high heat. Add the ground meat and cook until browned, about 5 minutes. As the meat cooks, use a wooden spoon to break the meat into crumbles.

      2Cook the onions: Move the browned meat to the side. Add the onions and cook, stirring them around the pot, until they soften, about 5 minutes.

      3Add garlic and spices: Stir in the garlic and taco seasoning and cook until fragrant, about 1 minute.

      4Simmer the soup: Add the tomatoes with their juices, canned chiles, beans, corn, and the stock. Bring to a boil, reduce to a simmer, and cook for 15 to 20 minutes. Use a wooden spoon to break apart the tomatoes as the soup simmers. Stir in the dill.

      5Serve: Taste, then adjust with salt, cayenne pepper, or hot sauce. Serve with your favorite taco toppings.

    Adam and Joanne’s Tips

    • Storing: I actually think it gets better over time! Refrigerate the soup stored in an airtight container for up to 4 days or freeze for up to 3 months.
    • Vegetarian or vegan: Skip the ground meat and use vegetable broth. To bulk up the soup a bit, add extra vegetables. I love to add bell peppers, zucchini, chopped sweet potatoes, and shredded cabbage. I’d brown the veggies before adding the stock and tomatoes for even more flavor.
    • Use a crock pot: To make the soup in a slow cooker, you’ll need a skillet and a slow cooker. Brown ground meat in a bit of oil. Move the browned meat to one side of the pot, add chopped onions and cook, stirring around the skillet, until softened. Add the browned meat, onions, and the remaining soup ingredients to the slow cooker. Stir. Cook on HIGH for 2 to 3 hours or on LOW for 5 to 6 hours.
    • The nutrition facts provided below are estimates.

    Nutrition Per Serving
    Serving Size
    1/6 of the recipe
    /
    Calories
    360
    /
    Total Fat
    9g
    /
    Saturated Fat
    2.3g
    /
    Cholesterol
    55.8mg
    /
    Sodium
    801.9mg
    /
    Carbohydrate
    43.5g
    /
    Dietary Fiber
    12.4g
    /
    Sugars
    9.5g
    /
    Protein
    28.7g


    AUTHOR:

    Joanne Gallagher

    Adam and Joanne of Inspired Taste

    We are Adam and Joanne Gallagher, the creators of Inspired Taste. Established in 2009, Inspired Taste grew from a childhood dream into one of the internet’s most trusted recipe sites with hundreds of reliable recipes, step-by-step videos, and expert tips.More About Us

    Source link

  • Easy Taco Bites – All Day I Dream About Food

    Easy Taco Bites – All Day I Dream About Food

    Taco bites are a fun keto appetizer that everyone loves. They’re easy to make, full of flavor, and infinitely poppable! Add your favorite taco toppings for a tasty high protein snack.

    Keto Taco Bites piled up in a black cast iron dish, with two sitting in front.

    These Taco Bites are bite-sized keto egg muffins with all the flavor of your favorite Mexican dish. Loved by kids and adults alike, they are an easy idea for any party or get together. And they take only four simple ingredients!

    Keto Taco Bites piled up in a black cast iron dish, with two sitting in front.

    I first made these easy keto appetizers for a New Year’s Eve party in 2018. It was a large group of all ages and I needed something easy that made enough for everyone. And something that appealed to all the picky kids (and some picky adults too!).

    Given the popularity of my Easy Taco Pie, I knew a taco-inspired appetizer would fit the bill. So why not just turn it into finger food? I browned up some beef, greased my mini muffin pan, and got cracking some eggs.

    At the party, I made sure to have plenty of sour cream, guacamole, and salsa for topping the bites. They were an instant hit, and I got several requests for the recipe. We now make them all the time as easy appetizers and high protein snacks!

    Four taco bites on a white plate in front of a black serving dish.

    Why we love this recipe

    How can you go wrong with little egg bites packed with meat, cheese, and taco seasonings?

    • Seriously easy! These little taco bites take only 4 ingredients and are ready in about 35 minutes.
    • Full of flavor: Taco seasoning is pretty much delicious on anything. But you can play up the heat in these, or tone it down. It’s up to you!
    • Kid-friendly: My kids love these and my friends’ kids love these. They have infinite appeal to the younger crowd!
    • High protein snack: Four of these little bites have 18g of protein and only 1g of carbs.
    • Make ahead: These are great for making ahead and storing in the fridge or freezer!

    Reader’s Thoughts

    “Just made these and couldn’t wait to try one! Delicious! Looking forward to breakfasts this week!” — Colleen

    Ingredient Notes

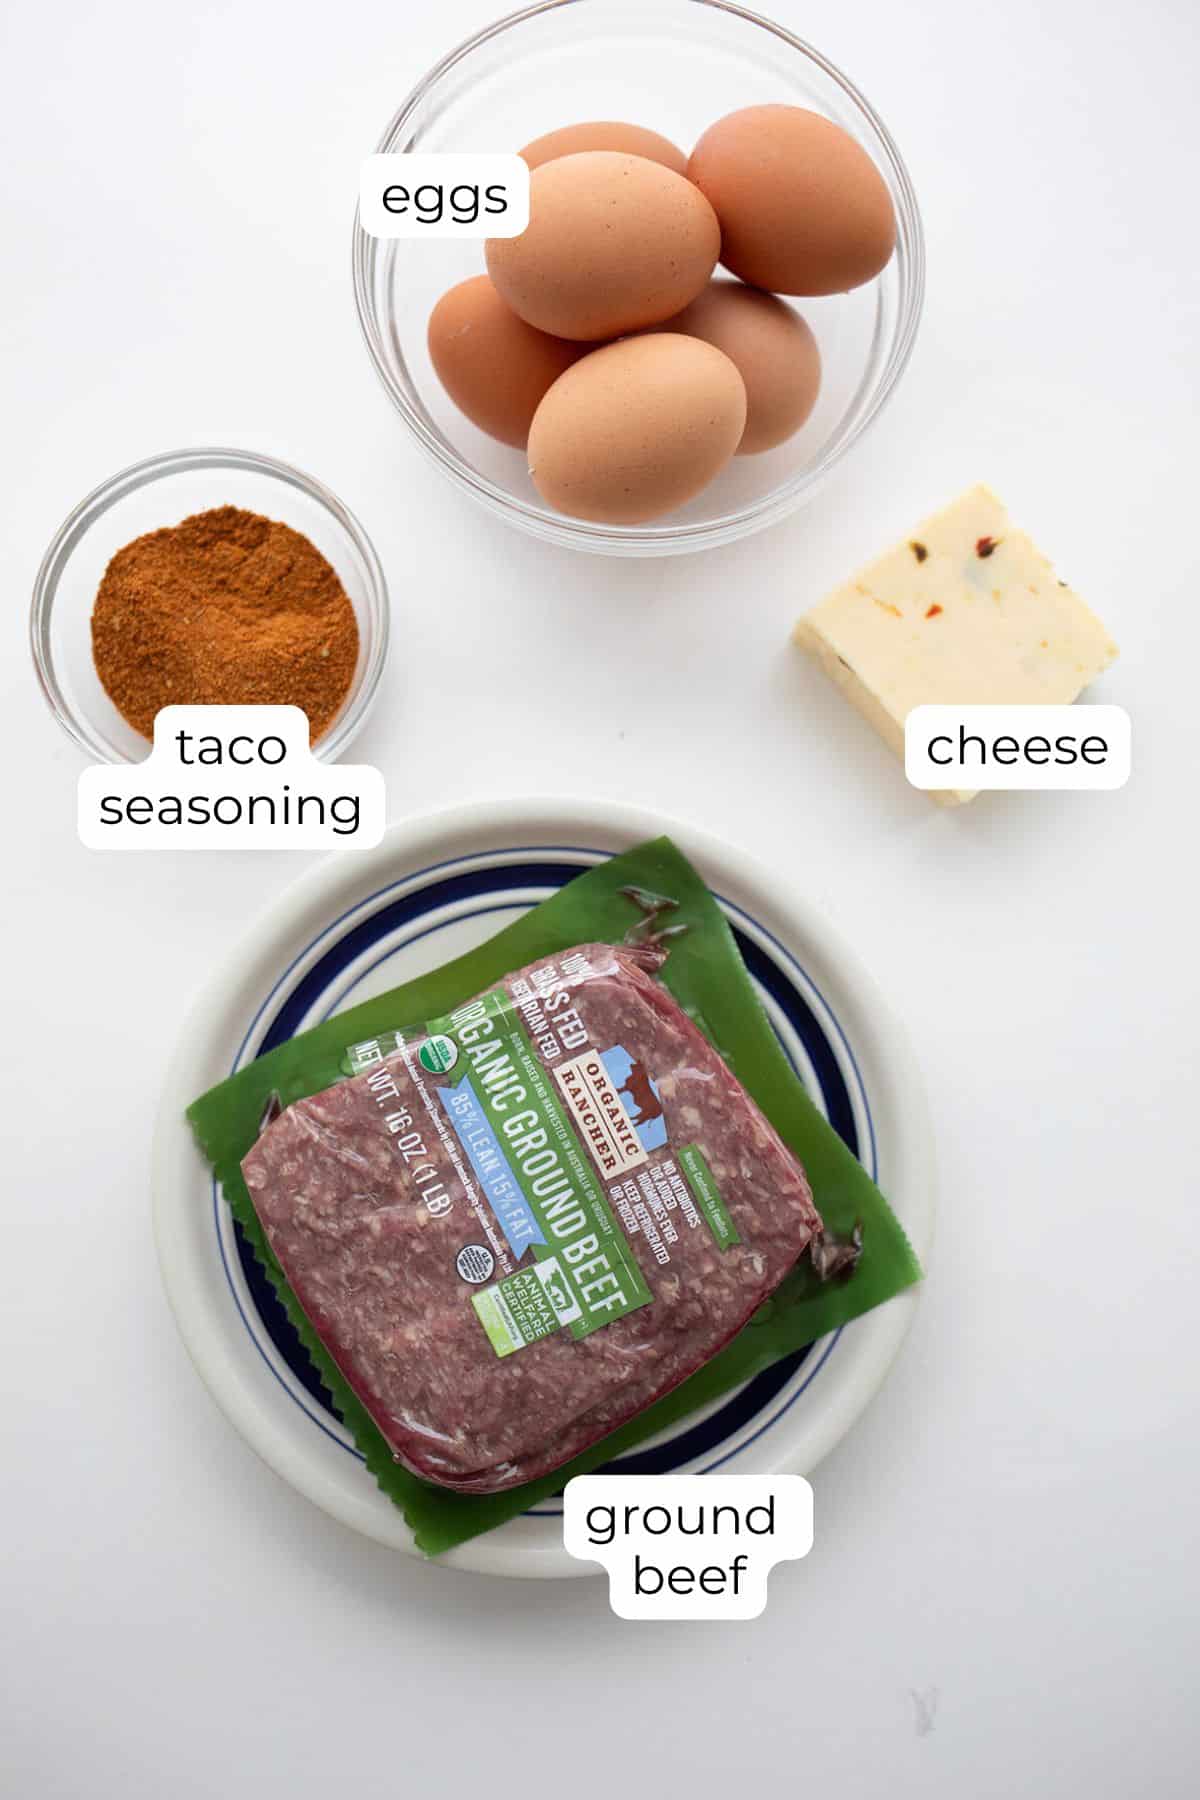
    Top down image of ingredients needed for Keto Taco Bites.
    • Ground beef: You can also use ground chicken or turkey.
    • Taco seasoning: I usually store-bought seasoning, but I always make sure it has no added fillers, sugars, or starches. Or make your own by combining chili powder, cumin, garlic, oregano, salt, and pepper.
    • Eggs: Eggs make up the bulk of this recipe, besides the taco meat. They help bind the meat and cheese together.
    • Shredded cheese: I usually use cheddar or a Mexican blend. You can also use Monterey Jack or Pepper jack.
    • Garnish: Sour cream, sliced olives, cilantro, salsa, or guacamole.

    Step by Step Directions

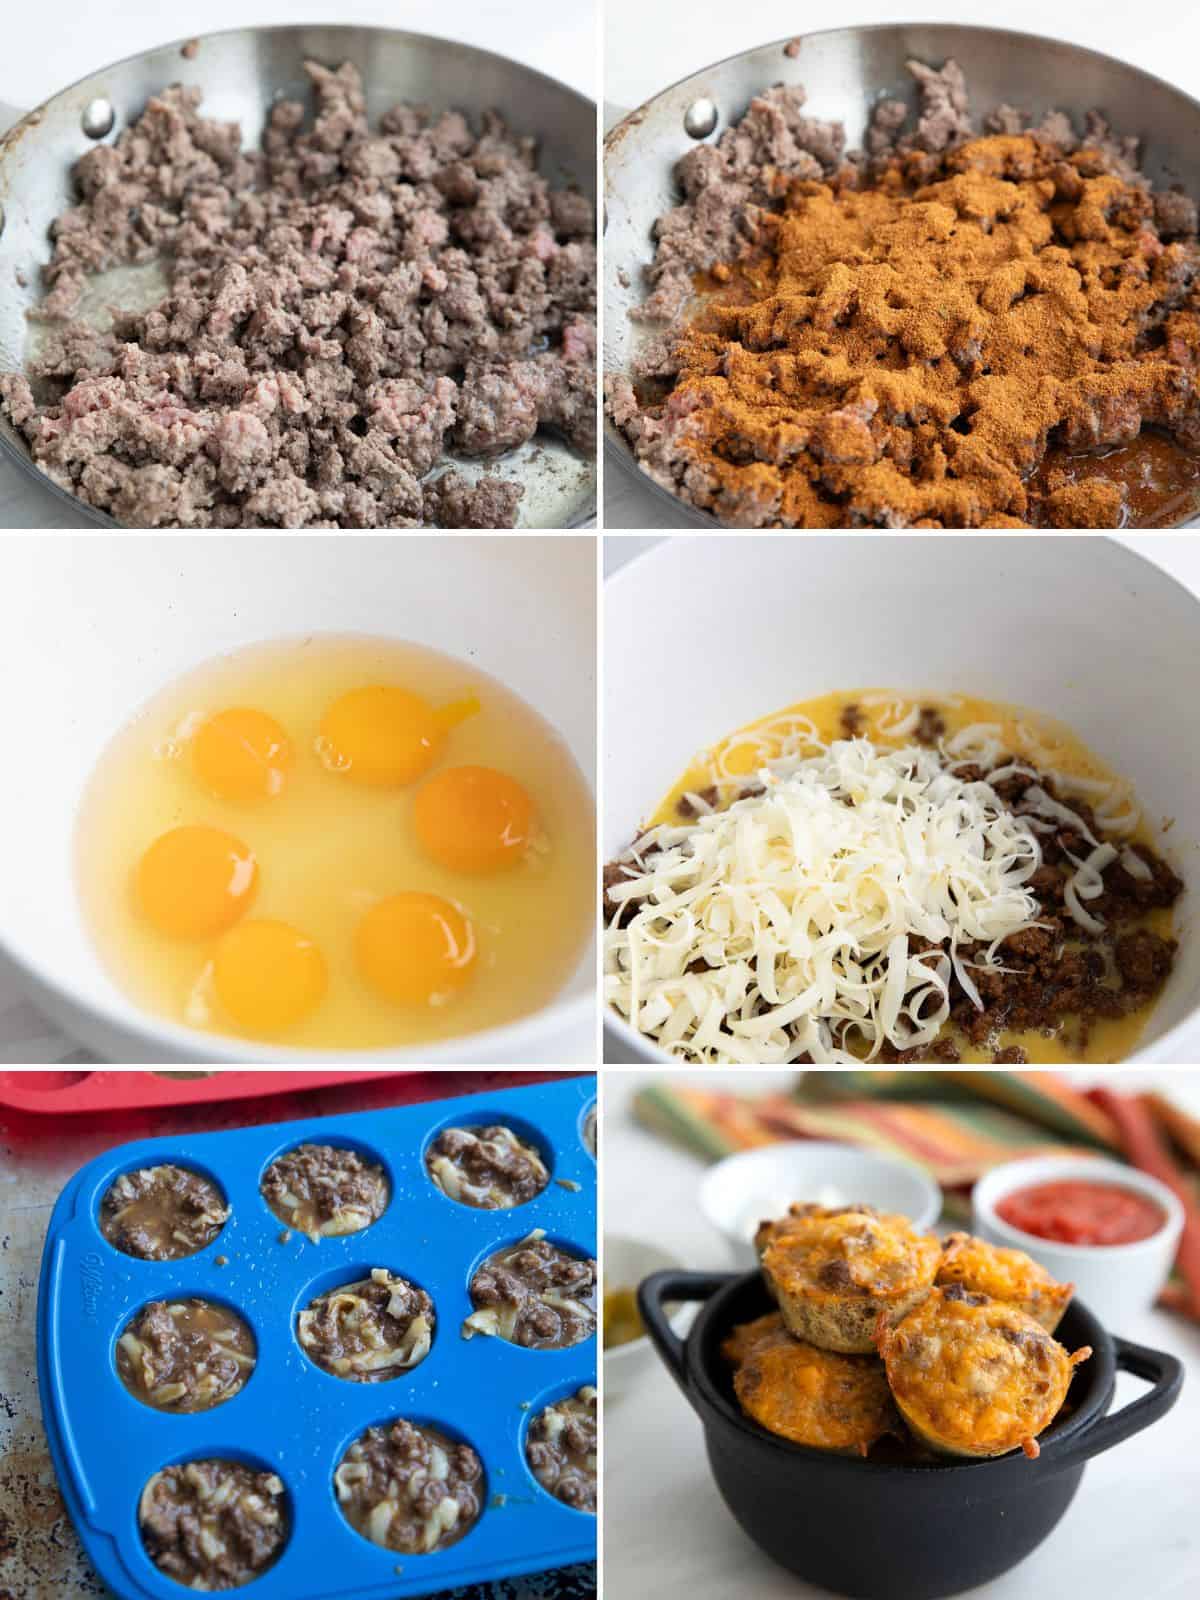
    A collage of 6 images showing how to make Taco Bites.
    1. Sauté the meat: In a large skillet over medium heat, sauté the ground meat until almost cooked through, breaking up the clumps with a wooden spoon. Add the taco seasoning and continue to sauté until completely cooked through. Remove from heat and let cool.
    2. Prepare the muffin pan: Preheat the oven to 350ºF and brush a good non-stick mini muffin pan with the melted butter. (You can also use silicone or parchment mini muffin liners, if you prefer – if your pan is not very non-stick, this is your best option). This recipe makes about 32 mini muffins so you may need to work in batches if you don’t have more than one mini muffin pan.
    3. Prepare the filling: In a large bowl, whisk the eggs. Add the taco meat and half of the shredded cheese. Whisk thoroughly to combine. Fill the muffin cups and sprinkle with the remaining shredded cheese. 
    4. Bake the bites: Bake 15 to 20 minutes, until puffed and firm to the touch. Remove and let cool 10 minutes. Use a thin flexible spatula to run around the edge of the muffins to release. Serve with your favourite taco toppings, such as salsa, sour cream, and guacamole.
    Taco bites piled up in a black dish on a wooden cutting board, with bowls of salsa, sour cream and pickled jalapeños.

    Tips for Success

    Choose your muffin pan (or muffin liners!) wisely, as it needs to be very non-stick. If you have an older metal pan, the taco bites may stick a lot. You can use silicone liners or a silicone muffin pan instead.

    Most taco seasoning has a fair bit of salt, as does cheese. So this recipe doesn’t call for any additional salt. If your taco seasoning is salt-free, add 1 teaspoon of salt to the meat along with the seasoning. If your bites aren’t quite seasoned enough after cooking, just sprinkle them with a little extra!

    Want to kick the heat up a notch? Add half a teaspoon of cayenne or chipotle powder along with the seasoning.

    Three taco bites with sour cream and pickled jalapeños on top, sitting on a small white plate.

    Frequently Asked Questions

    Is taco seasoning keto friendly?

    Most taco seasonings are just a mix of spices and are perfectly keto friendly. However, sometimes brands add starches or even sugar so it’s best to check the labels. I really like Kinder’s Taco Blend.

    How many carbs are in Keto Taco Bites?

    This easy low carb recipe for taco bites has only 1g of carbs per 4 bites. It’s a perfect high protein snack!

    Can I freeze Taco Bites?

    Keto Taco Bites are a fabulous make-ahead recipe. Simply bake the bites and remove from the pan, then let cool completely. Flash freeze them on a parchment lined baking sheet and

    Three mini taco egg muffins arranged in front of a black bowl filled with more muffins.

    More Delicious Bite Sized Recipes

    Keto Taco Bites piled up in a black cast iron dish, with two sitting in front.

    Mini Taco Bites

    Servings: 32 mini muffins

    Prep Time 10 minutes

    Cook Time 25 minutes

    Total Time 35 minutes

    Taco bites are a fun keto appetizer that everyone loves. They’re easy to make, full of flavor, and infinitely poppable! Add your favorite taco toppings for a tasty high protein snack.

    • 1 lb ground beef
    • 3 tbsp taco seasoning
    • 6 large eggs
    • 4 ounces shredded cheddar or Mexican cheese
    • Salsa, guacamole, and sour cream

    Prevent your screen from going dark

    • In a large skillet over medium heat, sauté the beef until almost cooked through, breaking up the clumps with a wooden spoon. Add the taco seasoning and continue to sauté until completely cooked through. Remove from heat and let cool.

    • Preheat the oven to 350ºF and brush a good non-stick mini muffin pan with the melted butter. (You can also use silicone or parchment mini muffin liners, if you prefer – if your pan is not very non-stick, this is your best option). This recipe makes about 32 mini muffins so you may need to work in batches if you don’t have more than one mini muffin pan.

    • In a large bowl, whisk the eggs. Add the taco meat and half of the shredded cheese. Whisk thoroughly to combine.

    • Fill the muffin cups and sprinkle with the remaining shredded cheese. Bake 15 to 20 minutes, until puffed and firm to the touch.

    • Remove and let cool 10 minutes. Use a thin flexible spatula to run around the edge of the muffins to release.

    • Serve with your favourite taco toppings, such as salsa, sour cream, and guacamole.

    Storage Information: Store the bites in a covered container in the fridge for up to 5 days. They can also be frozen for several months. 
    To freeze: Arrange the bites in a single layer on a parchment lined baking sheet, not touching. Freeze until firm and then transfer to an airtight container. This will keep the bites from sticking together once they are frozen. 

    Serving: 4bites | Calories: 234kcal | Carbohydrates: 1g | Protein: 18.7g | Fat: 14.5g | Saturated Fat: 7.2g | Fiber: 0.2g

    Categories:

    Appetizers & Snacks,
    Low Carb,

    Nutritional Disclaimer

    Please note that I am not a medical or nutritional professional. I am simply recounting and sharing my own experiences on this blog. Nothing I express here should be taken as medical advice and you should consult with your doctor before starting any diet or exercise program. I provide nutritional information for my recipes simply as a courtesy to my readers. It is calculated using MacGourmet software and I remove erythritol from the final carb count and net carb count, as it does not affect my own blood glucose levels. I do my best to be as accurate as possible but you should independently calculate nutritional information on your own before relying on them. I expressly disclaim any and all liability of any kind with respect to any act or omission wholly or in part in reliance on anything contained in this website.

    Free Bonus: Secrets to Keto Baking!

    Sign up for your favorite recipes delivered straight to your inbox plus get our FREE bonus: Secrets to Keto Baking!


    Source link

  • Healthy Chicken Taco Soup

    Healthy Chicken Taco Soup

    This creamy chicken taco soup is loaded with protein, fiber, and all the Tex-Mex flavor. It’s easy, filling, and surprisingly light on calories.


    Jump to: ℹ️ Overview | 🛒 Ingredients | 📷 How To Make | 📹 Watch The Video | 👩‍🍳 Recipe Tips | 🥗 Serving Suggestions | 📝 Full Recipe Card | 🍽 More High-Protein Recipes


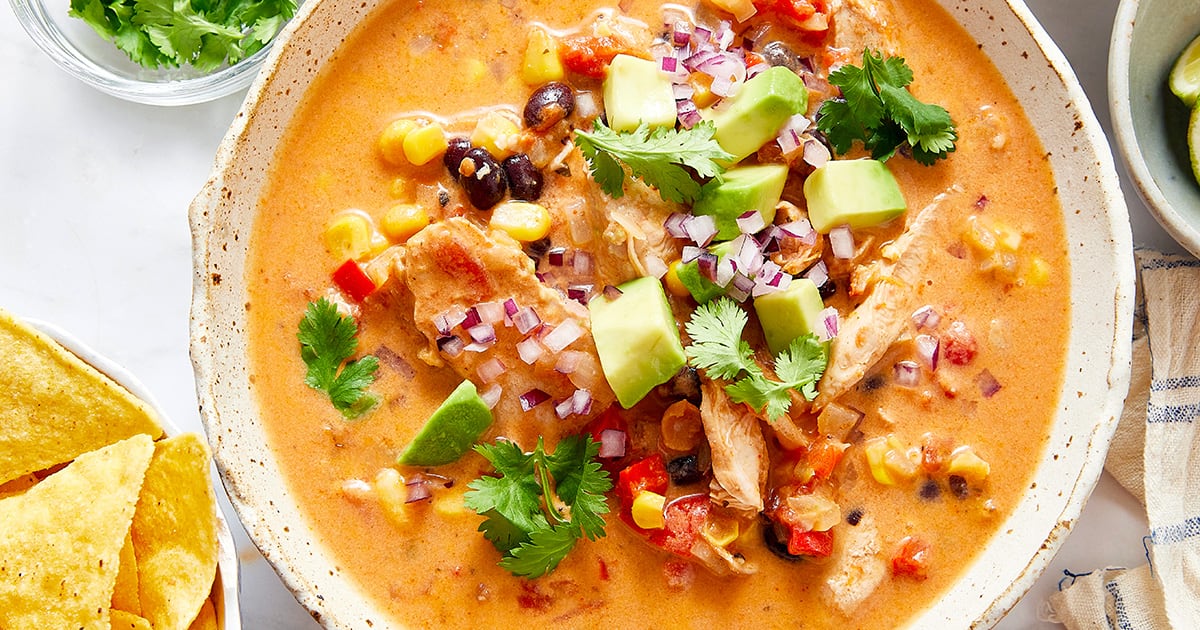
    This high-protein chicken taco soup is a cozy meal with a healthy twist. It’s hearty like a stew, with chunks of tender chicken, smoky spices, sweet corn, black beans, and a creamy base, without the heavy cream. The real trick? Blending cottage cheese with light cream to get that smooth richness without the calorie bomb.

    If you’re into high-protein and fiber meals, this one checks the boxes. Plus, it makes amazing leftovers with flavors deepening overnight, and it reheats like a dream.

    Nutrition (per serving): ~560 calories, 38 grams protein, 7 grams fiber (estimates based on ingredients used).

    👉 This healthy chicken taco soup is part of my high-protein and fiber meals series. You might also like this baked chia oats recipe, my avocado cottage cheese toast, or my high-protein butternut squash soup.

    Watch The Video

    What You’ll Need

    Here is what you’ll need for this chicken taco soup recipe. Find the full measurements in the recipe card below.

    For the soup base:

    • Chicken breasts – Raw or cooked (rotisserie chicken works!). Great protein source.
    • Chicken stock – Builds the savory soup foundation.
    • Onion, garlic, red bell pepper – Aromatics that bring the base to life.

    Spices & seasoning:

    • Ground cumin, smoked paprika, coriander, oregano – Warm, smoky, earthy spice blend.
    • Chili or chipotle powder – Optional kick, you can also add canned chipotle peppers.
    • Salt & pepper for season in layers.

    Veggies & fillers:

    • Black beans – High in fiber and protein.
    • Corn kernels – Sweet, chewy pops of goodness and high in fiber.
    • Diced tomatoes – Adds a little acidity and tomato depth.

    For the creamy finish:

    • Cottage cheese – Blended for creaminess and protein.
    • Light cream – Keeps it smooth without being too rich.
    • Cheddar cheese – For that melty, cheesy vibe (low-fat optional, I used regular here).

    Toppings (optional but encouraged):

    • Avocado – a few cubes for creamy, healthy fats.
    • Red onion – sharp and crunchy, finely diced is best.
    • Fresh cilantro/coriander – bright and herby, swap for parsley or basil.
    • Corn chips or tortilla chips – adds crunch and fun, don’t go overboard though.
    • Lime wedges – a fresh squeeze makes all the difference in my opinion.

    How To Make Healthy Chicken Taco Soup

    Find the full recipe and nutritional information below. Here are some handy step-by-step photos for healthy chicken taco soup.

    • Season chicken with salt and pepper and pan-fry in a little olive oil until golden on both sides, then set aside. Don’t worry if it’s not completely cooked through as it will go in the soup. If using rotisserie chicken, skip this step.
    • In the same pot, sauté onion until soft, then add red pepper and garlic.
    • Stir in all your spices and cornflour, just for a few seconds to wake them up.
    • Add beans, corn, tomatoes, and stock. Return the chicken to the pot.
    • Simmer until the chicken is cooked through (about 10 minutes). If using rotisserie chicken, you can reduce cooking to 5 minutes.
    • Blend the cottage cheese and cream until smooth, stir into the soup with the cheddar. If you don’t blend, you will have a few cottage cheese curds in the soup, not a biggy.
    • Simmer gently until everything is creamy and thickened.
    • Serve with toppings like avocado, red onion, lime juice, and crushed tortilla chips.

    Recipe Tips

    • Make-ahead: This soup keeps well for 4 days in the fridge. Reheat gently so the dairy doesn’t split.
    • Freezer-friendly: Freeze in portions without toppings. Defrost in the fridge overnight, then reheat on the stove.
    • Use rotisserie chicken: Skip the first step and just shred it in when you add the beans.
    • Spice it up: Add jalapeños or extra chipotle if you like it hot.
    • Smooth or chunky: Blend part of the soup if you want a smoother base.

    Serving Suggestions

    I love this soup as-is in a deep bowl with ALL the toppings: avocado cubes, crunchy tortilla chips, fresh cilantro, and a squeeze of lime. It also pairs nicely with a simple green salad or a slice of cheesy cornbread if you want it more substantial.

    💬 If you’ve tried this healthy chicken taco soup or any other recipe on the blog then don’t forget to rate the recipe and let me know how you got on in the comments below, I love hearing from you! You can also FOLLOW ME on Instagram, Facebook, Pinterest, YouTube, and or sign up to my Newsletter to see more of my delicious food.

    Want to Save This Recipe?

    Enter your email & I’ll send it to your inbox. Plus, get great new recipes from me every week!

    By submitting this form, you consent to receive emails from Cooked & Loved

    Healthy chicken taco soup made creamy with cottage cheese, full of flavor, and loaded with protein and fiber—basically your new go-to cozy dinner. Find step-by-step photos and more recipe tips above.

    • Cut chicken breasts in half and season with salt. Heat oil in a large pot over medium-high heat and cook chicken for 4 minutes per side. Remove and set aside to slice.

    • In the same pot, sauté onion for 4–5 minutes. Add red pepper and garlic; cook another minute.

    • Stir in cumin, paprika, coriander, oregano, chili powder (if using), black pepper, and cornflour.

    • Add beans, corn, tomatoes, chicken stock, and sliced chicken. Simmer for 10 minutes.

    • Blend cottage cheese and cream until smooth. Stir into the soup along with Cheddar. If you don’t blend, you will have a few cottage cheese curds in the soup, not a biggy.

    • Simmer on low until creamy and well combined. Taste and adjust seasoning.

    • Serve with avocado, onion, cilantro, lime, and tortilla chips.

    • Can I use cooked chicken? Yes! Rotisserie chicken works great, just skip the pan-frying step and add it with the beans.
    • What if I don’t have cottage cheese? You could try Greek yogurt or light cream cheese, but it won’t be quite as high in protein or as creamy.
    • Is it spicy? Not very unless you add the chili or chipotle powder. You’re in full control of the heat. Add jalapeños or extra chipotle if you like it hot.
    • How thick should it be? Think creamy stew rather than a brothy soup. It should coat your spoon.
    • Make-ahead: This soup keeps well for 4 days in the fridge. Reheat gently so the dairy doesn’t split.
    • Freezer-friendly: Freeze in portions without toppings. Defrost in the fridge overnight, then reheat on the stove.
    • Smooth or chunky: Blend part of the soup if you want a smoother base.

    Calories: 564kcal | Carbohydrates: 40g | Protein: 38g | Fat: 29g | Saturated Fat: 9g | Polyunsaturated Fat: 5g | Monounsaturated Fat: 13g | Trans Fat: 0.03g | Cholesterol: 103mg | Sodium: 1072mg | Potassium: 1211mg | Fiber: 7g | Sugar: 10g | Vitamin A: 1534IU | Vitamin C: 41mg | Calcium: 188mg | Iron: 3mg

    Keywords: Healthy Chicken Taco Soup, taco soup with chicken, creamy chicken soup

    More High-Protein Recipes


    Source link