This is, hands-down, our favorite minestrone soup recipe. It’s packed with veggies, beans, and pasta, all swimming in the coziest tomato-Parmesan broth. We can’t get enough of it.
I love this soup so much. It’s perfect on day one, but somehow it gets even better as the days go by. The trick is to add a Parmigiano Reggiano rind to the broth as it simmers. It melts a bit, seasons the broth, and adds a light cheesy flavor.
Thanks to the beans, tomatoes, loads of veggies, and a handful of pasta, this soup is hearty enough to be a meal all on its own. If you want something even heartier, check out our minestrone soup with sausage or try one of our other veggie soups like this easy vegetable soup.
Key Ingredients
Vegetables: The heart of any minestrone is a lot of veggies. You can play around with what you have on hand or what’s in season, but in our most made version, we use onion, carrots, celery, green beans, zucchini, and spinach.
Canned Tomatoes: I’m all about fire-roasted canned tomatoes for this soup. They add a little extra flavor compared to regular tomatoes.
White Beans: Use whatever white beans you love best. Canned or cooked both work. We usually go for cannellini, navy, or Great Northern beans. That said, kidney beans are popular in minestrone soup, so if you have a can of them, feel free to use them.
Pasta: I love a handful of dried pasta added to this soup. Go for a smaller shape like ditalini or orzo, or use shells, which trap some of the vegetables inside.
Stock: I used chicken broth in the photos, but vegetable broth is just as good. If you want to make your own, check out our chicken broth, chicken stock, and vegetable broth recipes.
Garlic, Tomato Paste, Rosemary, and Parmesan: These are what make the broth so good. Use fresh garlic if you can. Tomato paste makes the broth richer, and a tablespoon of chopped fresh rosemary makes it aromatic. If you have a Parmesan rind, drop it right into the pot and let it work its magic as the soup simmers. If you don’t have a rind, just stir in some grated Parmesan at the end.
Find the full recipe with measurements below.
How to Make Our Favorite Minestrone Soup
Tip 1: Sweat the vegetables. To remove the raw flavors of onions, carrots, and celery, briefly sauté them in olive oil. After a few minutes, that raw flavor will disappear, and they will smell sweet. We keep the other vegetables to the side for adding later since they do not need as long to become tender.
Tip 2: Build flavor with garlic, tomato paste, and rosemary. Just before pouring in your canned tomatoes, add the garlic, tomato paste, and rosemary. A minute or so of stirring them around the pot toasts the garlic and turns the tomato paste from a bright red to orange, which deepens its flavor.
Tip 3: Make the broth. Now, you can pile in the green beans, zucchini, canned tomatoes, beans, and broth. We drain and rinse our beans before adding them.
Tip 4: Add a Parmigiano Reggiano rind. This is my secret for the best minestrone soup. It works wonders. As the soup simmers, the cheese melts a bit and seasons the broth. Depending on how hard the rind you use is, it may not dissolve completely.
Tip 5: Add the pasta towards the end. So it doesn’t get too mushy, add your pasta when the soup has about 10 minutes left. The veggies only take about 20 minutes, so I usually simmer them for 10 minutes, then add my dried pasta and stir.
Tip 6: Turn off the heat, then stir in the spinach. I love finishing this soup with a generous amount of roughly chopped fresh spinach. It doesn’t take long to cook, so turn off the heat and stir in the spinach. Leave it for a minute or two, and it will be nicely wilted into the soup.
Serving Suggestions
I am perfectly happy to sit with a bowl of this soup and call it a day, but if you are looking for more, I’ve got a few suggestions for you. First off, a slice of homemade focaccia or sourdough with salted butter would be lovely. Then, for something light, try a salad on the side. Some of our favorites include panzanella salad, Caprese salad, arugula couscous salad, and lemon-herb zucchini salad.
More Vegetable Soups
Our Favorite Minestrone Soup
PREP
COOK
TOTAL
We’re always up for a bowl of veggie soup, and this minestrone soup recipe has so many things we adore. The broth is light but still has that cozy Parmesan flavor, thanks to a Parmesan rind that simmers right in the pot. Then, there are loads of vegetables and just the right amount of beans and pasta to make it feel like a real meal.
Some minestrone recipes start with pancetta, but we usually skip it. If you want to add it, just cook it in a little olive oil until it’s crisp, then scoop it out before you start the veggies. You can sprinkle the crispy bits on top when you serve, or save them for another meal. The soup will pick up a little extra flavor from the rendered pancetta fat.
6 Servings
You Will Need
¼ cup olive oil
1 medium onion, chopped
2 medium carrots, peeled and chopped
2 ribs celery, chopped
3 garlic cloves, minced, about 1 tablespoon
1 tablespoon finely chopped fresh rosemary, from 2 to 3 sprigs
2 tablespoons tomato paste
5 ounces fresh green beans, trimmed and chopped, 1 ½ cups (140g)
1 medium zucchini, chopped, 1 ½ cups
1 (15-ounce) can diced tomatoes, fire-roasted if available
2 (15-ounce) cans beans, like navy beans, cannellini beans, or kidney beans, drained and rinsed
8 cups chicken broth or vegetable broth
Fine sea salt and fresh ground black pepper
1 to 2 ounce piece Parmesan Reggiano cheese rind
5 ounces dried pasta, like shells, ditalini, or elbows (140g)
1Cook the veggies: Heat the olive oil over medium-low heat in a large, heavy soup pot or Dutch oven, then add the onion, carrot, and celery, and cook until they begin to soften and smell sweet, about 5 minutes.
2Build the soup: Stir in the garlic, rosemary, and tomato paste and cook, stirring them around the pot, for about one minute. Then, add the green beans, zucchini, tomatoes with all the juices, and the drained and rinsed beans to the vegetables.
3Simmer: Pour in the broth and bring to a simmer. Taste and season the broth with salt and pepper (we add around 1 teaspoon, but it will depend on your broth). Push the cheese rind into the soup so it is fully submerged in the broth. Simmer, partially covered for 10 minutes.
4To finish: Stir in the pasta and cook until al dente, about 10 minutes. Then, turn off the heat and stir in the spinach. Leave for 2 minutes, or until the spinach wilts. Remove any remaining cheese rind, then taste the soup and season with more salt and pepper as needed. Serve with grated Parmigiano Reggiano over the top.
Adam and Joanne’s Tips
Storing: Keep leftover soup in an airtight container in the fridge for up to 4 days. Reheat in a saucepan over medium heat.
Parmesan rind: Note that the Parmesan rind won’t fully melt. It softens, melts a little bit, and mostly “steeps” like a tea bag. It adds a light flavor to the broth, but you will likely need to remove it before serving. If you do not have rind, grate some Parmesan cheese and stir it into the broth before serving (¼ to ⅓ cup would be lovely).
Dried rosemary: Use 1 to 1 ½ teaspoons dried rosemary as a substitute for fresh.
The nutrition facts provided are estimates.
Nutrition Per Serving Serving Size 1/6 of the recipe / Calories 391 / Total Fat 14g / Saturated Fat 2.7g / Cholesterol 2.4mg / Sodium 784.3mg / Carbohydrate 51.5g / Total Fiber 9.4g / Total Sugars 8g / Protein 19.3g
If you’ve got a pack of ground chicken (mince) in the fridge and no clue what to make with it, you’re in the right place. These ground chicken recipes are easy, family-friendly, and packed with flavor — from juicy meatballs and quick stir-fries to saucy noodles, rice bowls, and better-than-takeout dinners. Basically, proof that ground chicken does not have to taste like “healthy sadness.”
Ground chicken (or minced chicken) is one of those ingredients that quietly saves dinner over and over again. It cooks quickly, takes on bold flavors like a champ, and works across basically every cuisine — garlic, ginger, taco seasoning, gochujang, fresh herbs. It plays well with everything.
The “bland” reputation? Mostly a seasoning problem. A little soy sauce, Parmesan, pesto, or a generous handful of garlic and spices can completely transform ground chicken into something people actually get excited about. No sad dry chicken vibes here.
This roundup covers a lot of ground (pun intended) — quick stir-fries and saucy noodle dishes, juicy meatballs in every flavour direction, rice bowls and salad bowls, Tex-Mex classics, hearty pastas, and cozy soups and chilis. Some recipes are veggie-packed and lighter, others are rich and satisfying, and quite a few bring serious heat — because it turns out ground chicken loves a spicy moment.
Ground Chicken Meatballs & Patties
Ground chicken makes incredibly tender, juicy meatballs and patties — and these recipes prove it. Whether you’re after a quick weeknight dinner, a saucy baked situation, or something with an Asian-inspired glaze, this collection covers every meatball mood.
Greek Chicken Meatballs
These Greek-inspired chicken meatballs look fresh, herby, and versatile enough for bowls, salads, or wraps. They’re the kind of recipe that works equally well for meal prep and family dinners. Recipe from The Wooden Skillet.
Best Anytime Baked Chicken Meatballs
The name says it all. These baked chicken meatballs are designed to be an easy, reliable staple. Make a batch and use them in everything from pasta to sandwiches throughout the week. Recipe from Pinch of Yum.
Chicken Ricotta Meatballs
Adding ricotta gives these chicken meatballs an extra-soft texture that sounds incredibly appealing. They’re a lovely alternative to traditional meatballs when you’re after something a little lighter. Recipe from Family Style Food.
Chicken Meatball Curry
This recipe combines juicy chicken meatballs with the cozy appeal of a flavorful curry. It’s a great way to turn ground chicken into a dinner that feels hearty and satisfying. Recipe from Kitchen Sanctuary.
Chicken Meatloaf
Chicken meatloaf is a lighter twist on a classic comfort food favorite. It’s simple, family-friendly, and perfect for nights when you want a dependable dinner on the table. Recipe from Little Sunny Kitchen.
Ground Chicken Burgers
These ground chicken burgers are a delicious change from beef while still delivering plenty of burger-night satisfaction. Add your favorite toppings, and you’ve got an easy crowd-pleaser. Recipe from Feel Good Foodie.
Chicken Rissoles / Patties
These chicken rissoles are a fantastic budget-friendly dinner that the whole family can get behind. They’re versatile, freezer-friendly, and perfect alongside a simple salad or veggies. Recipe from RecipeTin Eats.
Ground Chicken Stir-Fries & Noodles
Fast, flavor-packed, and endlessly versatile — ground chicken stir-fries and noodle dishes are weeknight gold. Most of these come together in 30 minutes or less, with bold sauces that make the whole family happy.
Ground Chicken Stir Fry
Cooked & Loved recipe: This ground chicken stir-fry is quick, colorful, and packed with the kind of flavors that make weeknight cooking feel easy. It’s a great way to turn simple ingredients into a satisfying meal.
Saucy Gochujang Noodles with Chicken
These noodles look wonderfully saucy with the bold sweet-spicy flavor that gochujang is known for. If you enjoy noodles with a little kick, this one deserves a spot on your menu. Recipe from Pinch of Yum.
Honey Garlic Chicken Noodles
Honey and garlic are always a winning combination, especially when tossed with noodles and ground chicken. This sounds like one of those easy dinners you’ll want to make again and again. Recipe from Mason Fit.
Chicken Cabbage Stir Fry
This simple stir-fry pairs ground chicken with cabbage for a meal that’s both budget-friendly and filling. It’s proof that a handful of ingredients can still make a really tasty dinner. Recipe from Feasting at Home.
Chicken Tantanmen Ramen
For noodle lovers, this chicken tantanmen ramen brings plenty of cozy comfort to the table. It looks rich, warming, and ideal for cooler evenings. Recipe from Lindsey Eats.
Hot Chili Chicken Noodles
These hot chili chicken noodles are made for anyone who enjoys a little heat with their dinner. The combination of noodles and spicy chicken is hard to pass up. Recipe from Ambitious Kitchen.
Dan Dan Noodles
Dan Dan noodles are famous for their bold flavor, making them a fun way to switch up your usual noodle routine. This version is budget-friendly and packed with personality. Recipe from Budget Bytes.
Egg Roll in a Bowl
All the flavors of an egg roll, without the wrapper, make this a popular weeknight dinner for good reason. It’s quick, satisfying, and loaded with texture. Recipe from Foodess.
Ground Chicken Fried Rice
Ground chicken fried rice is a practical way to turn everyday ingredients into a complete meal. It’s fast, filling, and perfect for using up leftover rice. Recipe from Eating on a Dime.
Rice Bowls & Salad Bowls
Chicken bowls are one of the best ways to get a balanced, satisfying meal on the table fast. These ground chicken recipes are loaded with fresh vegetables, bold sauces, and plenty of variety — from Asian-inspired rice bowls to Mediterranean and Middle Eastern flavors.
Honey Soy Ground Chicken Rice Bowls
Cooked & Loved recipe: These rice bowls combine savory ground chicken with a sweet-salty honey soy sauce for an easy meal that never feels boring. They’re perfect for meal prep or busy weeknights.
Chicken Lettuce Wraps
These chicken lettuce wraps are fresh, flavorful, and a great way to keep dinner light while still feeling satisfying. I love recipes like this when I want something quick but packed with texture. Recipe from The Big Man’s World.
Gochujang Chicken Bowls
If you’re a fan of sweet-spicy flavors, these gochujang chicken bowls look like a winner. The bold sauce turns simple ingredients into something crave-worthy. Recipe from Ambitious Kitchen.
Chinese Ground Chicken Bowl
This bowl is a simple way to enjoy the rich flavors of Chinese-inspired cooking with everyday ingredients. It’s the kind of meal that’s easy enough for weeknights but satisfying enough to repeat often. Recipe from Omnivore’s Cookbook.
Garlic Sesame Chicken Zucchini Bowls
Garlic and sesame are a combination that rarely disappoints, and these zucchini bowls sound both fresh and satisfying. They’re a nice alternative to traditional grain-based bowls. Recipe from Kalejunkie.
Greek Chicken Rice Bowl
This Greek chicken rice bowl brings together fresh Mediterranean-inspired flavors in one easy meal. It’s a great choice for lunch, dinner, or meal prep. Recipe from JZ Eats.
Buffalo Chicken Bowls
Buffalo chicken fans will appreciate this easy bowl packed with bold, tangy flavor. It’s a fun way to enjoy those classic buffalo-inspired flavors in a complete meal. Recipe from Killing Thyme.
Chicken Larb Salad
This chicken larb salad looks fresh, vibrant, and full of flavor in every bite. It’s a wonderful option when you’re looking for something lighter but still satisfying. Recipe from Cooking for Keeps.
Comfort Food, Pasta & Cozy Dinners
When you want something hearty and warming, ground chicken delivers. These recipes cover everything from rich pasta dishes and saucy rice bakes to skillet meals that feel like a hug — all made with chicken mince.
Tuscan Chicken Pasta
Tuscan-inspired flavors and pasta are always a comforting combination. This recipe looks like the kind of cozy dinner everyone happily comes back for seconds of. Recipe from Kim’s Cravings.
Gochujang Chicken Pasta
This recipe brings together creamy pasta comfort and the bold kick of gochujang. It’s a fun twist for anyone looking to break out of their usual pasta routine. Recipe from Easy Chicken Recipes.
Chicken Sloppy Joes
These chicken sloppy joes offer a lighter spin on the classic sandwich while keeping all the messy, delicious appeal. They’re a family-friendly dinner that’s always a hit. Recipe from Little Sunny Kitchen.
Chicken and Corn Skillet
Simple skillet meals are hard to beat, and this combination of chicken and corn sounds wonderfully comforting. It’s the sort of dinner that comes together with minimal fuss. Recipe from Eat the Gains.
Tex-Mex & Tacos With Ground Chicken
Ground chicken is a natural fit for Tex-Mex — it soaks up taco seasoning beautifully, works great in burritos and stuffed peppers, and makes a lighter but just-as-satisfying alternative to beef. These are the recipes you reach for on taco night and beyond.
BBQ Ground Chicken Tacos
Cooked & Loved recipe: These tacos combine smoky BBQ flavor with ground chicken for an easy dinner that’s a little different from the usual taco night. They’re fun, flavorful, and easy to customize.
Smashed Chicken Tacos
Cooked & Loved recipe: Smashed tacos have become popular for good reason, and this chicken version looks especially easy and satisfying. Expect plenty of flavor and crispy edges in every bite.
Chicken Burritos
These chicken burritos are a reliable dinner option when you want something filling and customizable. They’re perfect for feeding a hungry crowd or stocking the freezer. Recipe from Jo Cooks.
Chicken Taco Salad
This taco salad delivers all the flavors of taco night in a fresh, colorful bowl. It’s a great option when you want something lighter without sacrificing flavor. Recipe from Ambitious Kitchen.
Chicken Taco Soup
Taco soup is one of those comforting meals that’s easy to throw together and always satisfying. This chicken version looks perfect for busy evenings and leftovers. Recipe from Diethood.
The moment I learned how to make oat milk, I was obsessed! It takes less than 10 minutes, requires very few ingredients, and is perfect for everything from coffee and smoothies to pancakes and muffins.
Of all the plant-based milks, oat milk might be my favorite. It’s incredibly creamy, doesn’t require a lot of sweeteners to taste great, and, as you’re about to see, is surprisingly easy to make right in your kitchen!
All you need is a blender and rolled oats to whip up fresh oat milk. You can easily add it to your morning coffee or cold brew, use it in one of our smoothie recipes, or enjoy it with cereal. Plus, whenever I’m baking and suddenly realize I’ve run out of milk, homemade oat milk is my hero! I use it to make delicious vegan pancakes, vegan blueberry muffins, and more!
Key Ingredients
Rolled Oats: These are your best bet for creamy, perfectly blended oat milk (and are also what I use for my everyday oatmeal). Avoid instant oats, as they can lead to a slimy texture due to being more processed. Steel-cut oats may work, but are generally not recommended, as they’re harder to blend and won’t give you that creamy texture we all expect from oat milk. If you’re sensitive to gluten, be sure to choose gluten-free certified rolled oats.
Cold Water: This is the secret weapon against slimy oat milk! Using icy cold water when blending helps to control the starch in the oats, preventing that gummy, slimy unappetizing texture.
Optional: Feel free to flavor your homemade milk with vanilla extract, sea salt, cocoa powder, or sweeteners like maple syrup or honey. You can even make strawberry oat milk and blend in some strawberries (frozen is best)!
The secret to the best homemade oat milk—one that’s never slimy or gummy—lies in two crucial steps. In addition to blending the oats with ice-cold water, you must thoroughly strain the liquid. Use a nut milk bag, a clean cotton dishtowel, or even a few layers of cheesecloth to remove any remaining oat bits, which yields a silky smooth consistency that’s perfect for everything from coffee and smoothies to your baking needs.
Easy Homemade Oat Milk
Our homemade oat milk recipe is really easy to make. Just keep two things in mind for the best results. First, use rolled oats and ice-cold water. The cold water prevents the oat milk from turning slimy. Second, strain your oat milk using a nut bag, a clean dish towel, or a few layers of cheesecloth. Straining removes any extra bits of oats, which would make your milk slimy and gummy. The staining is so helpful that I like to strain my oat milk twice. Once you have it ready, enjoy your oat milk in smoothies like my favorite blueberry smoothie, or make these incredible vegan pancakes!
Makes 3 cups
You Will Need
1 cup (115g) rolled oats
4 cups (945ml) cold water
1 to 2 tablespoons maple syrup or honey, optional
1/2 to 1 teaspoon vanilla extract, optional for vanilla oat milk
Pinch fine sea salt, optional
Directions
1Blend the oats and water: Add the oats, cold water, and any optional ingredients to a blender. Cover with the lid and blend for 30 to 40 seconds. It’s okay if you see little speckles of oats. It is best not to over blend, as this can cause a slimy texture.
2Strain the oat milk: To prevent a slimy or gummy texture further, strain your oat milk. Strain it through a nut milk bag, a clean cotton dish towel, or multiple layers of cheesecloth set over a large bowl or pitcher. I like to double-strain the mixture so that most of the solids are removed.
3Storing: Store homemade oat milk in a sealed container in the fridge for up to a week. Shake or stir before using.
Adam and Joanne’s Tips
Make strawberry oat milk: Add frozen berries for a berry-flavored milk. Fresh are fine, but the cold berries help reduce starch.
Chocolate oat milk: Add a tablespoon or two of cocoa powder and sweeten it to taste with maple syrup or honey.
Why did my oat milk separate? Some separation is entirely normal. Stir or shake the milk before using.
Does homemade oat milk froth? Unfortunately, no. Store-bought oat milk that froth has a few more ingredients added (like stabilizers) to help it froth and heat up without turning slimy.
The nutrition facts provided below are estimates.
Nutrition Per Serving Serving Size 1/2 cup / Calories 50 / Total Fat 0g / Saturated Fat 0g / Cholesterol 0mg / Sodium 0mg / Carbohydrate 9g / Dietary Fiber 1.3g / Total Sugars 0g / Protein 1.7g
AUTHOR:
Joanne Gallagher
Previous Post: Perfect Vegan Pancakes Next Post: Chocolate Chia Pudding
]]>0adminhttps://recipeparadise.com<![CDATA[The Best Onion Dip Recipe]]>https://recipeprofessional.com/the-best-onion-dip-recipe/2026-06-10T02:14:46Z2026-06-10T02:14:46Z
This onion dip recipe is so much tastier than anything you can buy at the store, it always gets rave reviews!
Skip the prepackaged French onion soup mix or store-bought dips and make this homemade caramelized onion dip instead. Trust me, it’s really easy!
This sour cream and onion dip gets better over time, so save this recipe for when you need to prepare an appetizer ahead of time. I also love this black bean onion dip.
Key Ingredients
Onion: I use a sweet onion when making this dip. Look for Vidalia or Walla Walla onions. Yellow onions will work in the recipe but are less sweet.
Butter: We cook the onion with melted butter in the oven so it browns and becomes soft. I use salted butter, but unsalted is fine, you might need more salt at the end.
Sour cream: The base of our dip! Use a high-quality, full-fat sour cream for the best flavor. Some readers have asked about substituting yogurt. While I do prefer the flavor of this recipe with sour cream, plain, thick Greek or Icelandic style yogurt work.
Find the full recipe with measurements below.
How to Make the Best Onion Dip
Tip 1: Caramelize your onions. For the easiest French onion dip, caramelize your onions in the oven, it keeps things easy and hassle-free. You can caramelize the onions on the stove, like when making French onion soup. If you’d prefer to use the stovetop, we’ve included how to caramelize onions in the recipe below. I use the oven because it requires less hands-on time.
To caramelize the onions, mix them with melted butter and then bake until they smell sweet and softened. Roasting takes 50 to 60 minutes, but most of this time is hands-off. You’ll want to stir them every 10 to 15 minutes to ensure they roast evenly.
Tip 2: Let your dip sit in the fridge. When your onions finish roasting, stir them into sour cream and season with salt and pepper. We don’t add mayonnaise or other ingredients. Honestly, the dip doesn’t need it. Trust me. This dip is perfect the way it is. I prefer making this dip a day before I plan to serve it. It gets so much better after a night in the fridge, and all the caramelized onion flavor leaks out into the sour cream.
Serving Suggestions
I love serving homemade onion dip with potato chips (I especially love kettle chips), but tortilla chips, pita chips, flatbread, and pretzels are all excellent. It’s also delicious with raw vegetables like carrots, celery, cucumbers, and bell peppers. You can even serve it next to some roasted vegetables. These crispy potatoes and roasted broccoli are our family’s favorites.
More Dips and Spreads
The Best Onion Dip
PREP
COOK
TOTAL
Skip the prepackaged French onion soup mix and make this easy homemade onion dip instead. It’s easy to make, only requires five simple ingredients (two of which are salt and pepper), and tastes much better than anything you can buy at the store. This dip gets better over time, making this the perfect make-ahead appetizer!
Makes 2 cups
Watch Us Make the Recipe
You Will Need
1 medium-to-large sweet onion like Walla Walla or Vidalia, chopped small (2 ½ cups)
3 tablespoons salted butter, melted
1/4 teaspoon fine sea salt
1/8 teaspoon fresh ground black pepper
1 pint (16oz or 2 cups) sour cream
Directions
1Preheat the oven to 375°F (190°C). Line a small baking sheet with parchment paper or use a large baking dish.
2Toss the chopped onions with the melted butter and spread them into a thin layer on the baking sheet.
3Roast, stirring every 10 minutes, until the onions are soft, smell sweet, and turn a light golden color, 50 to 60 minutes. Keep a closer eye towards the end of the cooking time to ensure the onions do not overbrown.
4Transfer the onions while they are still hot to a mixing bowl and scrape all the butter left in the pan into the bowl with the onions.
5Stir in the salt, pepper, and sour cream.
6Cover and refrigerate overnight, and then serve. The dip will last up to 4 days in the fridge. Stir well before serving.
Adam and Joanne’s Tips
Storing: You can store in an airtight container in the fridge for up to 4 days. In fact, it tastes better the longer it sits since the sour cream has more opportunity to absorb the flavor of the roasted onions. When you are ready to serve the dip, give it a good stir. You might notice some liquid pooled at the top from the onions. That liquid tastes amazing, so we want to stir it back into the dip.
Freezing: Unfortunately, we do not recommend freezing your dip. Sour cream does not freeze and thaw well. While it’s okay to eat thawed frozen sour cream, the texture changes, making it less than ideal for a dip.
Caramelize onions on the stove instead of in the oven: Slice the onions into thin half-moons. Melt the butter in a wide pot over medium heat, add the onions, cover with a lid, and cook, over medium heat, until the onions look translucent, 12 to 15 minutes. Uncover the pot, and continue to cook the onions, stirring occasionally and scraping up any stuck browned bits from the bottom and sides. The onions take 45 to 60 minutes to caramelize. Keep a close eye on them. When you notice they begin to brown, stir them more often to keep them from burning. When they are golden and smell caramelized, mix into the sour cream mixture. Watch us caramelize onions in our French onion soup video.
Vegan alternatives: Swap the sour cream for vegan sour cream or use cashew cream. Use a plant-based butter when cooking the onions.
The nutrition facts provided below are estimates.
Nutrition Per Serving Serving Size 1 of 8 servings (about 1/4 cup) / Calories 147 / Total Fat 13.6g / Saturated Fat 7.6g / Cholesterol 39.8mg / Sodium 91.5mg / Carbohydrate 5.4g / Dietary Fiber 0.4g / Total Sugars 3.7g / Protein 1.6g
AUTHOR:
Joanne Gallagher
We are Adam and Joanne Gallagher, the creators of Inspired Taste. Established in 2009, Inspired Taste grew from a childhood dream into one of the internet’s most trusted recipe sites with hundreds of reliable recipes, step-by-step videos, and expert tips.More About Us
Flavor Profile: Savory, garlicky, buttery shrimp with bright tropical freshness and a creamy, spicy-tangy drizzle
Meal-Prep Friendly: Store components separately in the fridge for up to 2 days; add avocado fresh when serving
Best Served With: Fresh out of the fridge on a warm night, or as a quick lunch that feels anything but boring
This shrimp poke bowl is inspired by the Hawaiian garlic shrimp and the classic poke bowl flavors. The shrimp (or prawns) are pan-fried in a quick garlic soy butter sauce until glossy and fragrant, then piled over fluffy sushi rice with mango, avocado, cucumber, and edamame.
The Sriracha lime mayo is creamy, tangy, with just the right amount of heat — and once you’ve made it, you’ll find yourself drizzling it on everything. I love this one because it hits that sweet spot between fresh and satisfying: it’s colorful, it’s got great texture from all the toppings, and the shrimp have this beautiful savory depth that raw fish poke bowls just can’t replicate.
The whole thing comes together in 30 minutes, making it perfect for a weeknight dinner situation.
You might also like these recipes: classic tuna poke bowl, tofu poke bowl, or these poke bowl ideas; or try my Teriyaki salmon bowl, Tex-Mex steak and rice bowl or this versatile chicken and rice bowl.
What You’ll Need
Here is what you’ll need for this shrimp poke bowl recipe. Find the full measurements in the recipe card below.
For the garlic soy butter shrimp:
Shrimp — Large peeled shrimp (prawns) work best here; they stay juicy and get a nice sear. Frozen shrimp are completely fine — just thaw overnight in the fridge or quickly in cold water, then pat them very dry before cooking. The drier the shrimp, the better the sear.
Garlic — Fresh and finely minced. Don’t skip the mincing; you want the garlic to melt into the sauce, not sit in chunks.
Soy sauce — Use Tamari if you need this gluten-free. It does the same job beautifully. You can use regular or light soy sauce.
Butter — Just one tablespoon, but it makes the sauce go glossy and rich. For dairy-free, leave it out and add a tiny splash of extra oil.
Sesame oil — Toasted sesame oil gives the sauce that nutty depth. A little goes a long way.
Sriracha — Adds a background warmth to the shrimp. You can leave it out or double it depending on your heat preference.
Neutral oil — For searing. Vegetable, sunflower, or avocado oil all work.
For the sriracha lime mayo:
Mayonnaise — Kewpie mayo is genuinely worth tracking down for this — it’s richer and ever-so-slightly sweeter than regular mayo and makes the sauce extra creamy. Find it at Asian grocery stores or the international aisle of most major supermarkets. Light mayo works too if that’s what you have.
Sriracha — Start with 1 tablespoon and taste as you go. You can always add more heat; you can’t take it back.
Lime juice — Freshly squeezed is best. It makes the whole sauce brighter. Lemon works if that’s what you have.
Honey — Just a touch to balance the heat.
For the bowl:
Short or medium-grain rice — Sushi rice is ideal because it’s slightly sticky and holds together well in the bowl. Regular short or medium-grain rice is fine too.
Mango — Ripe but not mushy. It adds a gorgeous tropical sweetness that works so well against the savory shrimp. If you don’t want fruit in your poke bowl, you can swap it for pickles or cherry tomatoes.
Avocado — Slice or dice just before serving so it stays fresh. It adds creaminess and healthy fats.
Edamame — Shelled and thawed from frozen. A great source of plant-based protein that also adds a satisfying bite.
Cucumber — Thinly sliced for a fresh, cooling contrast. Persian or Lebanese cucumbers are my preference; they have fewer seeds.
Green onions and sesame seeds — For garnish and a bit of nuttiness. Toast the sesame seeds in a dry pan for a minute or two — it really does make a difference.
Optional extras — Pickled ginger is lovely for cutting through the richness, and chili crisp or fried shallots add a fun crunch.
How To Make Shrimp Poke Bowl
Find the full recipe and nutritional information below. Here are some handy step-by-step photos for how to make this shrimp poke bowl.
Cook the rice. Rinse until the water runs clear, cook according to packet instructions, then fluff with a fork and set aside.
Make the sriracha lime mayo. Whisk together mayo, sriracha, lime juice, and honey. Thin with a little water if needed, taste, and adjust. Set aside.
Prep your toppings. Dice the mango and avocado, slice the cucumber and green onions, thaw the edamame, and toast the sesame seeds in a dry pan until golden. Get everything ready before you start the shrimp — they cook fast.
Cook the shrimp. Pat dry (well!), season with salt and pepper, and sear in a hot oiled skillet for 1–2 minutes per side until pink. Cook in batches if needed.
Add the sauce. Reduce the heat to medium, and add the butter and garlic, and sauté for 30 seconds, and then add the soy sauce, sesame oil, and sriracha. Toss the shrimp through for 1 minute until glossy and fragrant, then pull off the heat.
Assemble. Divide the rice between two bowls, arrange the toppings, and pile the shrimp in the center. Drizzle with sriracha lime mayo and finish with green onions, sesame seeds, and any extras.
Watch The Video
Recipe Tips
Pat the shrimp completely dry before cooking. This is the single most important step for a good sear. Wet shrimp steam instead of sear, and you’ll miss out on those caramelized edges that make the shrimp so good.
Cook in a single layer. If your pan is crowded, the shrimp will steam rather than brown (yep, happened to me a few times). If you’re cooking for four, do the shrimp in two batches and set the first aside while you cook the second, then toss them all back in for the sauce.
Pull the shrimp off the heat as soon as the sauce is glossy. They carry over heat quickly, and overcooked shrimp go rubbery fast. When in doubt, pull them early.
Frozen shrimp work perfectly here. Thaw in the fridge overnight, or run under cold water for a few minutes, then drain and pat dry. Don’t thaw in hot water.
Make it gluten-free. Swap the soy sauce for tamari — same flavor, no gluten.
Make it dairy-free. Leave out the butter; the sauce is still delicious with just the oil, soy, garlic, and sesame.
Swap the protein. This bowl works beautifully with grilled salmon or even tofu (marinated in the same sauce, pan-fried until crispy). If you’ve already got my tofu poke bowl recipe bookmarked, that garlic soy combo will feel very familiar.
Make it spicier. Double the sriracha in the shrimp sauce, or serve with chili crisp drizzled over the top at the end.
Storage. Store the components separately in airtight containers for up to 2 days. The mayo will keep in the fridge for up to a week. Add the avocado fresh when serving — it doesn’t store well once sliced.
Serving Suggestions
This bowl is a complete meal on its own — you’ve got protein, carbs, healthy fats, and plenty of vegetables all in one. That said, a light miso soup alongside is a lovely addition, especially if you’re serving it in cooler weather.
If you’re making this for a group, lay everything out separately and let people build their own bowls — it’s one of those meals that works really well as an interactive dinner, and it means everyone can customize their heat level with the mayo. A squeeze of fresh lime right before eating is optional but highly recommended.
If you’ve tried this shrimp poke bowl or any other recipe on the blog then don’t forget to rate the recipe and let me know how you got on in the comments below, I love hearing from you! You can also FOLLOW ME on Instagram, Facebook, Pinterest, YouTube, and or sign up to my Newsletter to see more of my delicious food.
Want to Save This Recipe?
Enter your email & I’ll send it to your inbox. Plus, get great new recipes from me every week!
By submitting this form, you consent to receive emails from Cooked & Loved
Pan-fried garlic soy butter shrimp over sushi rice with mango, avocado, edamame, and cucumber, all finished with a creamy sriracha lime mayo. A delicious shrimp poke bowl ready in 30 minutes. The recipe below is for two bowls, but can be stretched to 3 servings. Find step-by-step photos and more recipe tips above.
For the garlic soy butter shrimp:
For the sriracha lime mayo:
Cook the rice. Rinse under cold water until the water runs clear. Cook according to packet instructions with ½ teaspoon salt. Once done, fluff with a fork and set aside.
Make the sriracha lime mayo. Whisk together the mayonnaise, sriracha, lime juice, and honey in a small bowl. Add a teaspoon of water if needed to thin it to a drizzleable consistency. Taste and adjust seasoning. Set aside.
Prep the toppings. Dice the mango and avocado, thinly slice the cucumber and green onions, and thaw the edamame. Toast sesame seeds in a dry pan over medium heat for 1–2 minutes until golden, stirring occasionally. Have everything ready before you cook the shrimp.
Cook the shrimp. Pat shrimp very dry with paper towels and season lightly with salt and pepper. Heat a large skillet over medium-high heat and add the neutral oil. Add shrimp in a single layer (cook in batches if needed) and cook for 1–2 minutes per side until pink and cooked through.
Add the sauce. Reduce heat to medium. Add butter, garlic, soy sauce, sesame oil, and sriracha to the pan. Toss shrimp through the sauce and cook for a further 60 seconds, stirring, until glossy and fragrant. Remove from heat immediately.
Assemble. Divide rice between two bowls. Arrange mango, avocado, edamame, and cucumber around the bowl. Top with garlic butter shrimp. Drizzle generously with sriracha lime mayo and finish with green onions, toasted sesame seeds, and any optional extras.
Important Ingredient Tips: Kewpie mayo is highly recommended for the sriracha lime mayo — it’s creamier and slightly sweeter than regular mayo and makes the sauce noticeably better. Find it at Asian grocery stores or the international aisle of most supermarkets. Light mayo or regular mayo can be substituted. For the shrimp, frozen is completely fine; thaw and pat dry thoroughly before cooking for the best sear. Key Recipe Tips: Pat shrimp completely dry before cooking — this is the most important step for a good sear. Don’t overcrowd the pan; cook in batches if needed. Pull the shrimp off the heat as soon as the sauce is glossy, as they continue cooking from residual heat. Storage Tips: Store all components separately in airtight containers in the fridge for up to 2 days. The sriracha lime mayo keeps for up to 1 week refrigerated. Add avocado fresh when serving — it doesn’t store well once cut. Make-Ahead Tips: The rice can be cooked ahead and kept in the fridge for up to 3 days. The sriracha lime mayo can be made up to a week in advance. Prep all toppings (except avocado) the day before and store in separate containers. Cook the shrimp fresh when ready to serve for best texture. FAQs: Can I use frozen shrimp? Yes, absolutely. Thaw them in the fridge overnight or under cold running water, then pat completely dry before cooking. Frozen shrimp work just as well as fresh here. Can I make this ahead? The components store well separately, so this is a great meal prep option. Cook the shrimp fresh for best results — they only take about 5 minutes. What can I substitute for mango? Pineapple works really well as a tropical alternative. Or skip the fruit entirely and add extra cucumber, radishes, or shredded cabbage for crunch. Is this recipe spicy? The shrimp have a mild background heat, and the mayo has a medium kick. You can easily adjust both up or down by changing the amount of sriracha. Can I make this gluten-free? Yes — simply swap the soy sauce for tamari. Everything else in the recipe is naturally gluten-free. Can I substitute the shrimp? Salmon works beautifully in this bowl with the same garlic butter sauce. Tofu is also a great option — marinate and pan-fry it in the same sauce until crispy.
]]>0adminhttps://recipeparadise.com<![CDATA[Minestrone Soup Recipe with Sausage]]>https://recipeprofessional.com/minestrone-soup-recipe-with-sausage/2026-06-08T04:14:54Z2026-06-08T04:14:54Z
This minestrone soup recipe with sausage is always a happy sight at our dinner table. It’s packed with loads of veggies and made with a light, cozy tomato-Parmesan broth. It’s so good.
This minestrone is my love language. Made hearty with lots of vegetables, golden-brown sausage crumbles, and the simplest Parmesan-tomato broth (thanks to a Parmesan rind). It’s pretty much guaranteed to put a smile on my face.
This recipe makes a big pot of soup, which is perfect because minestrone gets better the next day. Make it today and enjoy it all week! If you’re looking for more soup ideas, check out our chicken and vegetable soup, Italian wedding soup, and classic minestrone.
Key Ingredients
Vegetables: The heart of any minestrone is lots of veggies. You can play around with what you have on hand or what’s in season, but we love using fennel, onion, carrots, celery, potato, and zucchini (or yellow squash).
Sausage: Some minestrone recipes use pancetta, but we love swapping in Italian sausage. It makes the soup extra hearty and adds so much flavor. I usually go for mild, but spicy sausage is great if you like a little heat. You can use bulk sausage or just remove the casings from fresh links.
Canned Tomatoes: I’m all about fire-roasted canned tomatoes for this soup. They add a little extra flavor compared to regular tomatoes.
White Beans: Use whatever white beans you love best. Canned or cooked both work. We usually go for cannellini, navy, or Great Northern beans.
Stock: I used chicken stock in the photos, but vegetable broth is just as good. If you want to make your own, check out our chicken stock and vegetable broth recipes.
Garlic, Italian Seasoning, and Parmesan: These are what make the broth so good. Use fresh garlic if you can. If you have a Parmesan rind, drop it right into the pot and let it work its magic as the soup simmers. If you don’t have a rind, just stir in some grated Parmesan at the end.
Find the full recipe with measurements below.
How to Make Minestrone Soup with Sausage
Tip 1: Brown the sausage. The first step for this soup is to cook the sausage in a bit of olive oil until it browns and renders its fat. We’ll remove the sausage once it’s browned and stir it into the soup later, but we will keep the rendered fat in the pot for cooking the vegetables.
See all the tiny browned bits? This step makes the sausage more enjoyable in the soup and adds lots of flavor to the vegetables and broth.
Tip 2: Sweat the vegetables. To remove the raw flavors of the onion and fennel, briefly cook them in the rendered sausage fat. After a few minutes, that raw flavor will disappear, and they will smell sweet.
Tip 3: Toast the garlic. Just before pouring in your canned tomatoes, add the garlic, Italian seasoning, potatoes, and zucchini to the pot. A minute or so of stirring them around the pot toasts the garlic and brings out the flavor of the seasoning. We add the potatoes and zucchini at this point because they will have plenty of time to cook once you add the broth.
Tip 4: Simmer until the veggies are tender. This soup does not have a long cooking time. Once you add the broth, simmer for about 20 minutes, which should be enough time for the potatoes and zucchini to become tender.
After pouring in the stock, add a Parmesan rind. As it simmers, it perfumes the broth with a light Parmesan flavor. It’s lovely and one of the best secrets for incredible minestrone soup!
Serving Suggestions
I am perfectly happy to sit with a bowl of this soup and call it a day, but if you are looking for more, I’ve got a few suggestions for you. First off, a slice of sourdough with butter or some garlic bread would be lovely. Then, for something light, try a salad on the side. Fresh Caprese salad is perfect, as is a Caesar salad. And, if you have extra fennel in the fridge, we also love this shaved fennel salad with parmesan!
More of My Favorite Soup Recipes
Minestrone Soup with Sausage
PREP
COOK
TOTAL
This minestrone is pure comfort food. It’s loaded with Italian sausage, beans, and potatoes, and it comes together quickly. Plus, it just gets better as it sits, so you can enjoy it all week.
6 Servings
You Will Need
2 tablespoons extra-virgin olive oil
8 ounces bulk Italian pork sausage, see tips (226g)
1 medium fennel bulb, trimmed and finely chopped
1 small onion, finely chopped
3 medium carrots, peeled and finely chopped
3 ribs celery, finely chopped
1 large russet potato, peeled and chopped into 3/4-inch pieces
2 medium zucchini or yellow summer squash, chopped into 3/4-inch pieces
2 garlic cloves, minced
1 teaspoon Italian seasoning
1 (15-ounce) can fire-roasted diced tomatoes
1 (15-ounce) can cannellini beans, drained and rinsed
6 cups low-sodium chicken stock or vegetable broth (1.4L)
1 to 2 ounce piece Parmesan Reggiano cheese rind
Directions
1Brown the sausage: Heat the olive oil over medium-low heat in a large, heavy soup pot or Dutch oven, then add the sausage and cook until it starts to brown, breaking it into crumbles with a spoon as it cooks. Use a slotted spoon to transfer the sausage to a bowl, but leave the rendered fat in the pan.
2Cook the veggies: Add the fennel, onion, carrot, and celery, and cook until they begin to soften and smell sweet, about 6 minutes. Stir in the potato, zucchini, garlic, and Italian seasoning and cook for about one minute.
3Build the soup: Add the tomatoes with all the juices to the vegetables, then use a wooden spoon to scrape up any browned bits stuck to the bottom of the pot. Stir in the beans and stock.
4Simmer: Stir in the browned sausage, then taste and season the broth with salt and pepper. Add the bay leaf, then push the cheese rind into the soup so it is fully submerged in the broth. Simmer, partially covered, until the vegetables are tender, 15 to 20 minutes.
5Serve: Remove any remaining cheese rind, then taste the soup and season with more salt and pepper as needed. Serve with grated Parmigiano Reggiano over the top.
Adam and Joanne’s Tips
Storing: Keep leftover soup in an airtight container in the fridge for up to 4 days. Reheat in a saucepan over medium heat.
Sausage: Use bulk sausage, or buy sausage formed into links and remove the casings. To do it, cut a slit down the raw sausage and pull the casing away from the meat.
Parmesan rind: Note that the Parmesan rind won’t fully melt. It softens, melts a little bit, and mostly “steeps” like a tea bag. It adds a light flavor to the broth, but you will likely need to remove it before serving. If you do not have a rind, grate some parmesan cheese and then stir it into the broth before serving (1/4 cup to 1/3 cup would be lovely).
The nutrition facts provided are estimates.
Nutrition Per Serving Serving Size 1/6 of the recipe / Calories 539 / Total Fat 31.6g / Saturated Fat 10.5g / Cholesterol 60.4mg / Sodium 1140.2mg / Carbohydrate 40.6g / Dietary Fiber 8g / Total Sugars 7.3g / Protein 25.2g
AUTHOR:
Adam Gallagher
We are Adam and Joanne Gallagher, the creators of Inspired Taste. Established in 2009, Inspired Taste grew from a childhood dream into one of the internet’s most trusted recipe sites with hundreds of reliable recipes, step-by-step videos, and expert tips.More About Us
My easy vegan pancake recipe yields light, extra-fluffy pancakes that taste amazing every single time. Best of all, they’re naturally dairy-free and egg-free. If you’re looking for a gluten-free option, simply use your favorite gluten-free flour blend.
I’ve made these vegan pancakes countless times, and my son absolutely loves them—he asks for them all the time! This recipe is pure magic, whether you’re vegan or not. They work perfectly for plant-based eaters, but they’re also a lifesaver when your fridge is almost empty, and you’ve run out of eggs.
Trust me, you won’t miss a thing with these pancakes. They’re light and fluffy in the middle, still get those perfect crispy brown edges, and taste incredible. Go ahead and save this recipe. You’ll be so glad you did! For more vegan recipes, see our easy vegan blueberry muffins!
Key Ingredients
Flour: You’ve got options! Use all-purpose, whole wheat, or your favorite gluten-free flour blend. All work beautifully in this recipe.
Baking Powder: This is your secret weapon for achieving those light, extra-fluffy pancakes. We use a generous amount, which might seem like a lot, but trust the process—it creates that incredible airy middle. To avoid any metallic aftertaste, I highly recommend using aluminum-free baking powder (like Bob’s Red Mill). I use the same trick for my classic pancakes.
Salt, Vanilla Extract, and Cinnamon: These make our pancakes taste incredible. Don’t skip these!
Non-Dairy Milk: Feel free to use whatever you have in the fridge. Almond, coconut, hemp, cashew, and oat milk all work perfectly. For an extra special touch, you can even try our homemade oat milk recipe.
Oil or Plant-Based Butter: These add moisture and flavor. I particularly love using coconut oil or melted vegan butter for their rich taste. Regular oil, like olive oil, is also a great option and works wonderfully.
Sugar: For the tastiest pancakes, a bit of sugar really makes a difference. Granulated, brown, coconut, or even maple syrup will work. While you can omit the sugar, be aware that your pancakes won’t brown as well and will have slightly less flavor.
Vegan pancakes are so easy to make (my 4-year-old even helps me make them). I love serving my vegan pancakes with fruit, such as bananas or berries, and a drizzle of maple syrup. You could also add a spoonful of vegan whipped coconut cream (yum) and make them extra special with this berry fruit salad!
Perfect Vegan Pancakes
PREP
COOK
TOTAL
Our vegan pancakes are perfect for everyone (vegans and non-vegans alike!). They are just as fluffy as our classic pancakes and taste incredible. They also freeze really well! See my tips for freezing them below the recipe. I love these topped with fruit, our berry fruit salad, and this coconut whipped cream (also known as vegan whipped cream).
Makes 6 pancakes
You Will Need
1 cup (130g) all-purpose flour, whole wheat flour, or gluten-free flour blend
2 teaspoons aluminum-free baking powder
1/4 teaspoon fine sea salt
1/4 teaspoon ground cinnamon, optional
1 cup (236ml) dairy-free milk, try homemade oat milk
Nonstick cooking spray, melted vegan butter, or oil for the skillet
Directions
1Prepare the dry ingredients: In a medium bowl, whisk the flour, baking powder, and salt until well blended.
2Prepare the wet ingredients: In another bowl, whisk the milk, sugar, olive oil, and vanilla extract until well combined.
3Make the pancake batter: Create a well in the center of the flour mixture, then pour the milk mixture into it. Use a fork to stir until no clumps of flour remain. It is okay if the batter has a few small lumps.
4Cook the pancakes: Heat a large skillet over medium heat (or use a griddle). The pan is ready if you splatter a little water onto the pan surface, and the water dances around the pan and eventually evaporates.
5Lightly brush or spray the skillet with oil or melted plant-based butter. Use a 1/4 cup measuring cup to spoon the batter onto the skillet. Gently spread the batter into a 4-inch circle.
6When the edges appear dry, bubbles start to form and pop on the top surface of the pancake, flip it over. This takes about 2 minutes. Once flipped, cook for an additional 1 to 2 minutes or until lightly browned and cooked through in the middle.
7Serve immediately with warm syrup and berries.
Adam and Joanne’s Tips
Storing: Place cooked and cooled vegan pancakes in an airtight container in the fridge for up to a week, or freeze them for up to 2 months. If freezing, line the pancakes on a baking sheet and freeze for about 30 minutes. Then, transfer them to a freezer-safe bag with parchment paper between each pancake to prevent sticking.
Reheating pancakes: Place them on a microwave-safe plate and cook for 20 seconds per pancake (add more time for multiple pancakes). Or wrap the pancakes in foil and bake at 350°F for about 10 minutes.
Baking powder: For the fluffiest pancakes, use baking powder. We use quite a bit to achieve that fluffy middle (I know it seems like a lot, but trust us). I buy aluminum-free baking powder (Bob’s Red Mill) since it prevents that tinny flavor that can appear when baking powder is used in higher quantities (like in this recipe). For extra fluffy pancakes, use 3 teaspoons of baking powder.
Non-dairy milk: We use unsweetened dairy-free milk in these pancakes. If you only have sweetened milk, consider reducing the sugar called for in the recipe.
The nutrition facts provided below are estimates.
Nutrition Per Serving Serving Size 1 pancake / Calories 160 / Total Fat 7.7g / Saturated Fat 1g / Cholesterol 0mg / Sodium 131.4mg / Carbohydrate 21g / Dietary Fiber 0.7g / Total Sugars 3.3g / Protein 2.4g
]]>0adminhttps://recipeparadise.com<![CDATA[Easy Sweet Chili Chicken Wings Recipe]]>https://recipeprofessional.com/easy-sweet-chili-chicken-wings-recipe/2026-06-07T02:06:29Z2026-06-07T02:06:29Z
Our Thai sweet chili chicken wings are out of this world delicious and so simple to make. You’ll bake the wings to sticky perfection and then toss them with even more delicious sticky Asian sweet chili glaze. So good!
Our sweet chili wings are sticky, sweet, and spicy, with a bit of crunch, thanks to a handful of chopped peanuts and sliced green onion sprinkled on top. They are easy, too. The sweet chili glaze only needs three ingredients!
It’s no secret that we love our chicken wings. For more recipes like this, see our baked buffalo hot wings, spicy glazed chicken wings, BBQ chicken wings, or these Vietnamese wings made with fish sauce!
Key Ingredients
Chicken Wings: You can usually find them whole or already separated into drumsticks and wingettes. If you can only find whole chicken wings, hop over to our tutorial for separating a chicken wing.
Thai Sweet Chili Sauce: This is the main ingredient of our glaze. It’s a delicious blend of sweet, spicy, and tangy flavors. I love Mae Ploy Sweet Chili Sauce, but feel free to use your favorite brand. I also use sweet chili sauce to make the dressing for this Thai chicken salad!
Light Soy Sauce or Tamari: This adds a savory balance and seasons the sticky glaze.
Chili Paste: Sambal Oelek is my go-to for its pure chili heat, but you can also use Sriracha or Gochujang. Just remember to adjust the amount to your desired level of spice. I also use Sambal Oelek in our spicy garlic ginger edamame.
Peanuts and Green Onions (Optional): These add a lovely crunch to the finished wings. Toasted sesame seeds are also a great option! I use the same topping for our hoisin sticky ribs.
Find the full recipe with measurements below.
How to Make Sweet Chili Chicken Wings
These sweet and spicy Thai chili chicken wings are incredibly easy to make! You’ll whisk together Thai sweet chili sauce, soy sauce, and chili paste to create the sticky glaze. You can easily adjust the heat by adding more or less chili paste.
Next, toss the wings with half of the glaze and arrange them on a baking sheet fitted with a rack. Baking the wings on a rack allows hot air to circulate, resulting in crispy skin. If you don’t have a rack, no worries! Just bake them directly on the sheet, and remember to flip and rotate them a few times during cooking.
Once the wings are out of the oven, toss them with the remaining glaze and finish with a sprinkle of chopped peanuts and sliced green onions. These wings are so simple yet incredibly delicious! I love them.
Easy Sweet Chili Chicken Wings
PREP
COOK
TOTAL
These Thai sweet chili chicken wings are out of this world delicious and so simple to make. You can adjust the spice level of the sticky glaze by reducing or increasing the chile paste. I love Sambal Oelek for its fresh, clean heat, but Sriracha or Gochujang are good substitutes (you will need to adjust to your taste, though).
2 to 3 Servings
Watch Us Make the Recipe
You Will Need
1 ½ pounds (680g) chicken wings, separated at joints, tips discarded
3/4 cup (177ml) Thai sweet chili sauce, I use Mae Ploy Brand
2 teaspoons light soy sauce or tamari
1 to 3 teaspoons Sambal Oelek
1/4 cup chopped peanuts
2 green onions, trimmed and thinly sliced
Directions
1Preheat the oven to 425°F (220°C). Set a wire rack inside a large-rimmed baking sheet.
2Whisk the Thai sweet chili sauce, soy sauce, and Sambal Oelek together, adjusting the chili paste according to how spicy you’d like the glaze. Transfer 1/2 cup of the glaze to another bowl to toss the baked wings later.
3Pat the wings dry, and then add them to the remaining glaze. Toss well, then spread out in one layer on the wire rack.
4Bake until cooked through and crispy, 35 to 45 minutes.
5Toss the baked chicken wings in the reserved glaze, pile them onto a plate, and sprinkle them with sliced green onions and chopped peanuts.
Adam and Joanne’s Tips
No wire rack: If you do not have a wire rack that will fit inside a baking sheet, you can still bake hot wings. Arrange them on the baking sheet without the rack and rotate a few times during baking.
The nutrition facts provided below are estimates.
Nutrition Per Serving Calories 373 / Total Fat 10.5g / Saturated Fat 2.2g / Sodium 837mg / Cholesterol 96.9mg / Carbohydrate 26g / Dietary Fiber 2.3g / Total Sugars 21.9g / Protein 39.9g
AUTHOR:
Adam Gallagher
We are Adam and Joanne Gallagher, the creators of Inspired Taste. Established in 2009, Inspired Taste grew from a childhood dream into one of the internet’s most trusted recipe sites with hundreds of reliable recipes, step-by-step videos, and expert tips.More About Us
]]>0adminhttps://recipeparadise.com<![CDATA[60+ Dinner Recipes for When You Are Out of Ideas]]>https://recipeprofessional.com/60-dinner-recipes-for-when-you-are-out-of-ideas/2026-06-06T10:27:53Z2026-06-06T10:27:53Z
Say hello to over 60 dinner recipes for when you are all out of ideas. From quick and easy weeknight recipes to entertaining-worthy dishes.
Bookmark this page for the next time you are staring blankly into your fridge. It feels like we are always looking for new, mouthwatering dinner recipes. We took some time and put together this list of over 60 dinner ideas to keep you (and ourselves) inspired.
Most of these are quick and weeknight-friendly, several are impressive enough for entertaining friends, and a handful are the dinners that our family comes back to every week. Dinner does not need to be boring!
Find the recipes below. For more, join our free newsletter to get our best recipes delivered straight to your inbox. Happy cooking!
Our Favorite Dinner Recipes
The Best Chicken Noodle Soup
Our family loves soup for dinner. Our easy homemade chicken noodle soup has tender chicken, fresh veggies, and the most delicious broth that tastes like it’s been cooking for hours.
Easy Roast Chicken
Another family favorite, this roast chicken recipe guarantees incredibly juicy, tender chicken with gorgeous golden-brown skin every single time.
Juicy Chicken Breasts
One of our quickest dinners! We’ve used this skillet chicken breast recipe for years. It never fails. It’s fast, easy, and guarantees the juiciest, most tender chicken.
Easy Chicken Pot Pie
The most perfect chicken pot pie, made with lots of chicken and classic vegetables, all surrounded by a creamy sauce and baked under a towering puff pastry crust.
Butter Chicken
This Indian butter chicken recipe simmers spiced yogurt-marinated chicken in a creamy, buttery tomato sauce. We love serving over rice and with plenty of naan for dipping. Such a delicious dinner!
Juicy Poached Chicken
My poached chicken recipe makes the juiciest, most tender chicken ever. Poaching is one of the easiest ways to guarantee foolproof, juicy chicken breasts.
Yogurt Marinated Chicken
This endlessly useful yogurt chicken marinade recipe works wonders for all cuts of chicken, and is especially good for chicken breasts.
Chicken Tikka Masala
This chicken tikka masala recipe guarantees juicy, tender, yogurt-marinated chicken simmered in a creamy, spiced tomato sauce that’s just so good. Spoon it over rice or scoop it up with naan. Either way, you’re in for a treat.
Juicy Chicken Burgers
These ground chicken burgers are seriously delicious. The secret is a mixture of spiced veggies that we mix right into the patties. Trust me, you’ll want to make these again and again (our family has this dinner recipe on repeat).
Our Favorite Chicken Curry
When I’m craving Indian curry at home, this chicken curry recipe is where I turn! We simmer tender chicken with ginger, garlic, and spices in an incredible yogurt and cream sauce.
Honey Mustard Chicken
Our honey mustard chicken recipe packs in so much incredible flavor thanks to an easy honey dijon marinade that doubles as a sauce for serving.
Crispy Chicken Milanese
A reader favorite! This chicken Milanese recipe turns out perfectly crisp and golden on the outside and juicy and tender inside. It’s simple to make and everyone I’ve served it to loves it!
Perfect Shepherd’s Pie
My family loves this easy shepherd’s pie with tender ground beef (or lamb), veggies, a delicious savory gravy, all topped with cheesy mashed potatoes.
Epic Birria Tacos
Say hello to our family’s favorite birria tacos recipe (aka quesabirria). These popular pan-fried shredded beef tacos are crispy, cheesy, and incredibly delicious!
Oven Baked Beef Ribs
Learn how to cook incredibly delicious BBQ beef ribs in the oven. Most of the cooking time is hands-off, letting the ribs slowly bake until fall-apart tender.
Tender Beef Stew
In this incredible beef stew, we slowly braise chuck roast and short ribs in a rich mix of red wine and beef broth until the meat is so tender it practically melts in your mouth.
Epic Taco Salad
Our favorite taco salad is an easy weeknight meal with fresh lettuce, tortilla chips, seasoned ground beef, cheese, and a creamy cilantro lime dressing.
Seriously Good Smash Burgers
Our recipe for these smash burgers is the real deal! We add onions before smashing, top with melty cheese, and finish with our favorite burger sauce.
Tender Braised Beef Short Ribs
This impressive braised short ribs recipe has mouthwateringly tender beef slowly cooked in a caramelized onion and red wine broth.
Beef Bulgogi (Korean BBQ Beef)
With our bulgogi recipe, you can easily make incredible Korean barbecue beef at home. Thanks to our bulgogi marinade, the beef turns out perfectly sweet, savory, and melt-in-your-mouth tender.
Oven Baked Ribs
This is hands down the best ribs recipe! The secret to incredibly tender ribs is baking them low and slow. Baking ribs in the oven is so easy. 95% of the cooking time is spent relaxing while your ribs transform into fall-off-the-bone perfection.
Easy Ground Beef Tacos
Super quick dinner! Our family makes this beef taco recipe once a week. It calls for lean ground beef and a simple blend of pantry spices. One of my favorite 20-minute dinners, and the entire family loves it!
The Best Juicy Skillet Pork Chops
Say goodbye to dry and flavorless pork chops. With our easy recipe and my simple tricks, you can make juicy and tender pork chops with very little fuss. I love how juicy these are!
Best Juicy Pork Tenderloin
Say goodbye to dry and flavorless pork. With my easy pork tenderloin recipe, it turns out juicy and tender in under 30 minutes.
The Best Pork Loin Roast
This roasted pork loin recipe has the most delicious honey soy glaze. The pork turns out juicy, tender, and so flavorful.
Crispy Pork Milanese
This pork milanese recipe is all about tender, juicy pork with a light, crispy breading. It’s easier than you might think and turns out absolutely delicious every time.
Easy Ground Pork Tacos
Thanks to ground pork, this pork tacos recipe comes together fast. You can even make the filling in advance. This is one of my favorite ground pork recipes!
Best Turkey Meatloaf
This is hands down the best turkey meatloaf recipe I’ve ever made. It’s outrageously flavorful and unbelievably moist. Say goodbye to dry meatloaf!
Ground Turkey Tacos
Our family makes this ground turkey tacos recipe almost weekly! We all love it, and it takes less than 30 minutes. A true weeknight dinner!
Creamy White Turkey Chili
This white turkey chili recipe is pure comfort in a bowl. It’s creamy, cozy, and packed with ground turkey, white beans, and a velvety, perfectly spiced broth. Not too heavy, just really, really tasty.
Turkey Meatball Soup with Orzo
This light and savory turkey meatball soup recipe is made with tender mini meatballs, orzo, and fresh kale. It’s simple, nourishing, and just delicious.
Perfect Seared Scallops
Learn how to cook restaurant-worthy scallops at home. Our recipe guarantees beautiful golden-brown seared scallops and comes together in 10 minutes!
Garlic Shrimp Scampi
Our shrimp scampi recipe made with garlic, butter, white wine, and lemon feels fancy but is actually super quick and easy. It’s basically the best garlic butter shrimp you’ll ever make.
Easy Oven Baked Trout
Learn how to cook moist, flaky trout in the oven.This incredible baked trout recipe is easy and works for rainbow trout but can easily be adapted for larger varieties like steelhead.
Brown Sugar Baked Salmon
This brown sugar baked salmon recipe is such a delicious and easy one-pan dinner. Our easy brown sugar rub caramelizes and turns into a sweet, smoky glaze in the oven.
The Best Cajun Shrimp
This cajun shrimp recipe is outrageously flavorful and easy! We cook the shrimp in a hot skillet, and then swirl in the most delicious garlic cajun butter.
Salmon Burgers
These incredible salmon burgers are made with fresh salmon, lemon, and plenty of dill. They’re moist in the middle, packed with flavor, and so easy to make. I think you’ll love them as much as we do!
Bang Bang Shrimp
This Bang Bang shrimp with light, crispy fried shrimp tossed in the easiest homemade Bang Bang sauce makes us so happy. Crispy, creamy, a little sweet, and just the right amount of heat.
Quick Shrimp Stir Fry
Fast dinner idea! This shrimp stir fry recipe is fast, easy, and unbelievably delicious. Ready in 20 minutes with juicy shrimp, crisp veggies, and a crave-worthy homemade sauce.
Perfect Poached Salmon
I’m convinced this poached salmon makes some of the most tender, mouth-watering salmon. It’s also ridiculously easy!
Creamy Mac and Cheese
If you love creamy mac and cheese, this is the recipe for you! It’s rich, delicious, and thanks to a simple homemade cheese sauce, it’s on your table in under 30 minutes.
Best Zucchini Noodles We’ve Made
This is my favorite zucchini noodles recipe (zoodles)! It’s quick, easy, low-carb, and vegetarian-adaptable!
The Best Cheese Lasagna
My family loves this easy cheese lasagna! It’s rich, incredibly cheesy, and absolutely delicious. Best of all, you can assemble it in about 20 minutes.
Easy Orzo Pasta Salad
We love this easy orzo pasta salad recipe with a simple lemon dressing, tomatoes, cucumber, and fresh herbs. It’s quick and always a hit with everyone I share it with! The perfect no-cook dinner.
Easy Veggie Spaghetti
We love this easy vegetable spaghetti recipe! With over 1 ½ pounds of vegetables, this veggie pasta is so good that we could honestly eat it every day.
Easy Avocado Pasta
You can make our avocado pasta recipe in 15 minutes and you don’t need any special equipment for the creamy avocado sauce, just a bowl and fork.
Pasta Primavera
This incredible pasta primavera recipe is light, fresh, and made with lots of seasonal vegetables tossed in a light, lemon cream sauce.
The Best Veggie Burger
This is the most delicious veggie burger recipe. They taste amazing and are packed with vegetables (nearly 1 cup of veggies in every patty).
Perfect Baked Tofu
My family loves this crispy baked tofu recipe! It might be my favorite way to cook tofu and you can add it to your favorite stir-fry, rice bowls, or curries.
Perfect Cheese Pizza
Pizza for dinner! My family loves this homemade cheese pizza! Made with two types of cheese, it’s been on repeat in our home for years. This extra cheesy pizza is perfect for any pizza lover and occasion.
Easy Three Ingredient Tomato Soup
This easy tomato soup recipe is the best you’ll ever make, and it’s shockingly simple. It calls for just three main ingredients: butter, onion, and tomatoes.
Easy Vegetable Soup
I love this vegetable soup recipe! It’s made with a light tomato broth and packed with healthy veggies. It’s so comforting and satisfying!
Homemade Vietnamese Pho
This Vietnamese pho recipe is made with an authentic broth made from scratch using charred ginger, onion, fennel, clove, star anise, cardamom, and cinnamon.
Our Favorite Minestrone Soup
This is, hands-down, our favorite minestrone soup recipe. It’s packed with veggies, beans, and pasta, all swimming in the coziest tomato-Parmesan broth. We can’t get enough of it.
Minestrone Soup with Sausage
This minestrone soup recipe with sausage is always a happy sight at our dinner table. It’s packed with loads of veggies and made with a light, cozy tomato-Parmesan broth. It’s so good.
Easy Cabbage Soup
This cabbage soup is easy to make and loaded with vegetables, a heaping pile of cabbage, and the perfect blend of spices. I love it so much that I genuinely crave it.
Easy Tortellini Soup
We love this cozy tortellini soup! It’s filled with tender veggies, store-bought tortellini, and a garlicky broth that’s ready in just 30 minutes.
Easy Thai Green Curry
I’d happily eat this unbelievably flavorful Thai green curry made with chicken, coconut milk, and veggies every week.
Sauerkraut Soup
Our homemade sauerkraut soup, made with kielbasa and bacon, is smoky, tangy, and incredibly comforting.
Shrimp Carbonara
We love this delicious shrimp carbonara which features perfectly cooked shrimp tossed with spaghetti in a silky sauce.
Pasta Carbonara
This is our favorite pasta carbonara recipe! We rely on a short list of ingredients to make an impossibly silky sauce that only takes about 15 minutes. You’ll love this one!
Spaghetti and Meatballs
This homemade spaghetti and meatballs is a keeper. The meatballs are tender and flavorful, and the quick sauce tastes like it’s been simmering for hours.
Easy Chicken Alfredo
This chicken Alfredo combines juicy chicken, fettuccine noodles, and a rich, unbelievably good sauce.
For more cooking inspiration, join our free newsletter and get our best seasonal recipes delivered straight to your inbox. Click here to join. Happy cooking!
]]>0adminhttps://recipeparadise.com<![CDATA[What To Cook In June In USA]]>https://recipeprofessional.com/what-to-cook-in-june-in-usa/2026-06-05T12:22:46Z2026-06-05T12:22:46Z
Discover what to cook in June in the USA, Canada, UK, and Europe with seasonal foods, easy summer recipes, and fresh meal ideas for what’s at its peak right now.
If you’re in the Northern Hemisphere and wondering what to cook in June, this is when things really start to open up in the kitchen.
It’s the beginning of summer — and with it comes that first flush of produce that actually tastes like something. Strawberries that are genuinely sweet, zucchini that appears practically overnight, cherries that don’t need anything done to them at all.
For me, June cooking is about keeping it fresh and simple. Lighter meals, faster cooking, more salads and grilled things, and dishes that don’t require hovering over a hot stove. The grill becomes your best friend. One-pan dinners that come together in 20 minutes are suddenly everywhere. My Ninja Creami is back on the countertop.
If the heavier winter months felt like a bit of a cooking rut, this is a really good reset.
What’s In Season In June (USA, Canada, UK & Europe)
Here’s what to look for at the shops and farmers’ markets right now:
Vegetables
Zucchini (courgette) – starting to come in strong and only getting more abundant
Asparagus – still going in early June before it fades; make the most of it
Broad beans (fava beans) – a real treat if you can find them
Spinach – fresh and leafy; use it raw in salads or wilt into everything
Lettuce & salad greens – at their crispest and most abundant
Radishes – crisp and peppery; great in salads and slaws
Spring onions (scallions) – mild, versatile, good in pretty much anything
Fennel – great raw in salads or slow-braised
New potatoes – tender and sweet, best simply boiled or roasted
Zucchini flowers – if you’re near a good market, snap these up
Cucumbers – starting to appear toward the end of June
Carrots – reliable year-round but sweet and fresh right now
Fruit
Strawberries – peak strawberry season; keep it simple
Cherries – they have a short window; eat them as fast as you can
Blueberries – coming in toward the end of June
Raspberries – just starting to appear
Apricots – beginning of stone fruit season
June produce is all about freshness, sweetness, and speed. Most of it needs very little done to it.
How To Cook In June (The Summer Approach)
In June, I naturally shift toward:
Grilling and charring — quick, adds flavor, and keeps the kitchen cool
Quick sautéing and pan-frying — fast meals that don’t require much fuss
Big salads that work as a main meal — especially with protein added
Minimal cooking, maximum flavor — good olive oil, fresh herbs, acid
Throw-together bowls – chicken bowls, tofu bowls, steak bowls with seasonal toppings and a bright sauce
Smoothies, ice cream, and popsicles – blend fruit and berries into something cold and delicious
I use the oven far less and the outdoor grill or stovetop far more. I’m also making more use of dressings, herb sauces, and fresh finishes — a good pesto, a quick tahini, a lemon-herb vinaigrette. The goal is meals that feel light and satisfying at the same time.
What To Cook With Zucchini in June
Zucchini is the vegetable of June. It starts appearing in earnest this month and will only get more prolific — so now is a good time to get comfortable cooking with it.
Quick ways I use zucchini:
Sautéed with garlic and lemon as a fast side
Sliced into ribbons for a raw zucchini salad
Turned into noodles (zoodles) with pesto or marinara
Tossed into pasta or grain bowls
Baked in a slice or frittata
What To Cook With Strawberries in June
Strawberries in June are genuinely sweet — a different thing entirely from the ones you get off-season. They’re at their absolute peak and don’t need much.
Simple ideas:
A big bowl of fresh strawberries with good yogurt and a drizzle of honey
Sliced over oats or overnight oats
Into a summer salad with arugula, goat cheese, and balsamic
Roughly mashed and stirred into whipped cream for an easy dessert
Macerated with a little sugar and lemon and spooned over ice cream
Resist the urge to do too much. The best strawberry dish in June is a bowl of them, still warm from the market.
Fresh Salads for June
June is when I stop thinking of salads as a side and start making them the main. A proper summer salad with protein and texture can be a really satisfying dinner.
Grilling Ideas for June
June is when I start thinking of the grill as a proper cooking method rather than a weekend treat. It’s fast, it adds flavor you can’t replicate indoors, and it keeps the kitchen cool.
Things I love grilling in June:
Zucchini halves — brushed with olive oil and a little chili
Asparagus — high heat, 5 minutes, and it’s done
Chicken thighs — marinated overnight and grilled for about 20 minutes
Skewers/kabobs — pork, chicken, beef, shrimp, veggies – marinated in lemon, herbs, and garlic or something more exciting
Easy Weeknight Dinners for June
Not every June dinner needs to involve the grill. These are quick stovetop or oven meals I lean on when I want something solid without much effort:
Early Berries: What To Do With Them
Blueberries and raspberries are just starting to come in toward the end of June. When they hit the market fresh, they’re very different from the ones you’ve been getting all year.
A few quick ideas:
Toss into overnight oats or chia puddings for breakfast
Stir into yogurt with a little honey and granola
Bake into muffins or a quick fruit crumble
Blend into a smoothie with some frozen banana and milk
Keep in a little jar in the fridge and eat by the handful
Early-season berries are often more tart than later in summer — balance with a little sweetness if you’re baking.
June Meal Planning Tips
A few principles I come back to in June:
Keep a bowl of fresh fruit on the counter — strawberries and cherries eaten this way are the best version of themselves
Use fresh herbs generously — basil, mint, dill, and parsley are abundant; throw them into everything
Make dressings ahead — a good lemon vinaigrette or tahini sauce in the fridge means every salad takes 5 minutes
Don’t underestimate simple — a piece of grilled chicken, a salad, some good bread. That’s dinner. It doesn’t need to be more than that
More June Cooking Inspiration
What are you cooking this June? Drop it in the comments below or tag me on Instagram @cookedandloved — I love seeing what you’re making!


 Overview |
  Meatballs & Patties |
  Stir-Fries & Noodles |
  Rice Bowls & Salad Bowls |
  Comfort Food, Pasta & Cozy Dinners |
  Tex-Mex & Tacos
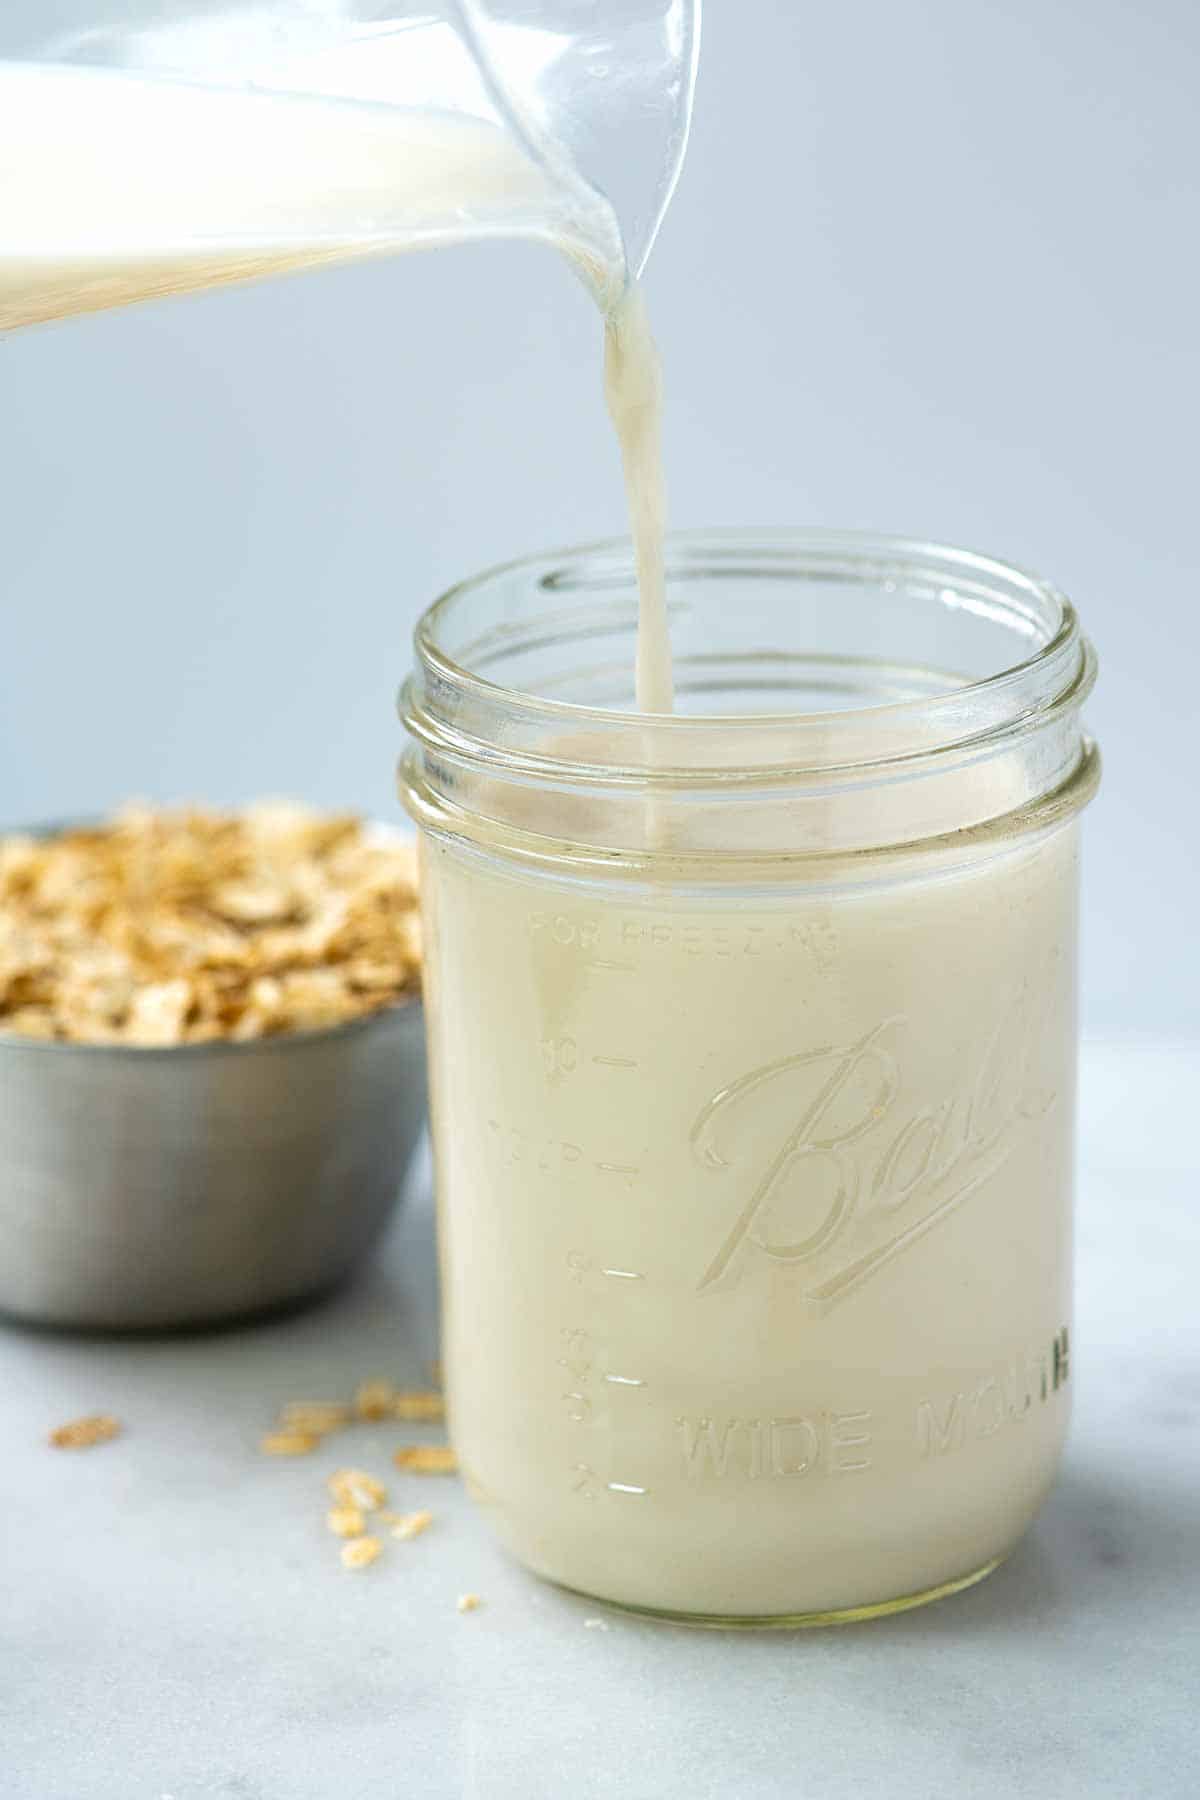
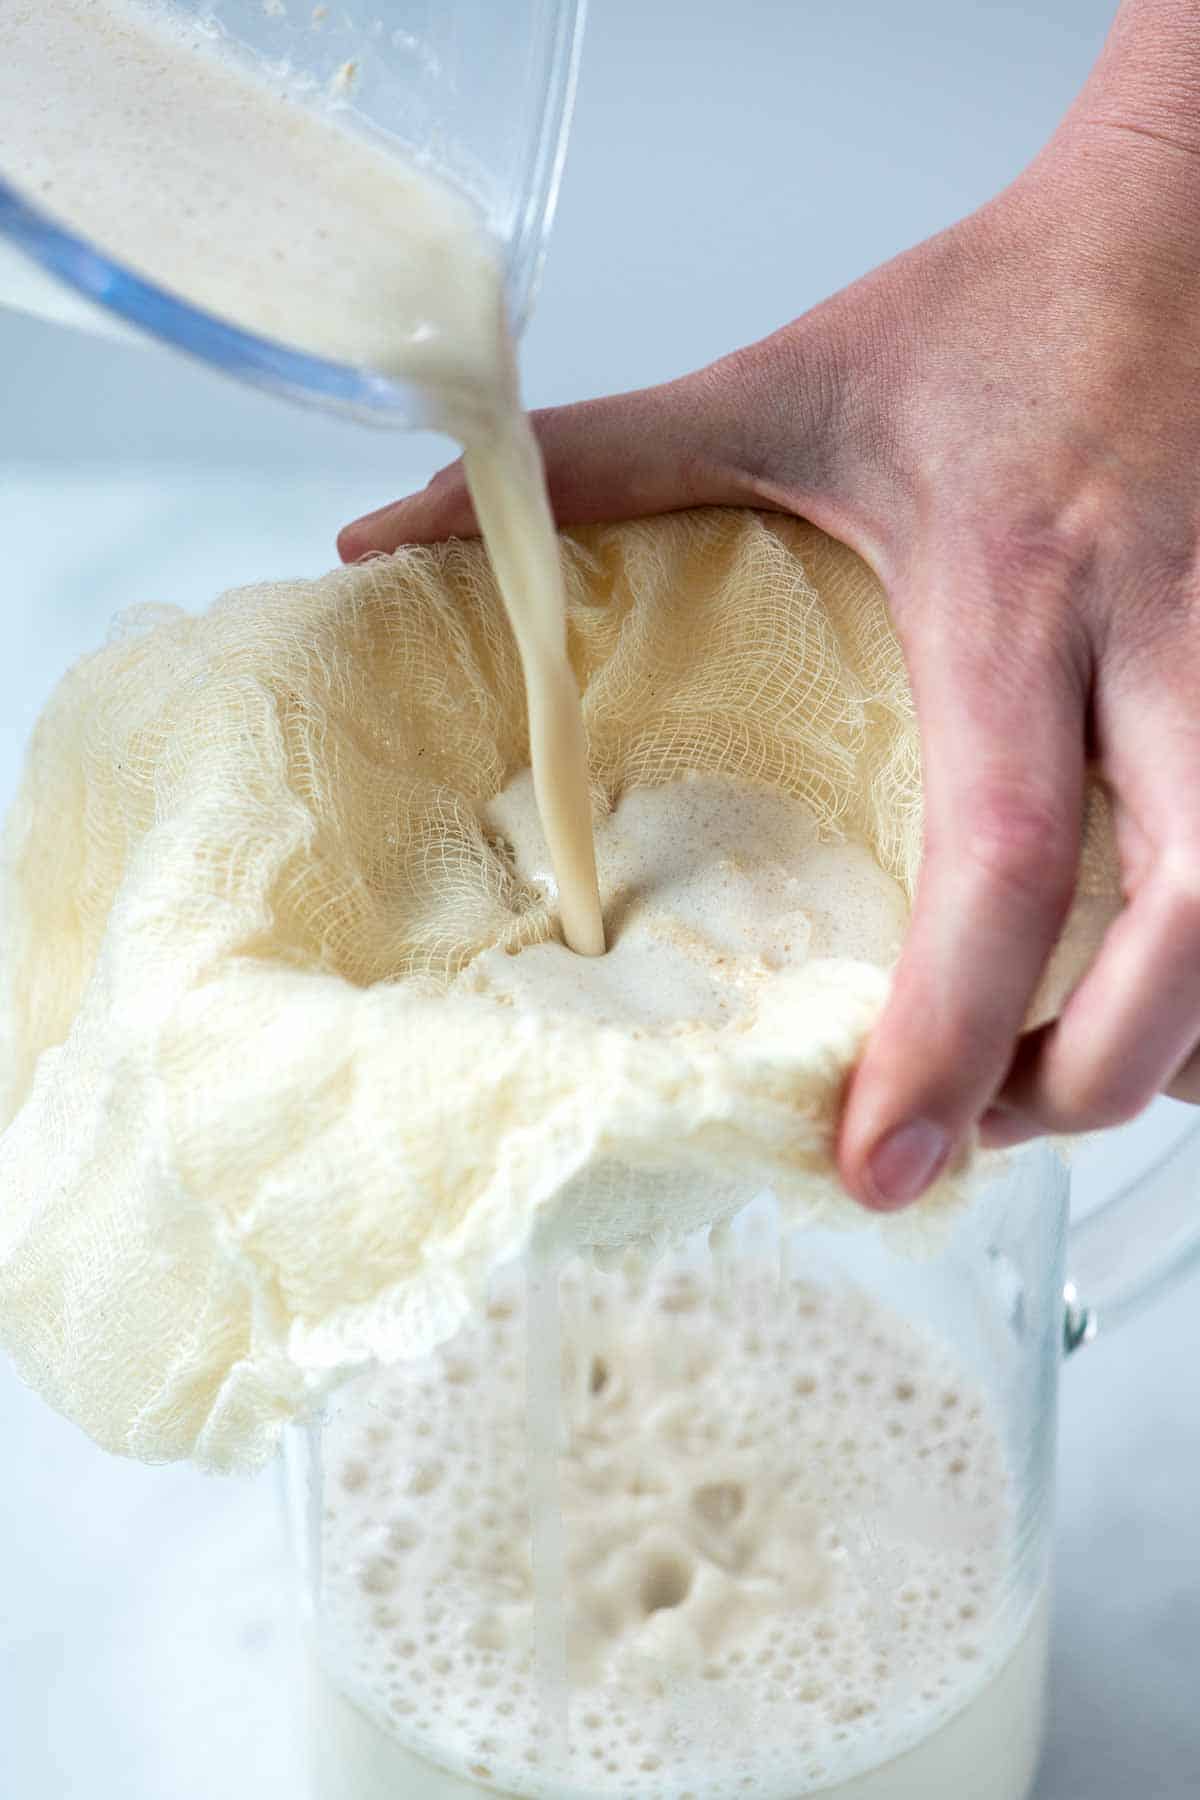
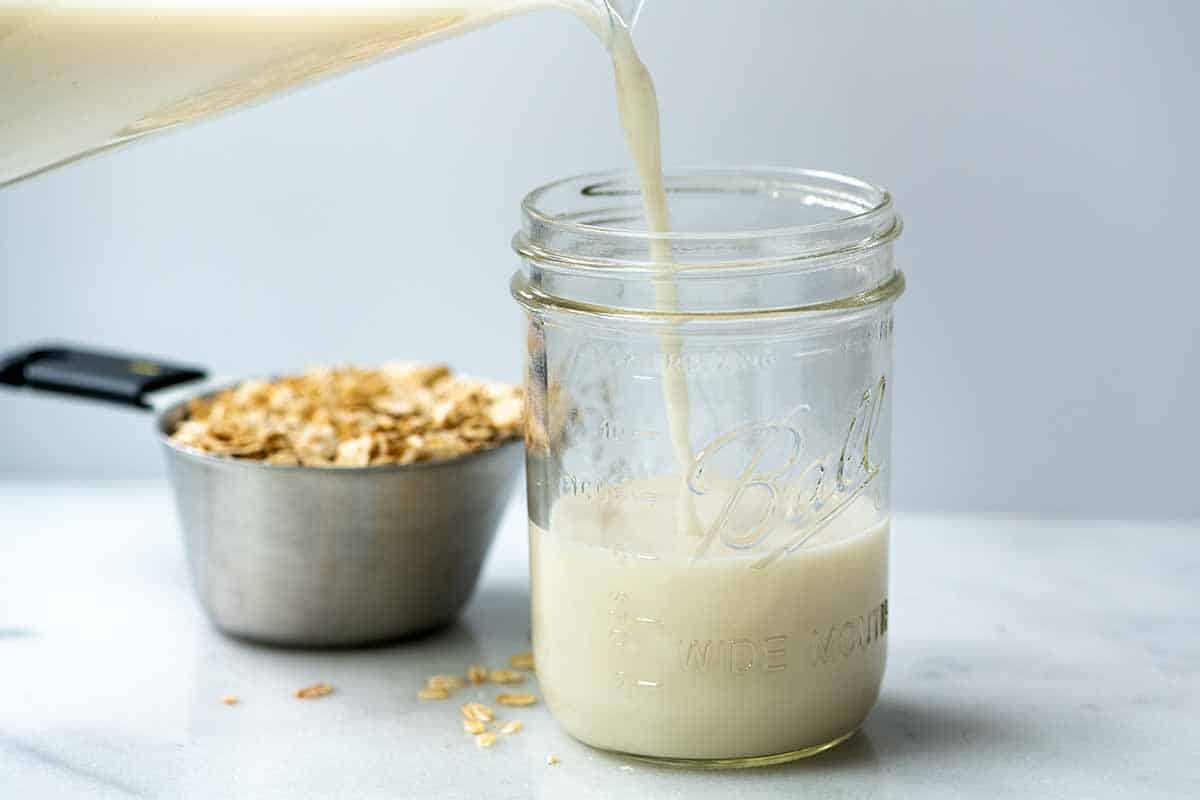

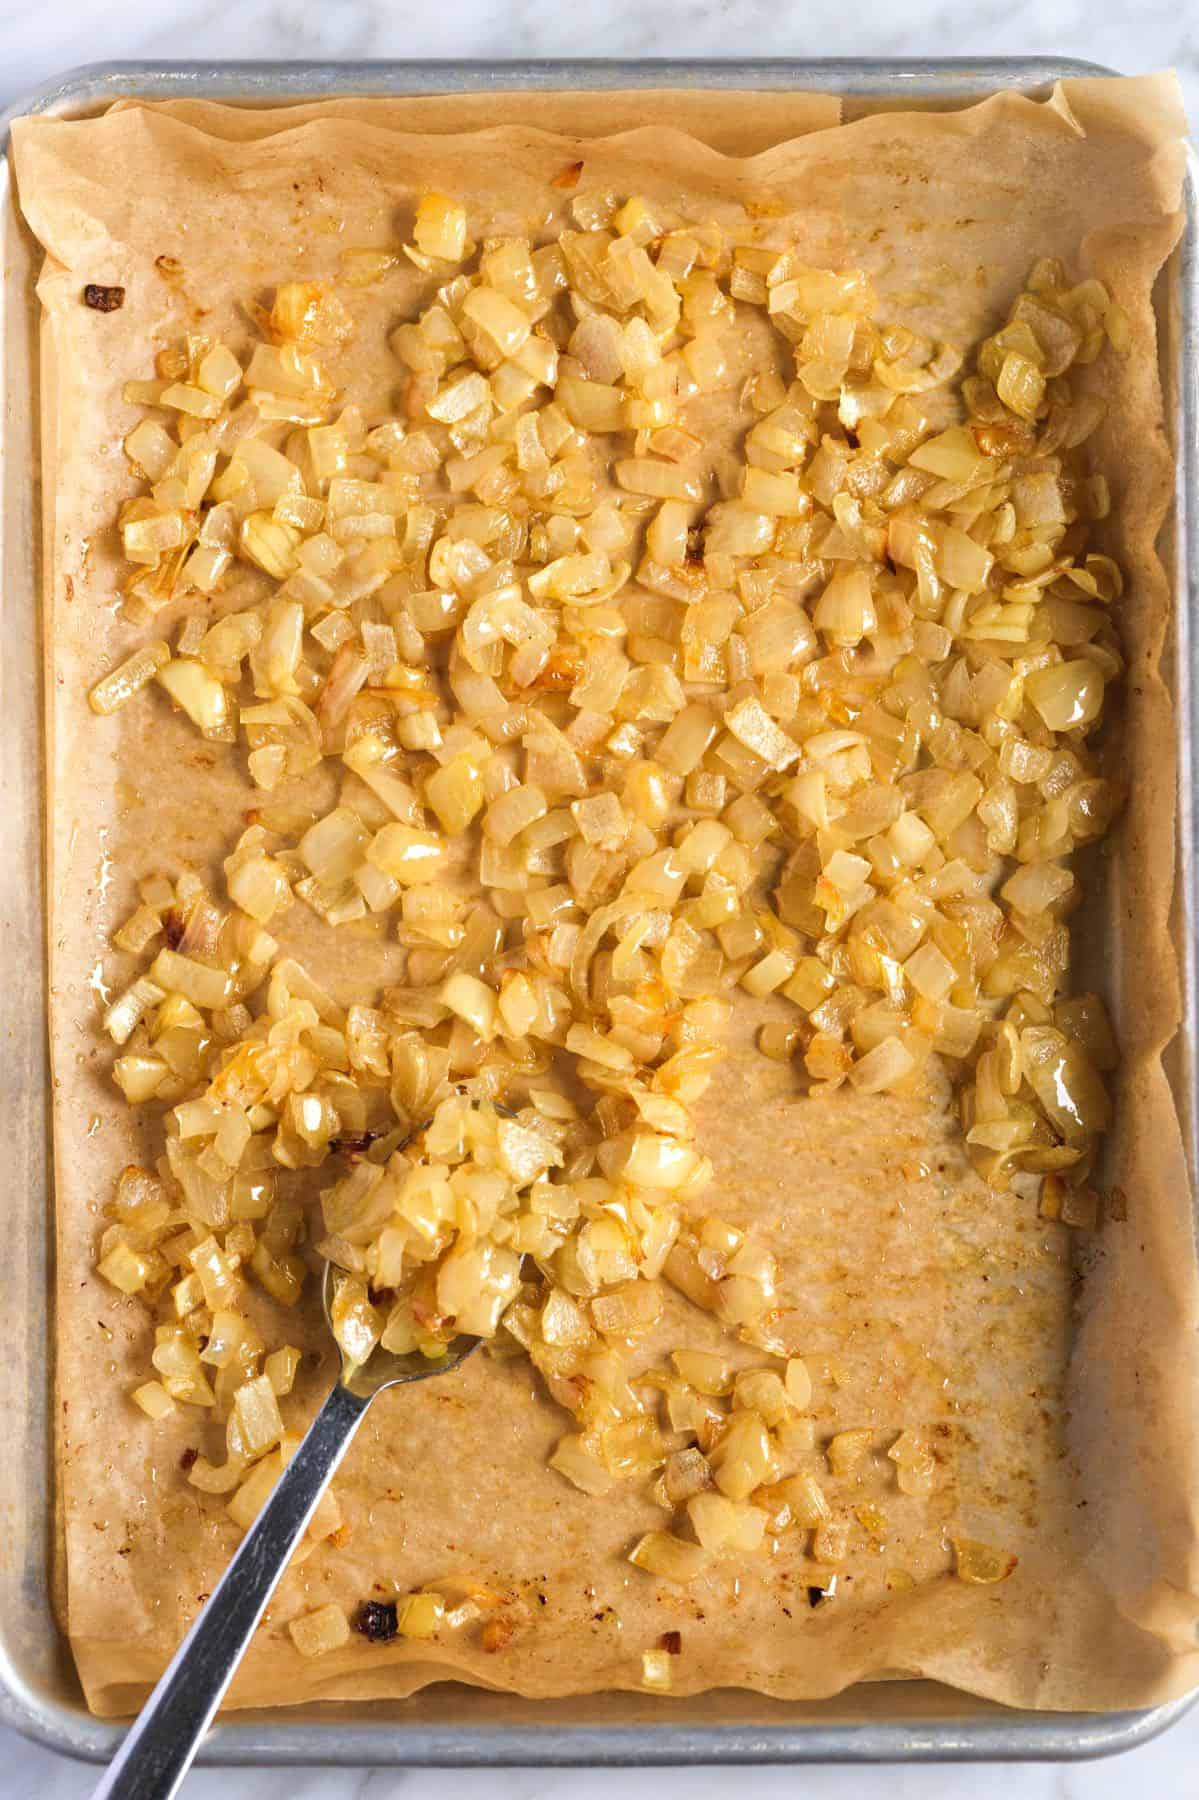


 Ingredients |
  How To Make |
  Watch The Video |
  Recipe Tips |
  Serving Suggestions |
  Full Recipe Card |
  More Rice Bowl Recipes
 Ready In: 30 minutes
 Diet: Dairy-free option, gluten-free option (use tamari), high-protein, healthy
 Nutrition Highlights: High in lean protein and healthy fats; naturally balanced meal with complex carbs, greens, and fiber
 Main Ingredients: Shrimp, sushi rice, mango, avocado, edamame, cucumber, Sriracha, mayo, garlic, soy sauce, butter.
 Flavor Profile: Savory, garlicky, buttery shrimp with bright tropical freshness and a creamy, spicy-tangy drizzle
 Meal-Prep Friendly: Store components separately in the fridge for up to 2 days; add avocado fresh when serving
 If you’ve tried this shrimp poke bowl or any other recipe on the blog then don’t forget to rate the recipe and let me know how you got on in the comments below, I love hearing from you! You can also FOLLOW ME on Instagram, Facebook, Pinterest, YouTube, and or sign up to my Newsletter to see more of my delicious food.


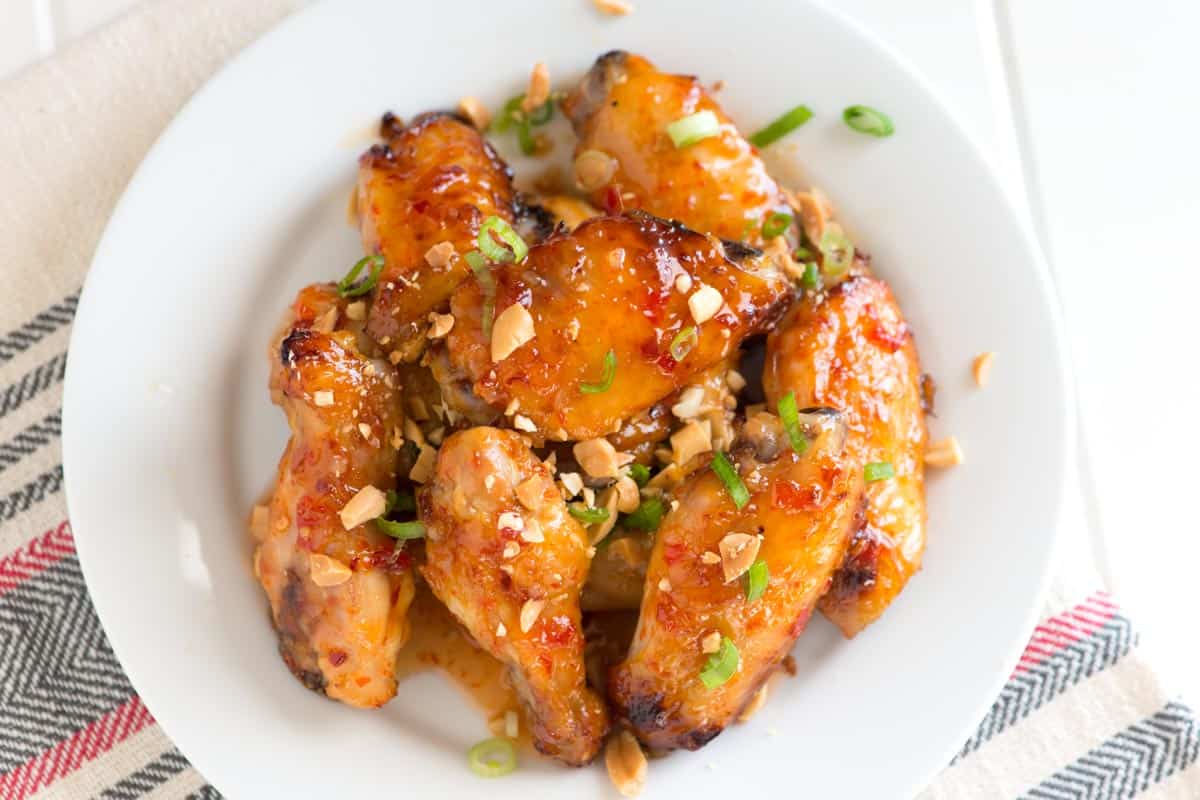


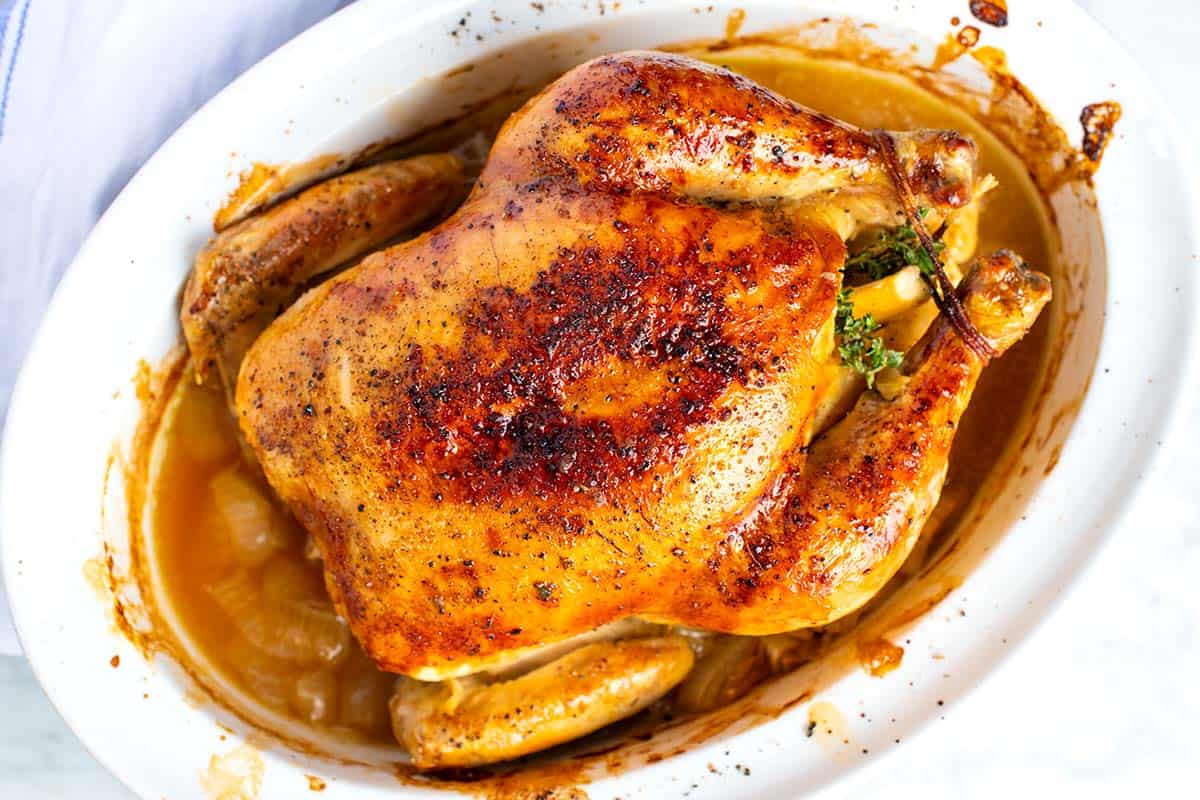
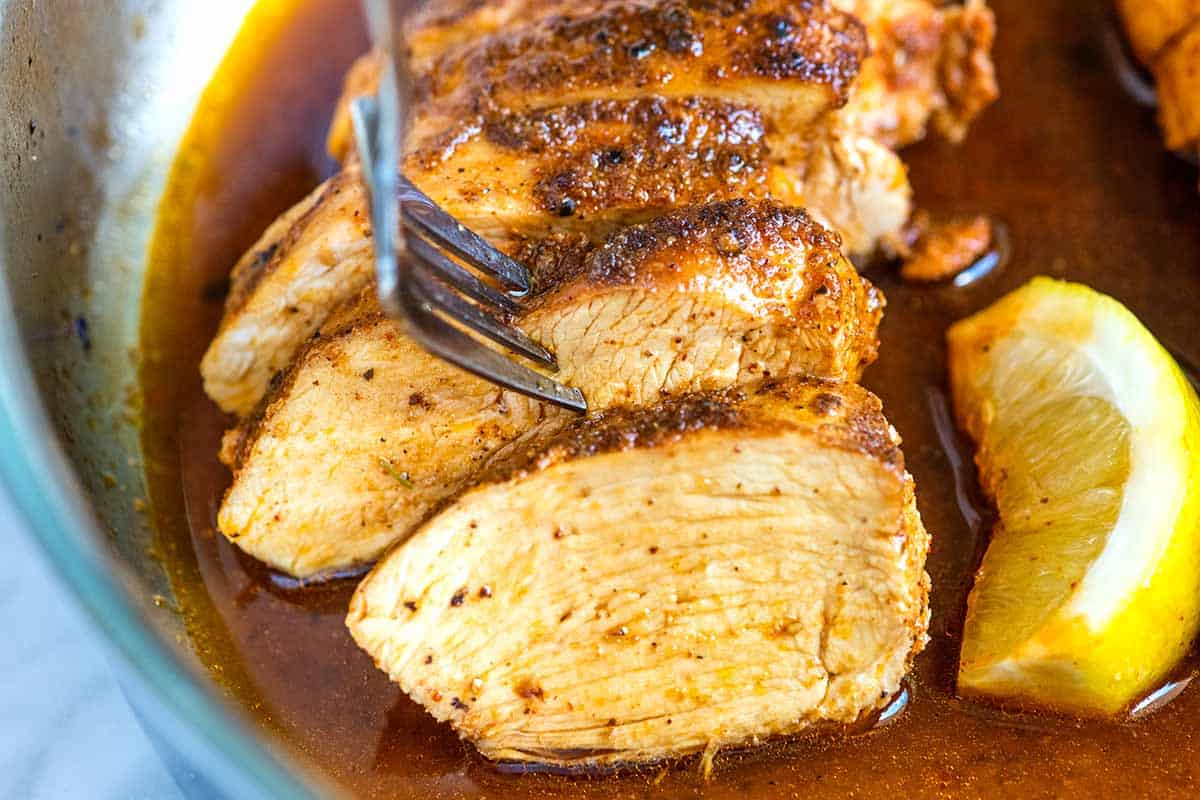


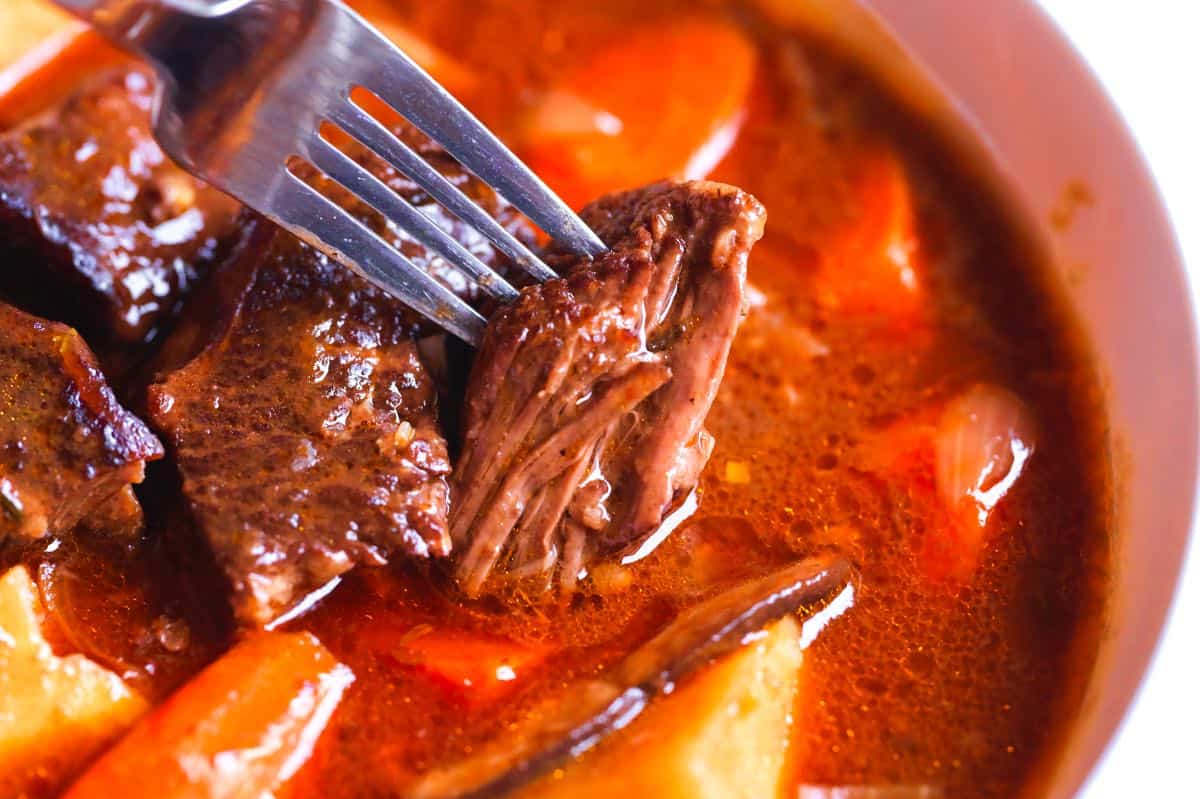

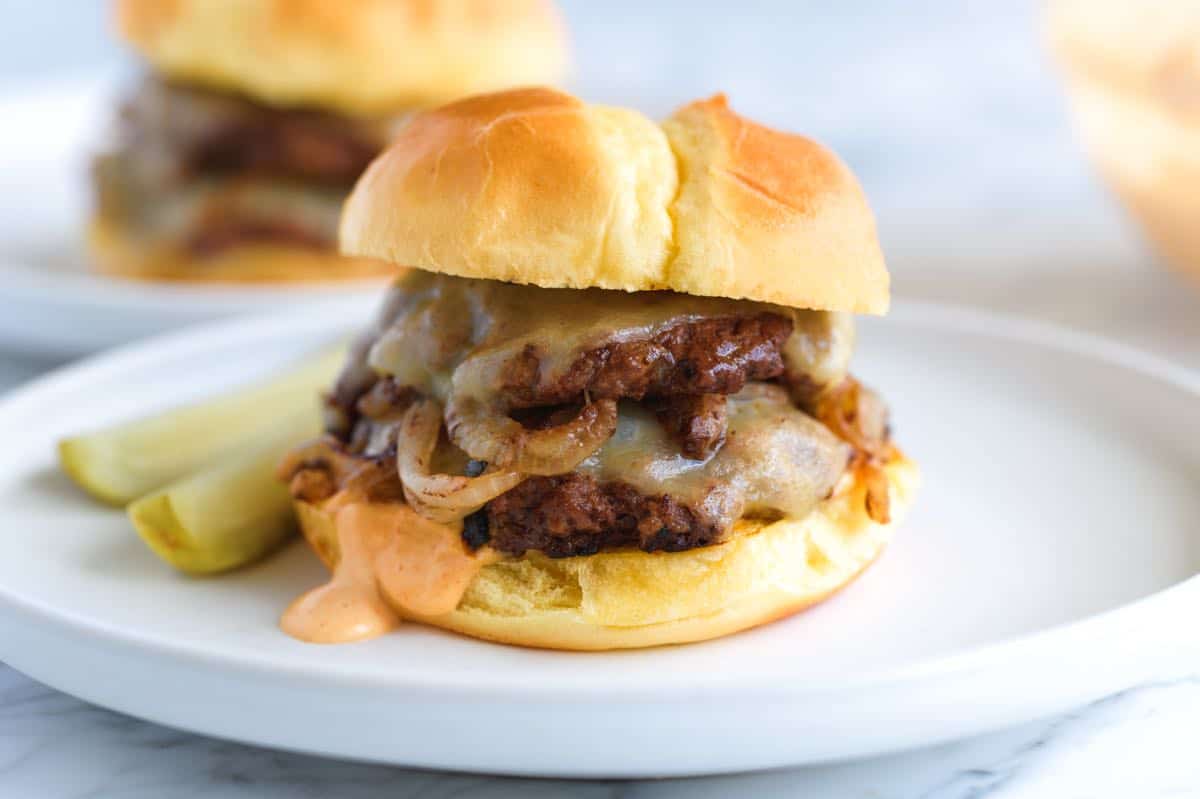


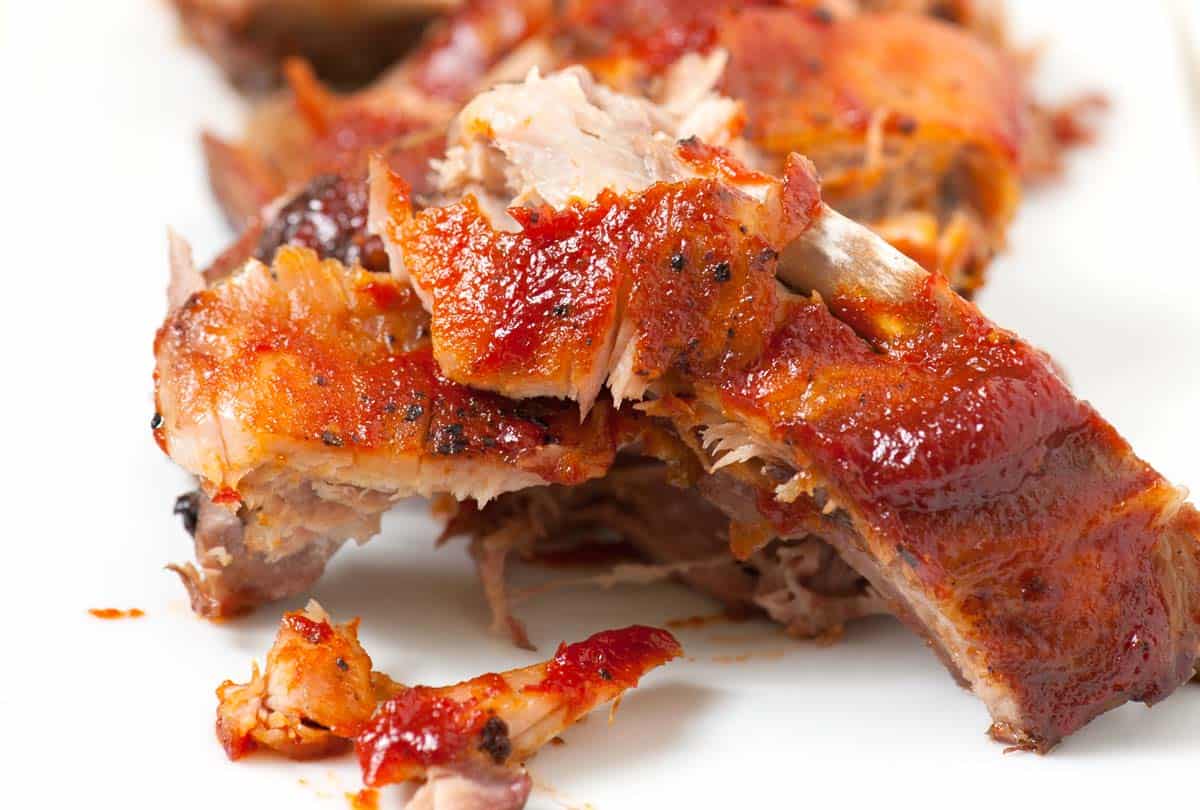


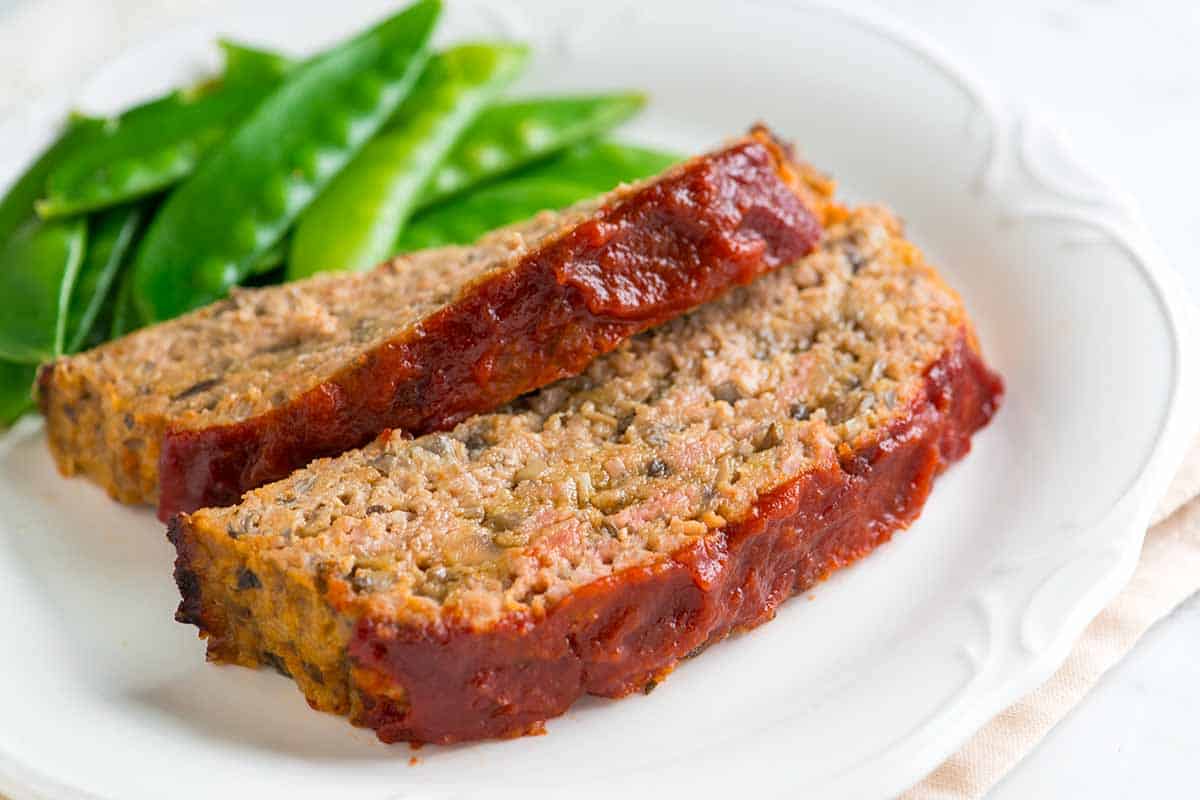


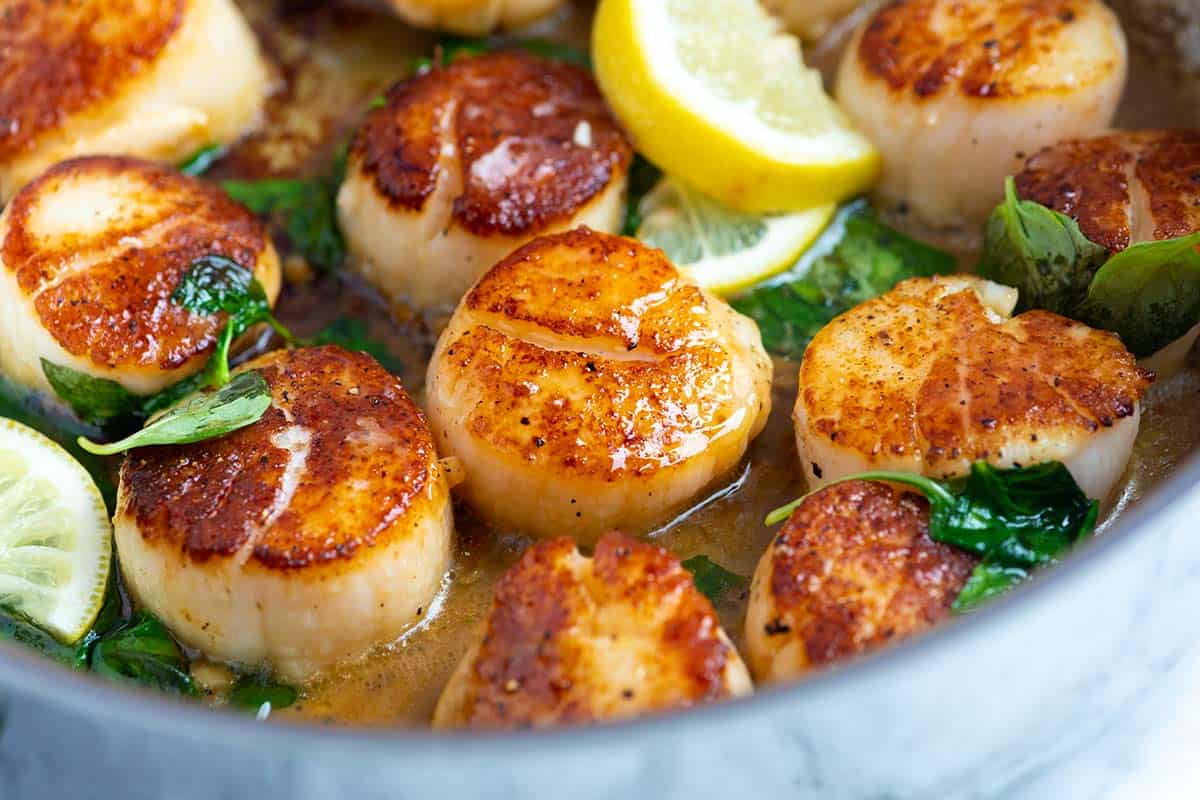
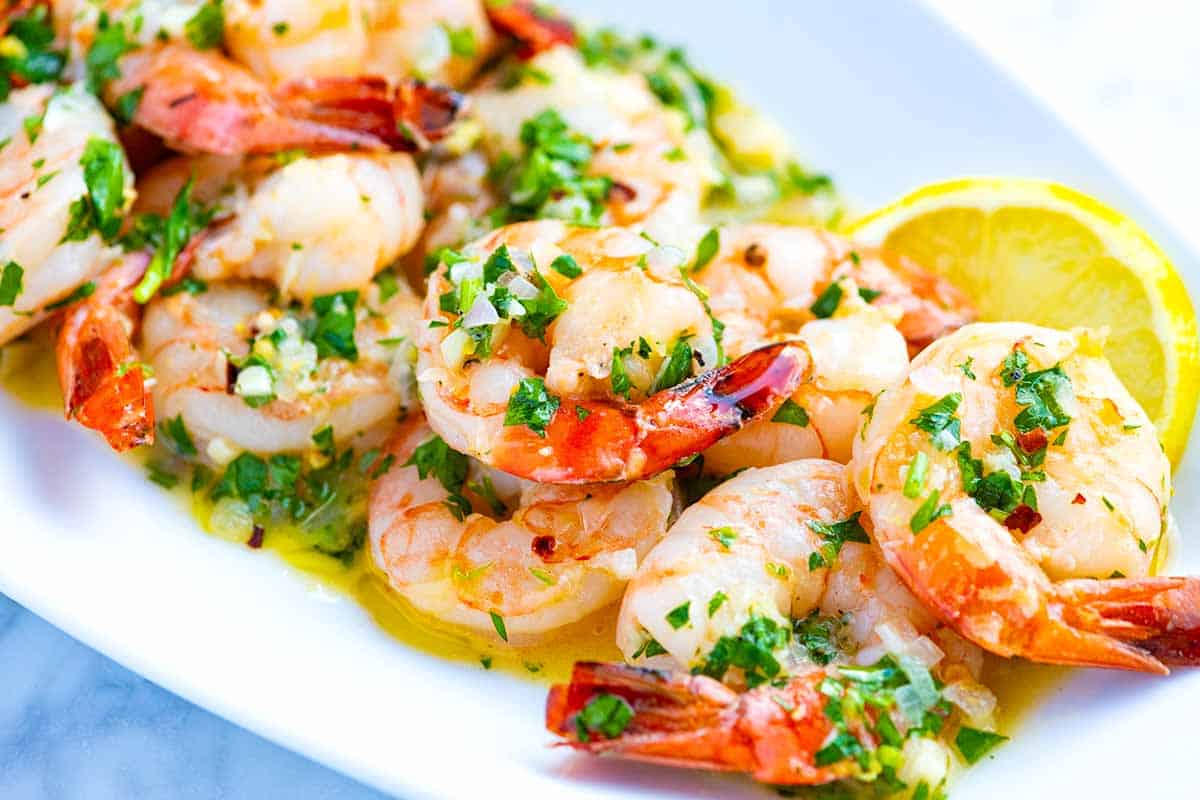
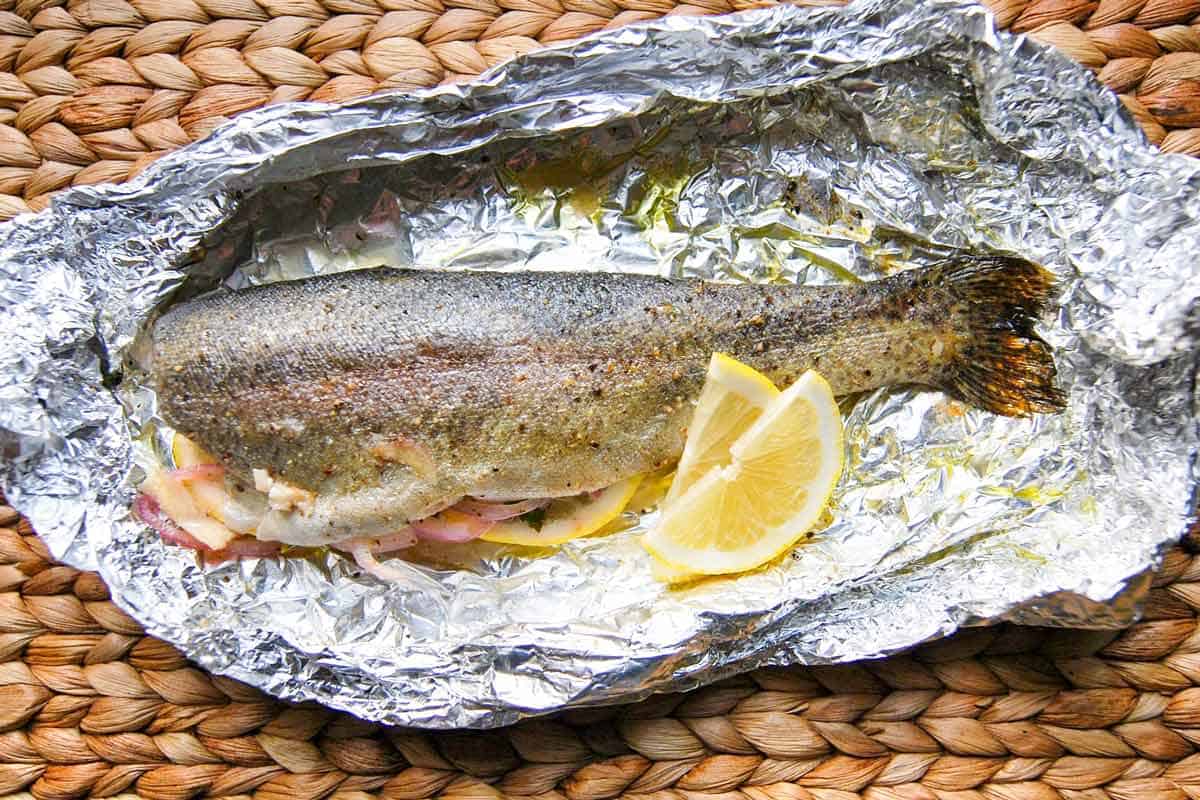
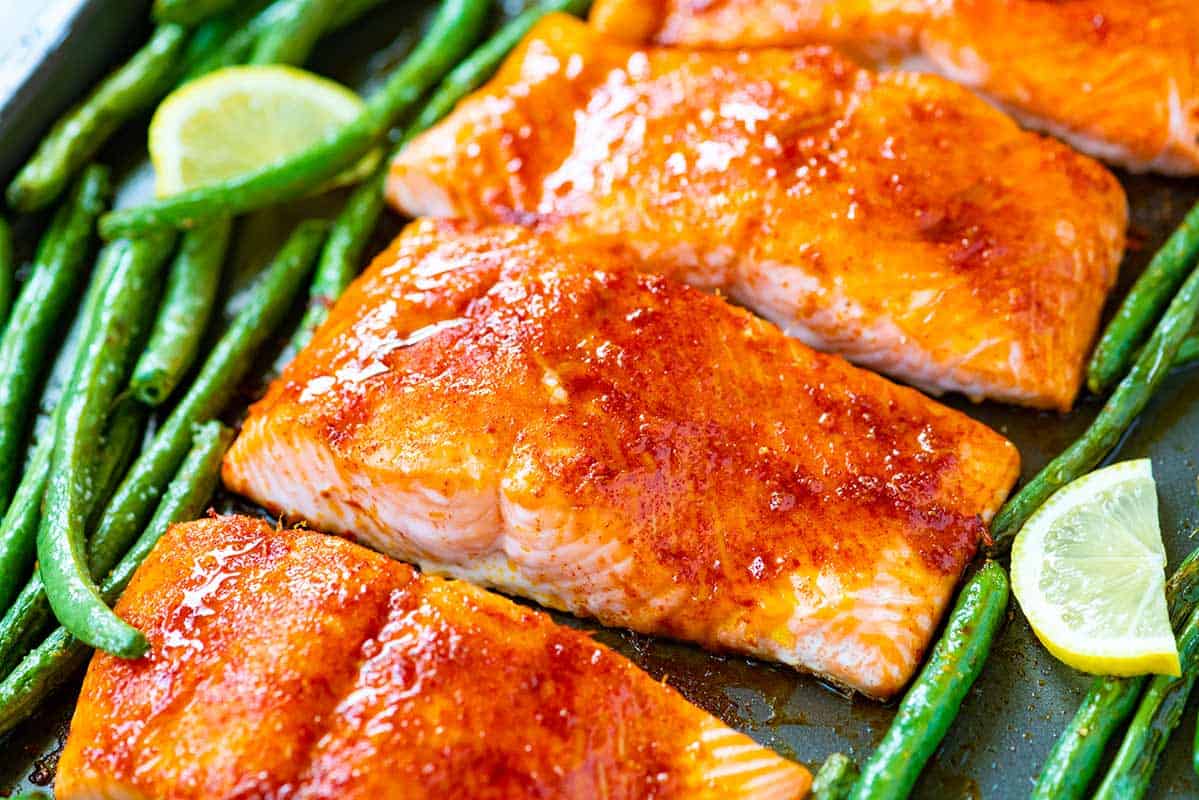


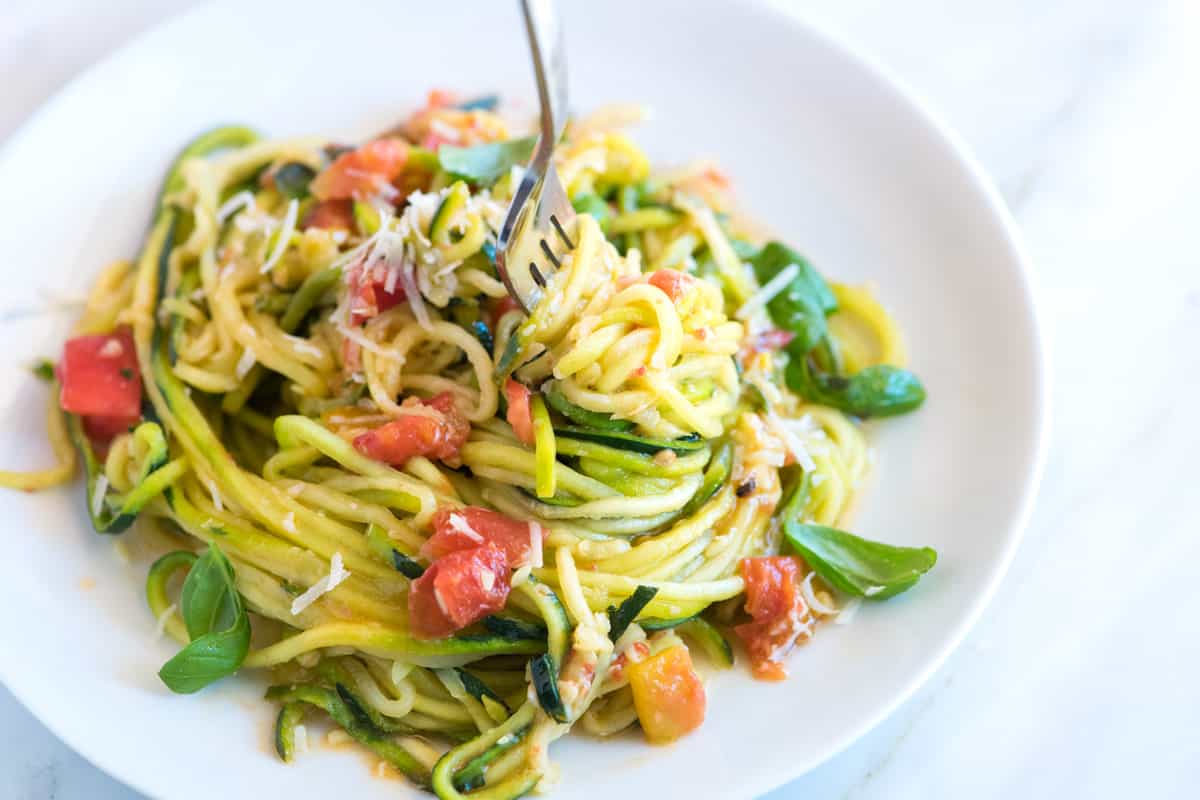


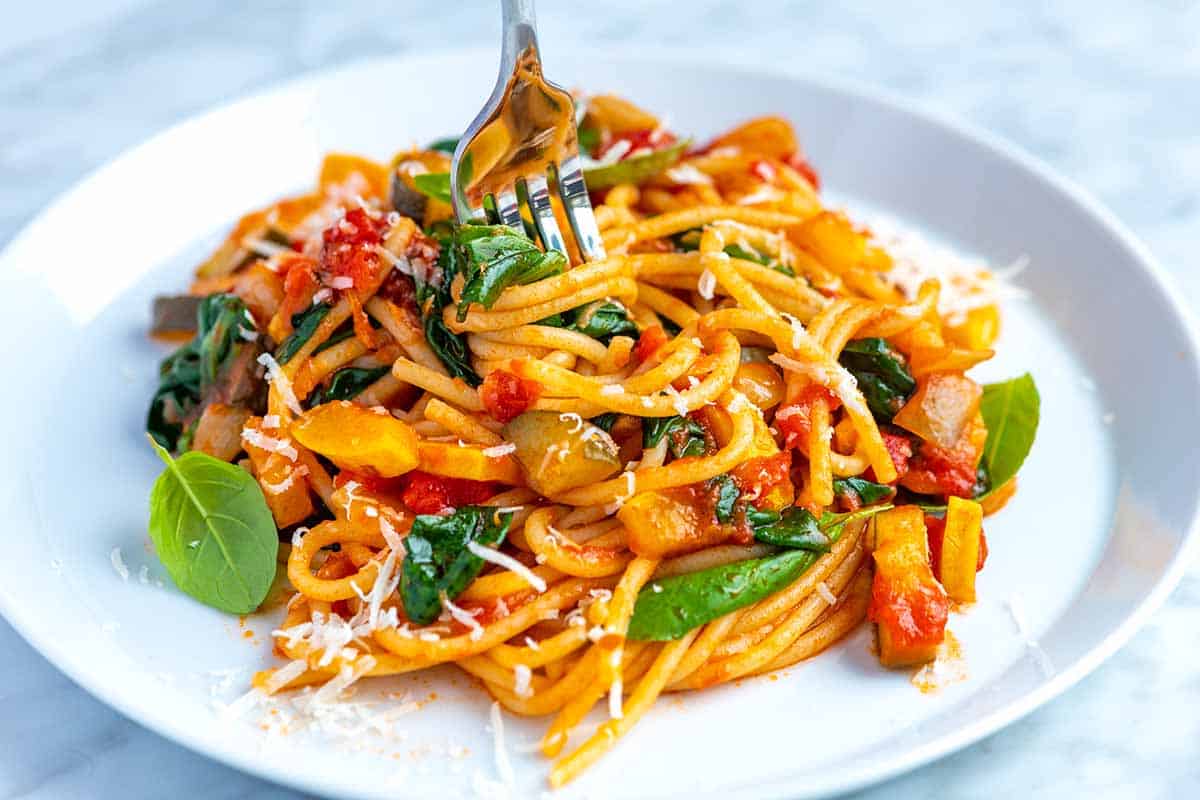


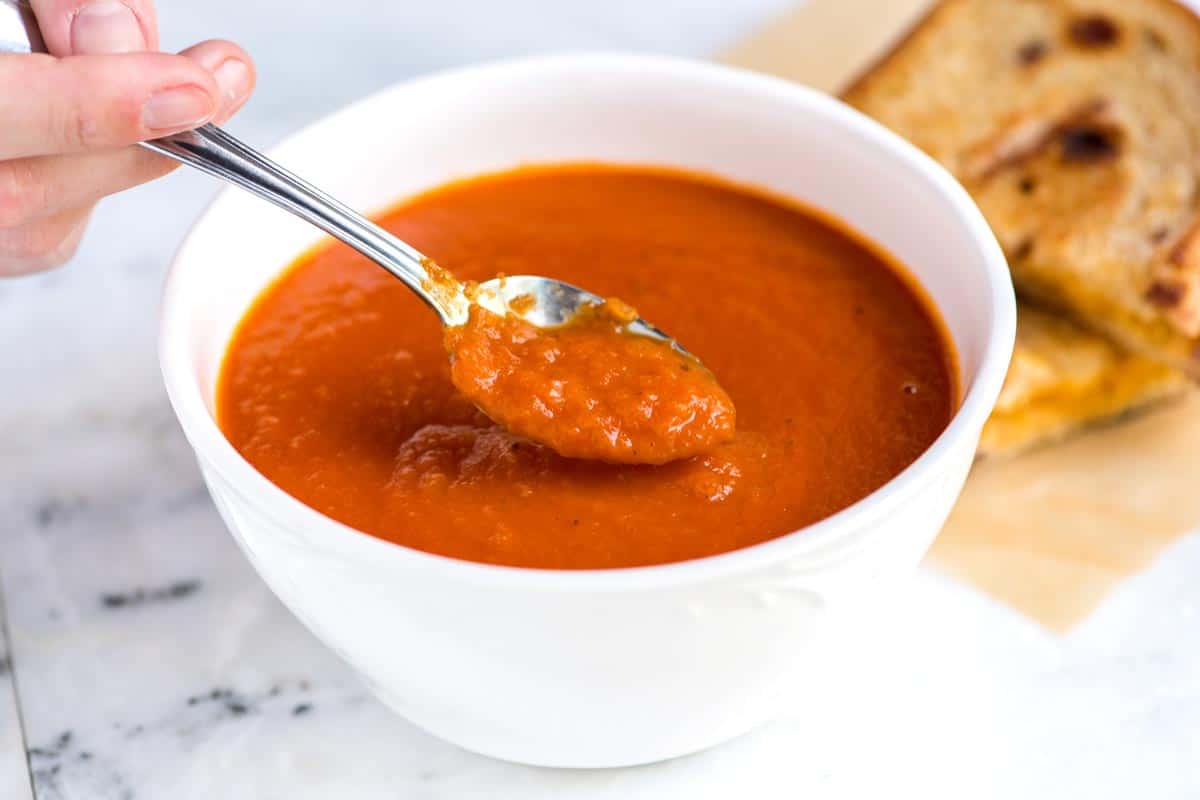
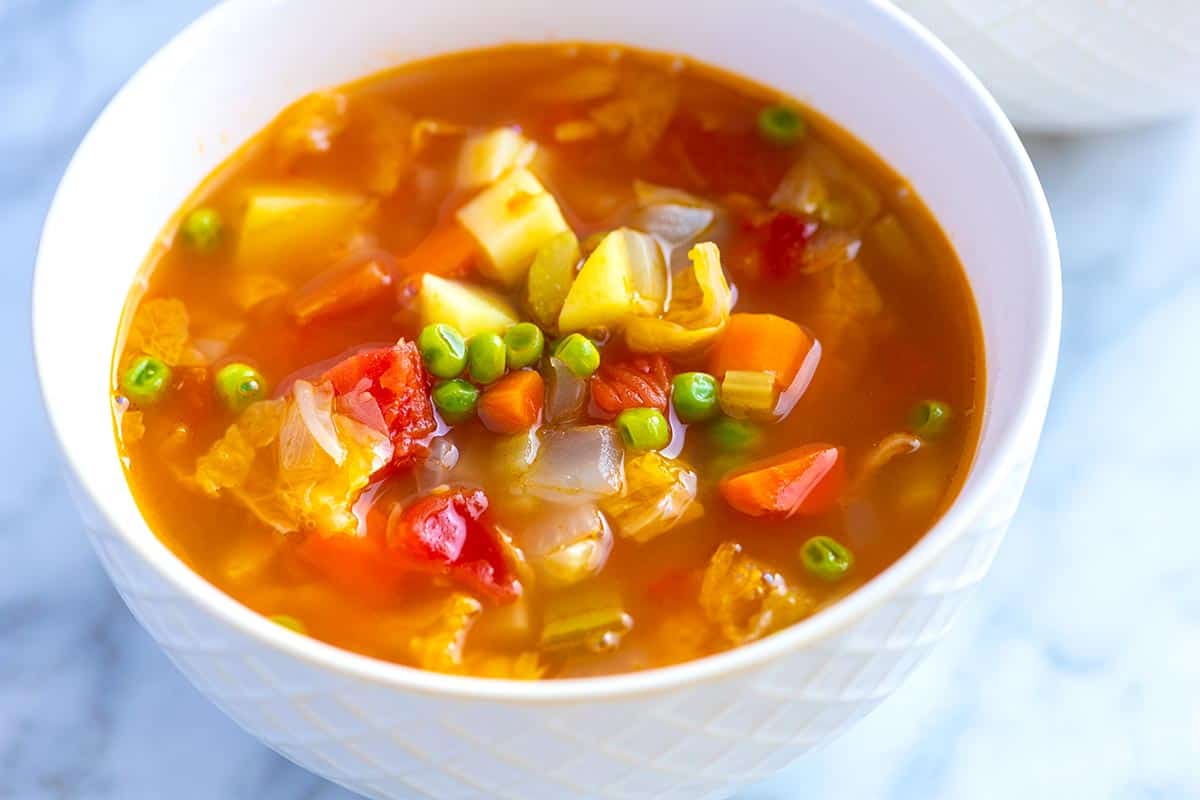

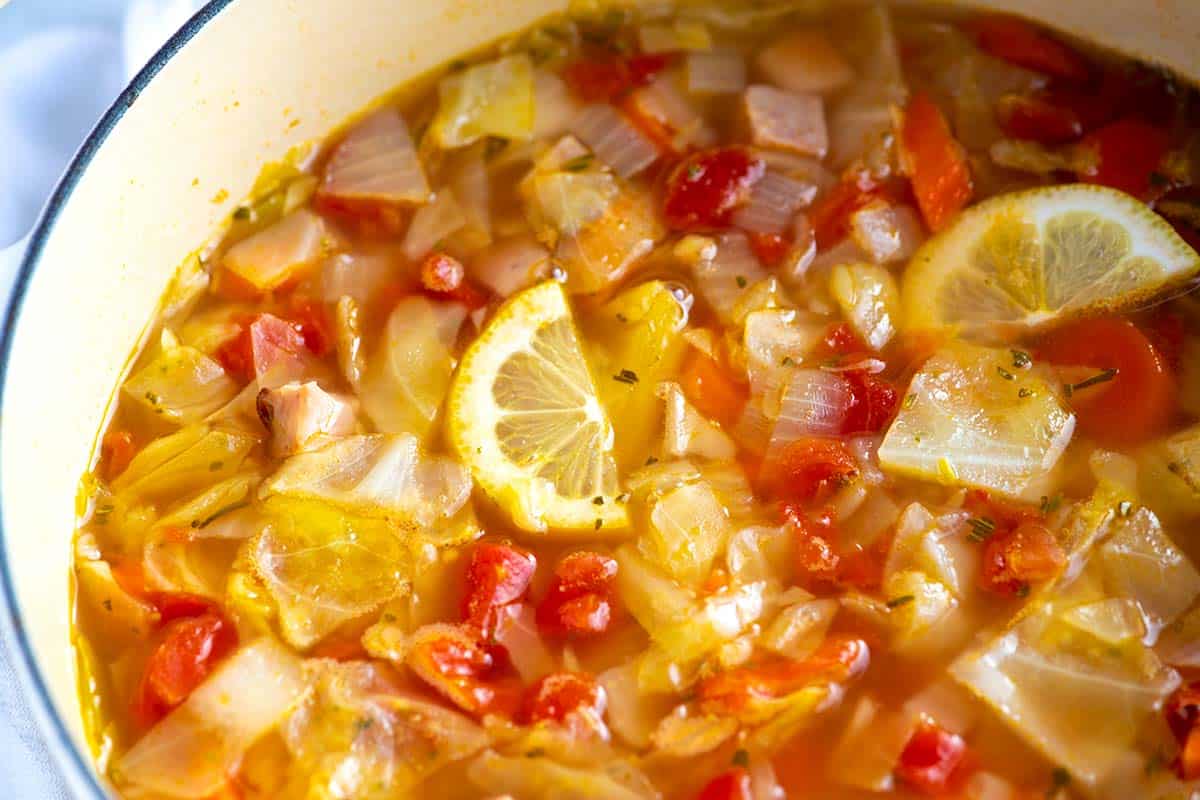
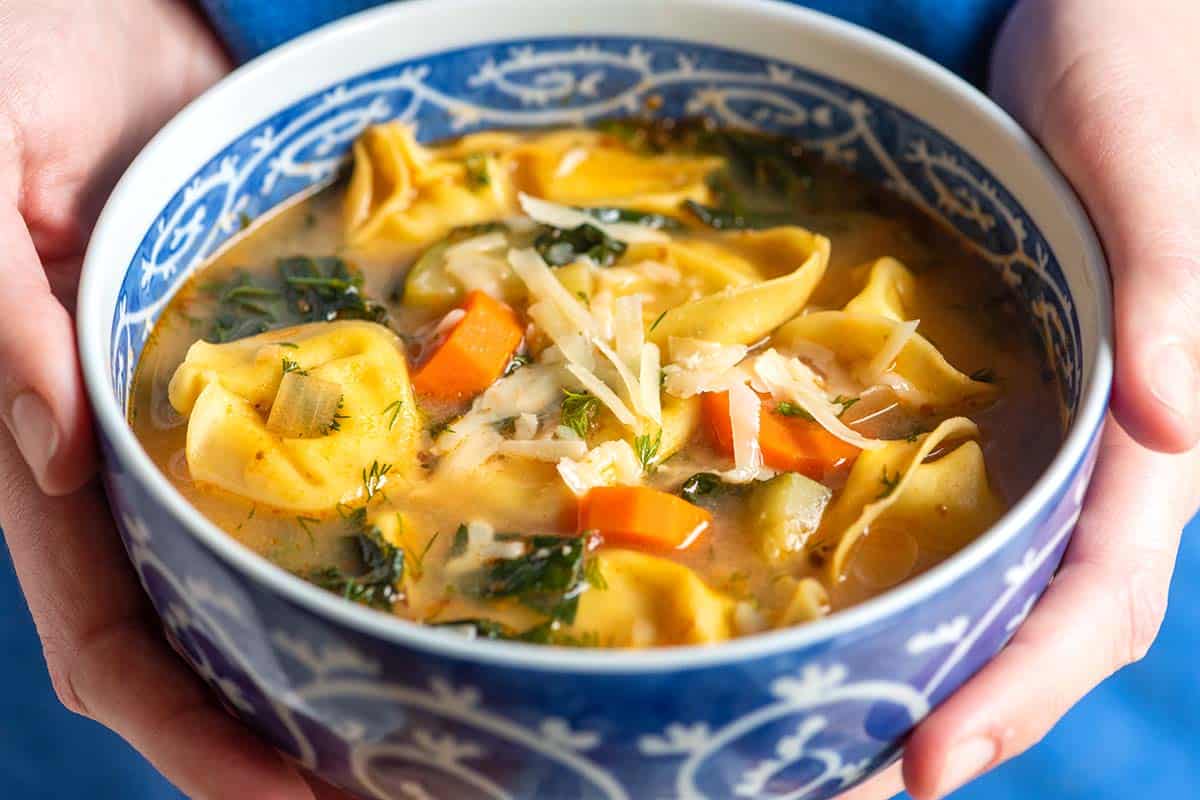


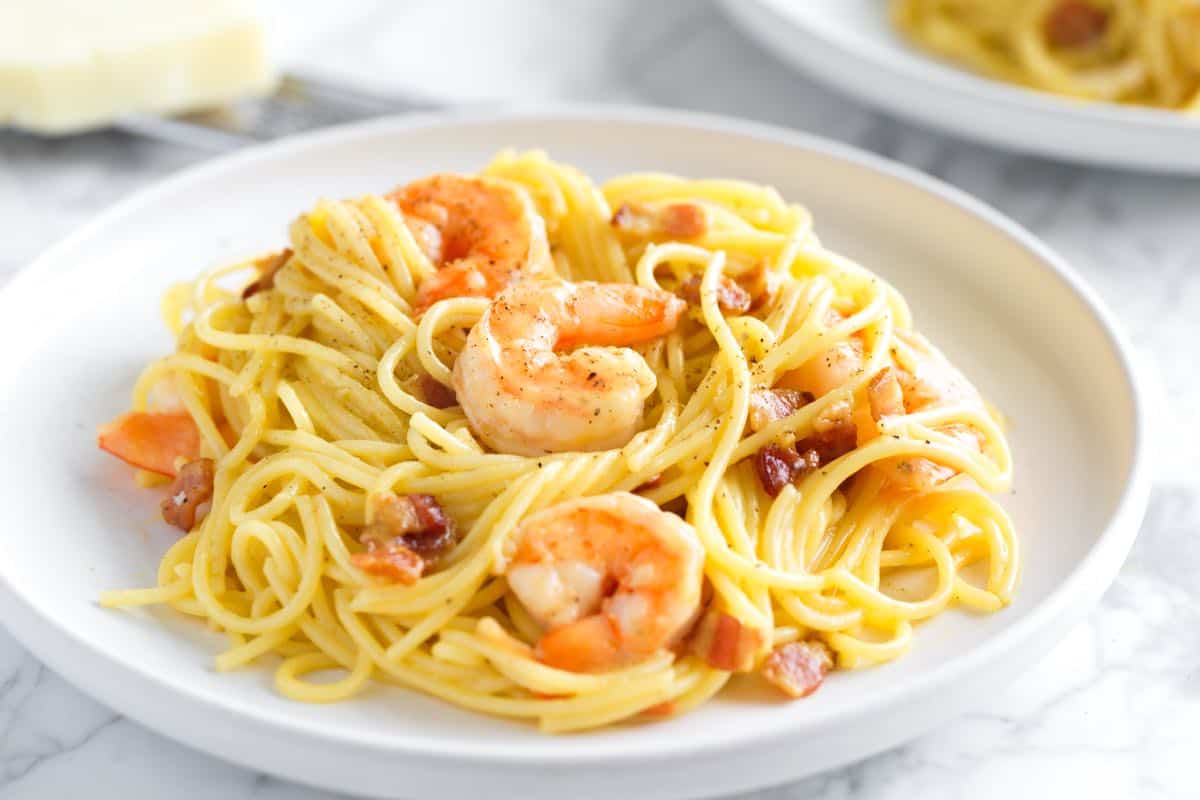
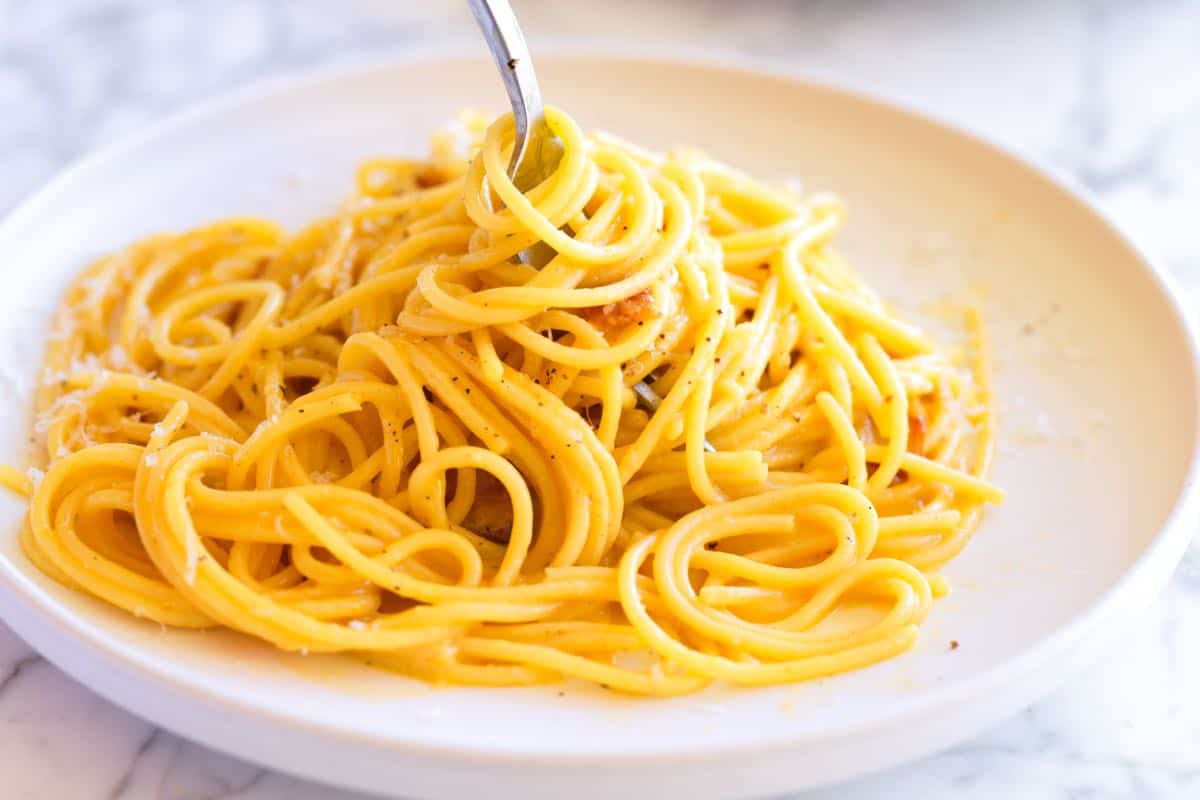

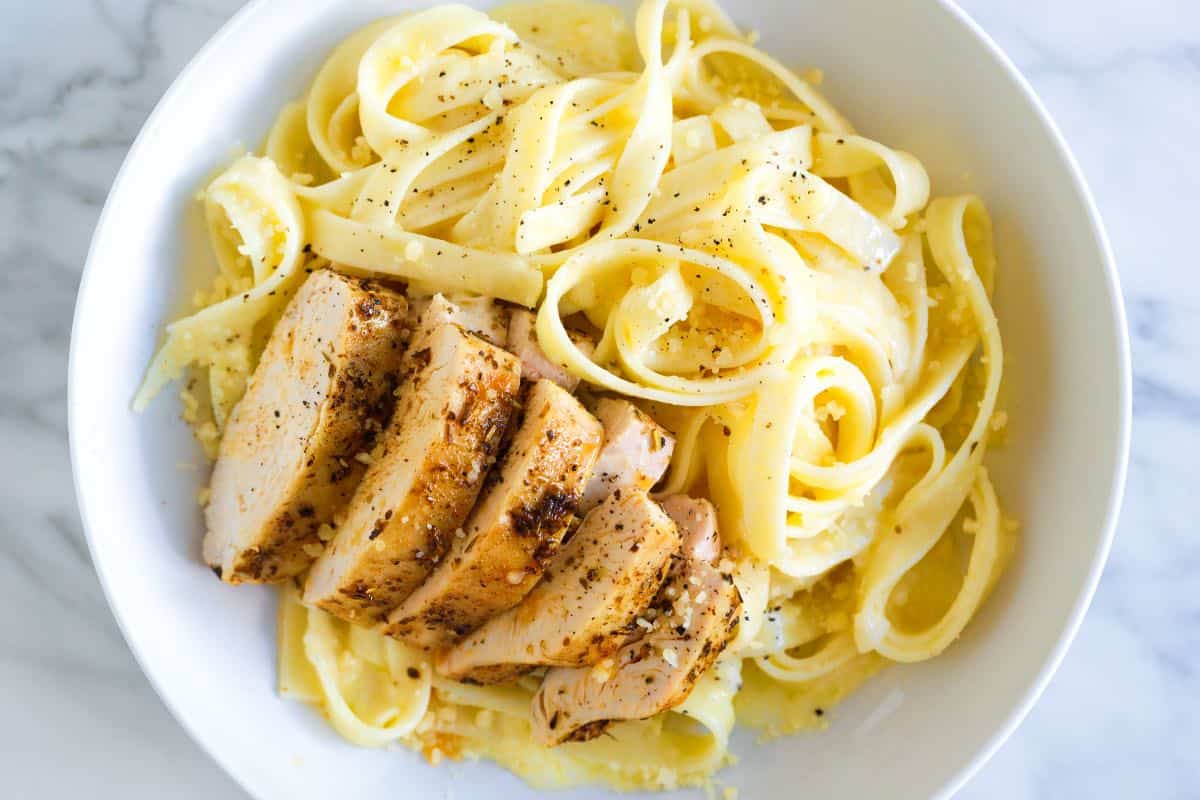
 June produce is all about freshness, sweetness, and speed. Most of it needs very little done to it.
 How To Cook In June (The Summer Approach)
 What To Cook With Zucchini in June
 What To Cook With Strawberries in June
 Fresh Salads for June
 Easy Weeknight Dinners for June
 Early Berries: What To Do With Them
 June Meal Planning Tips
 More June Cooking Inspiration