Bowls packed with teriyaki tofu that gets shredded and caramelized in a sweet and garlicky sauce! A fast and easy weeknight dinner that’s high in texture and flavor!
Appetizers
Crispy Onion Rings (Baked or Fried!)
30 minutes
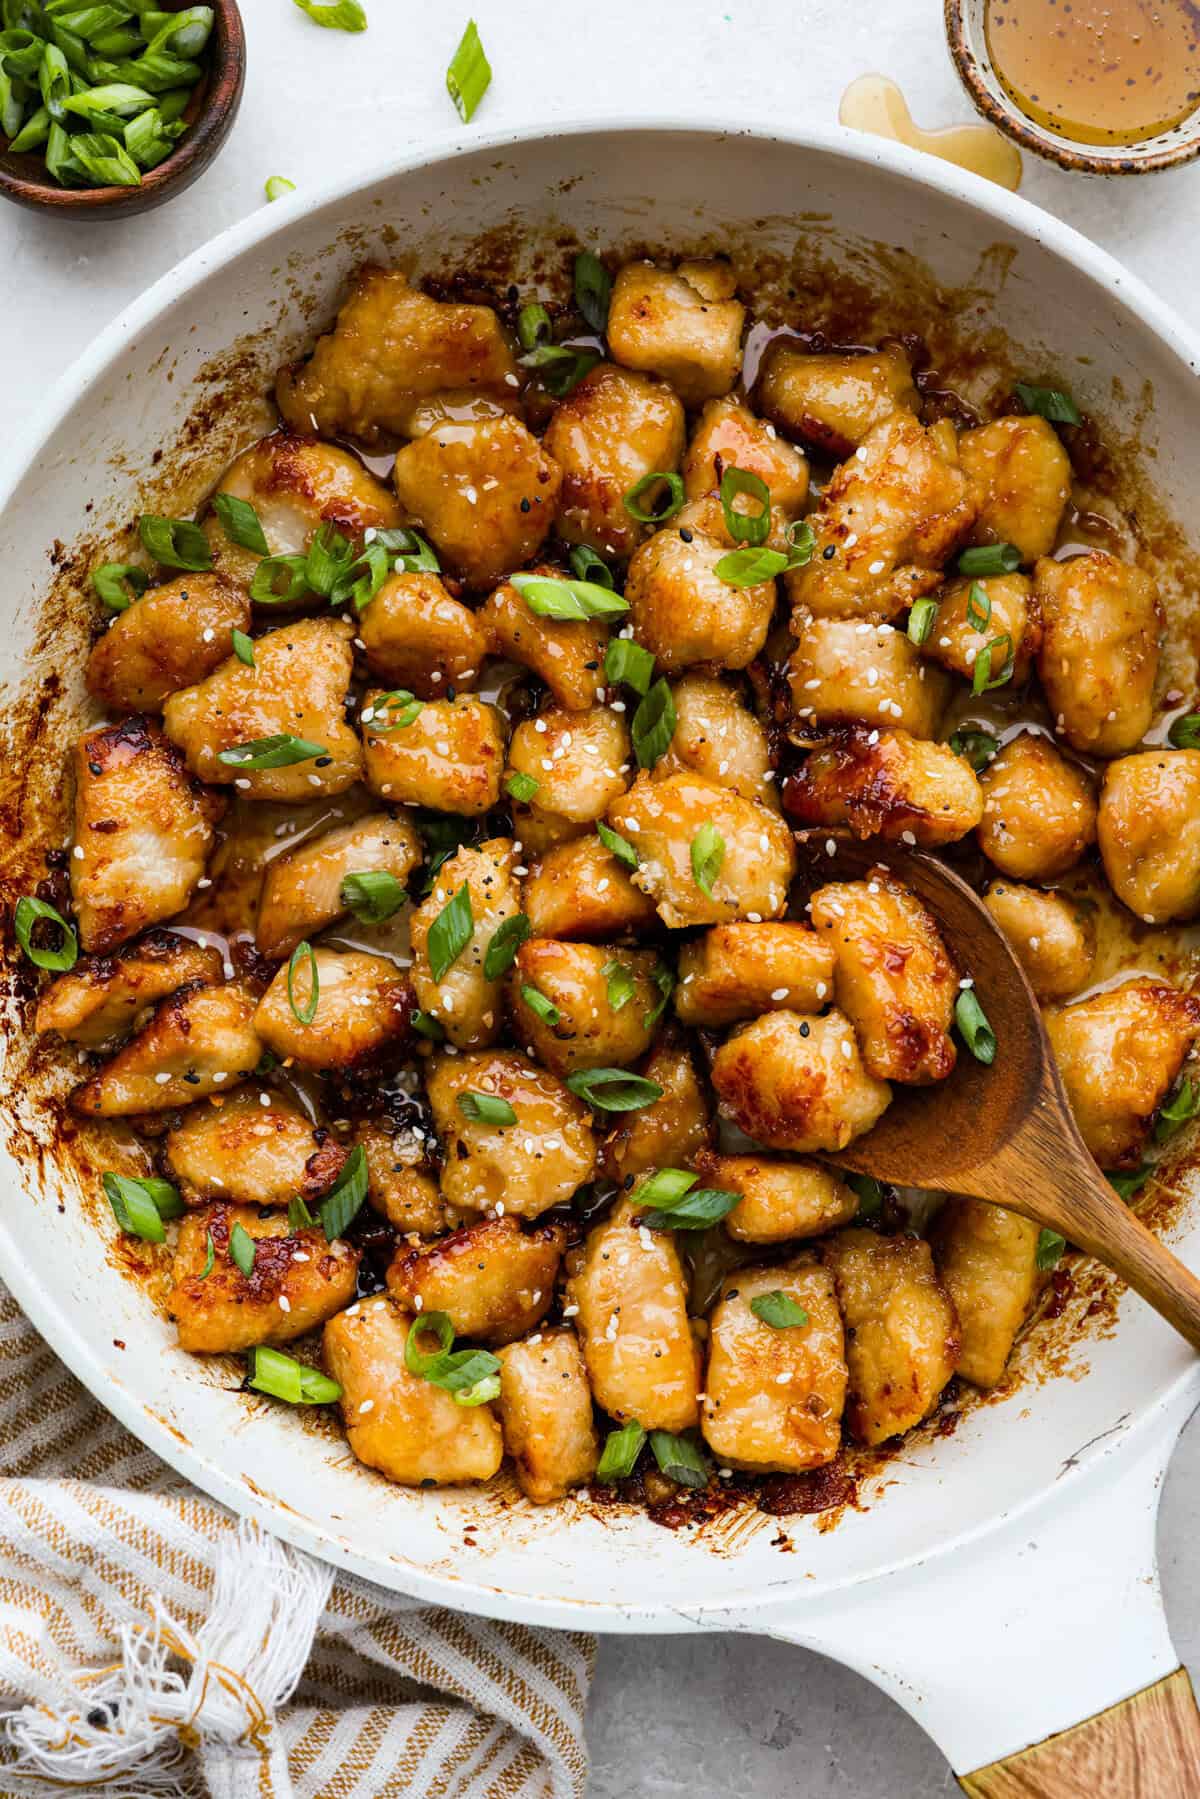
These healthy chicken bites are like the snacky, protein-packed cousin of popcorn chicken—crispy, juicy, and baked or air-fried to golden perfection. Serve them as the main protein for dinner or use as a protein-rich snack or lunchbox addition.
Jump to:  Overview |
  Ingredients |
  How To Make |
  Watch The Video |
  Recipe Tips |
  Serving Suggestions |
  Full Recipe Card |
  More Healthy Chicken Recipes
These tasty chicken bites remind me of popcorn chicken, but without the greasy aftermath. The chicken is marinated in spiced yogurt, which tenderises and adds big flavor, then coated in a seasoned flour blend for that addictive outer crunch. I tested this recipe both in the oven and the air fryer and they both come out golden and crispy, which tender chicken inside.
Each serving is high in protein, lower in fat, and great for both grown-ups and kids. They double up as a healthy weeknight dinner recipe and a protein-snack you can grab out of the fridge or add to your breakfast. Whether you’re meal prepping or snacking straight off the tray (guilty!), this one’s a reliable go-to. I often make these for my popcorn chicken bowls.
You might also like: Sriracha chicken bites, chicken karaage, air fryer bbq chicken wings, honey soy chicken meatballs, air fryer kielbasa, or my healthy chicken patties.
Here is what you’ll need for this chicken bites recipe. Find the full measurements in the recipe card below.
Find the full recipe and nutritional information below. Here are some handy step-by-step photos for how to marinate and cook these chicken bites in the oven and in the air fryer.
These are super versatile. Serve them with your favorite dip—healthy yogurt ranch dressing, aioli (sun-dried tomato or rosemary chili), bang bang sauce—or pile into a wrap, salad bowl, or lunchbox. I often serve them with air-fried chips or roasted sweet potatoes for a fun, high-protein dinner that doesn’t feel like “healthy food.” And of course, you must try my popcorn chicken bowls.
 If you’ve tried this chicken bites or any other recipe on the blog then don’t forget to rate the recipe and let me know how you got on in the comments below, I love hearing from you! You can also FOLLOW ME on Instagram, Facebook, Pinterest, YouTube, and or sign up to my Newsletter to see more of my delicious food.
Want to Save This Recipe?
Enter your email & I’ll send it to your inbox. Plus, get great new recipes from me every week!
By submitting this form, you consent to receive emails from Cooked & Loved
These healthy chicken bites are like the snacky, protein-packed cousin of popcorn chicken—crispy, juicy, and baked or air-fried to golden perfection. Find step-by-step photos and more recipe tips above.
Marinate: Mix yogurt, spices, and salt in a bowl. Add chicken and coat well. Cover and refrigerate for at least 30 minutes (or overnight).
Coating: Mix all coating ingredients in a bowl.
Coat: Spread half the coating on a plate, lay chicken on top, sprinkle remaining coating, and toss gently to coat.
Bake: Preheat to 210°C / 410°F. Line a tray, place chicken on it, and spray with oil. Bake for 15 minutes, flip, spray again, bake another 10 minutes.
Air Fryer: Preheat to 200°C / 400°F. Lightly oil the basket and spread chicken in a single layer. Spray with oil and air fry for 12 minutes, flipping halfway.
Let rest for a few minutes to finish crisping before serving.
Calories: 291kcal | Carbohydrates: 32g | Protein: 29g | Fat: 5g | Saturated Fat: 1g | Polyunsaturated Fat: 1g | Monounsaturated Fat: 1g | Trans Fat: 0.01g | Cholesterol: 76mg | Sodium: 1603mg | Potassium: 593mg | Fiber: 2g | Sugar: 2g | Vitamin A: 682IU | Vitamin C: 2mg | Calcium: 77mg | Iron: 2mg
This orange teriyaki baked salmon with red onions is a delicious, healthy dinner meal. This salmon recipe is Paleo, Whole30, and gluten-free friendly and can be served with a side of vegetables, salad or with rice if desired. This post has recently been updated!
Jump to: Overview | Ingredients | How To Make | Serving Suggestions | Go To Full Recipe |  More Salmon & Fish Recipes
One of my favourite quick and easy dinners is a tray of baked salmon served alongside a large salad or some stir-fried vegetables. For this delicious meal, I made orange teriyaki sauce, which works beautifully with the fatty salmon.
I love adding red onions rings both for the flavour and because they make this dish look so pretty when it comes out of the oven. I think it’s the purple against the bright orange colour, and the juxtaposition of the geometrical shapes.
This teriyaki baked salmon is super easy to make and I know you will love it!\
You may also like my Mediterranean fish with white bean purée.
You can use salmon fillets or steaks in this recipe, with or without the skin. In fact, any other type of fish will work well with the orange teriyaki sauce (as would shrimp or chicken). In this recipe, I only cooked two fillets but you can easily fit 4-6 on a baking tray, simply double up the sauce ingredients.
The sauce is super versatile and you can use it on chicken wings or pork skewers. You can also check out my go-to paleo stir-fry sauce, which is similar to this.
For other lovely salmon recipes, check out this baked Salmon Loaf with cucumber and dill salad, or my Japanese baked salmon balls.
I served this baked salmon with a simple stir-fry of Chinese cabbage and carrots with some garlic, lemon juice and sesame oil. I also like to serve some pickled radish or ginger.
You can also make a batch of my coconut cauliflower rice, or white rice if you desire, or make a simple side salad. If you like the salmon and salad combo, check out my pan-fried salmon with pea radish salad.
My orange ginger asparagus would be a nice complementary dish as well and if you want something more starchy, try miso sweet potatoes, which you could start baking a little earlier, then finish both at the same time.
Want to Save This Recipe?
Enter your email & I’ll send it to your inbox. Plus, get great new recipes from me every week!
By submitting this form, you consent to receive emails from Cooked & Loved
A delicious and healthy meal of orange teriyaki salmon baked in the oven with red onions. This baked salmon recipe is gluten-free, Paleo and Whole30 friendly. The recipe below also includes a simple vegetable stir-fry to serve on the side.
Preheat the oven to 200 C / 400 F. Leave the salmon out of the fridge for at least 10 minutes before cooking, to come to room temperature.
Place the salmon fillets, skin side down, on a flat baking tray lined with parchment/baking paper. Surround with onion rings, sprinkle with orange zest, sea salt and then drizzle evenly with olive oil.
Place the tray in the oven, middle shelf, and cook for 8 minutes. In the meantime, combine the sauce ingredients in a small bowl and whisk together.
Remove the salmon from the oven and pour the sauce over the top making sure to cover the salmon and the onions. Fold the edges of the paper inwards, as to prevent the sauce from spilling out. Sprinkle with sesame seeds. Place back in the oven for 7-8 more minutes.
While the salmon is finishing cooking, stir-fry the vegetables in a little coconut oil over medium-high heat for 4-5 minutes, stirring frequently. Add garlic, salt, pepper and lemon juice towards the end and stir through. Finally, drizzle and stir through the sesame oil.
Serve salmon alongside the veggies for a tasty, healthy dinner.
Calories: 694kcal | Carbohydrates: 38g | Protein: 47g | Fat: 40g | Saturated Fat: 11g | Polyunsaturated Fat: 10g | Monounsaturated Fat: 17g | Cholesterol: 110mg | Sodium: 2108mg | Potassium: 1895mg | Fiber: 6g | Sugar: 18g | Vitamin A: 7350IU | Vitamin C: 101mg | Calcium: 264mg | Iron: 4mg
This delicious, healthy Broccoli Soup is thick and creamy without using dairy or coconut cream. Topped with a robust nut and olive pesto, it’s flavoursome and satiating. This soup recipe is gluten-free, paleo Whole30, vegan-friendly, and rich in anti-ageing antioxidants. This post was recently updated!
I love this broccoli soup for its health benefits AND taste. Made with nutritious vegetables, and lots of healthy fats from olive oil, nuts, and olives, it is very high in antioxidants, vitamins and minerals.
I originally made it as Whole30 and paleo broccoli soup, so I didn’t use any dairy or flour to thicken it. I also didn’t want the coconut flavour, so I avoided using coconut milk or cream. So what makes it thick and creamy?
Well, the hack is using some white potatoes. The starch in the potato is great for both thickening and making this soup more satiating. It adds that velvety, thick texture. If avoiding nightshades, feel free to use sweet potato or swedes/rutabaga instead. Are Potatoes Paleo? An In-Depth Analysis
This soup is quite satiating and can be served as a main dish. And, with only about 25-28 grams of net carbohydrates per serving, it will suit those following a low-carb or carb-restricted diet, plus it’s gluten-free and vegan-friendly!
PS. If you want another dairy-free, gluten-free veggies soup, I have recently been obsessed with this curried broccoli cauliflower soup from Salted Plains. Or you can check out these other fall soup recipes.
To go with the soup, I made a nut and olive pesto. It’s similar to an olive tapenade – nutty, salty, garlicky with a note of bitterness. While the soup is tasty as is, I use this pesto as a bit of condiment or topping. It adds a more intense and interesting flavour and some crunchy texture.
These toppings would also work well instead of the pesto: crispy bacon bits, fried shallots, shredded chicken or diced smoked chicken, sun-dried tomato pesto or basil pesto.
For a vegetarian dish, it’s very nutrient-dense. I call it an anti-ageing soup with high amounts of antioxidants (vitamins C and E, zinc and selenium, indoles, and allium sulphur compounds).
It’s also rich in vitamin K, which you need for bone health and blood clotting, and many essential minerals. Protein is decent with 8 grams per serving thanks to the nuts pesto, and you’ll be getting plenty of fibre, too.
This healthy broccoli soup is paleo, gluten-free, Whole30, vegetarian and vegan-friendly.
Nutrition Macros Per serving (with olive pesto): 365 calories, 35 g total carbs, 7.5 g fibre (28.5 g net carbs), 8 g protein, 24.7 g fat.
Find the full list of ingredients, instructions and extra cooking notes below. If you have questions or cook this recipe, please let me know in the comments and make sure to rate this recipe so it’s easy for others to find.
Want to Save This Recipe?
Enter your email & I’ll send it to your inbox. Plus, get great new recipes from me every week!
By submitting this form, you consent to receive emails from Cooked & Loved
You will love this healthy yet delicious broccoli soup served with a topping of nut and olive pesto. This soup is nutrient-dense and full of antioxidants, plus it’s Paleo, Whole30, gluten-free and vegan-friendly. It’s easy to make and is great for batch cooking and freezing.
Add olive oil, onion, salt and lemon zest to a large saucepan and heat over medium heat. Sauté for 3 minutes until softened and lightly golden.
Add celery and diced potatoes, stir and cook together for a minute.
Add the stock, water, and cumin powder and stir through. Cover with a lid and bring to a boil. Cook over medium heat for 10 minutes, then add the broccoli, garlic, pepper and bay leaves. Cover with a lid and bring the heat to high. Cook for 5 minutes until broccoli has softened but hasn’t lost its green colour.
Remove from heat and transfer the contents of the soup – in batches – to a food processor or a blender (remove the bay leaves). Process into a smooth puree, then return to the saucepan and add stir in the lemon juice.
While the soup is cooking, prepare the pesto. Place the nuts into a food processor with an S-blade attachment and grind into crumbs. Add the rest of the ingredients and process together until ground up and blended into a course, pesto-like consistency. Remove to a bowl.
Serve the soup in bowls with a tablespoon of pesto stirred in.
Calories: 388kcal | Carbohydrates: 36g | Protein: 10g | Fat: 25g | Saturated Fat: 4g | Polyunsaturated Fat: 4g | Monounsaturated Fat: 17g | Sodium: 1767mg | Potassium: 999mg | Fiber: 8g | Sugar: 7g | Vitamin A: 1548IU | Vitamin C: 158mg | Calcium: 116mg | Iron: 3mg
This website may contain affiliate links and advertising so that we can provide recipes to you. Read my disclosure policy.
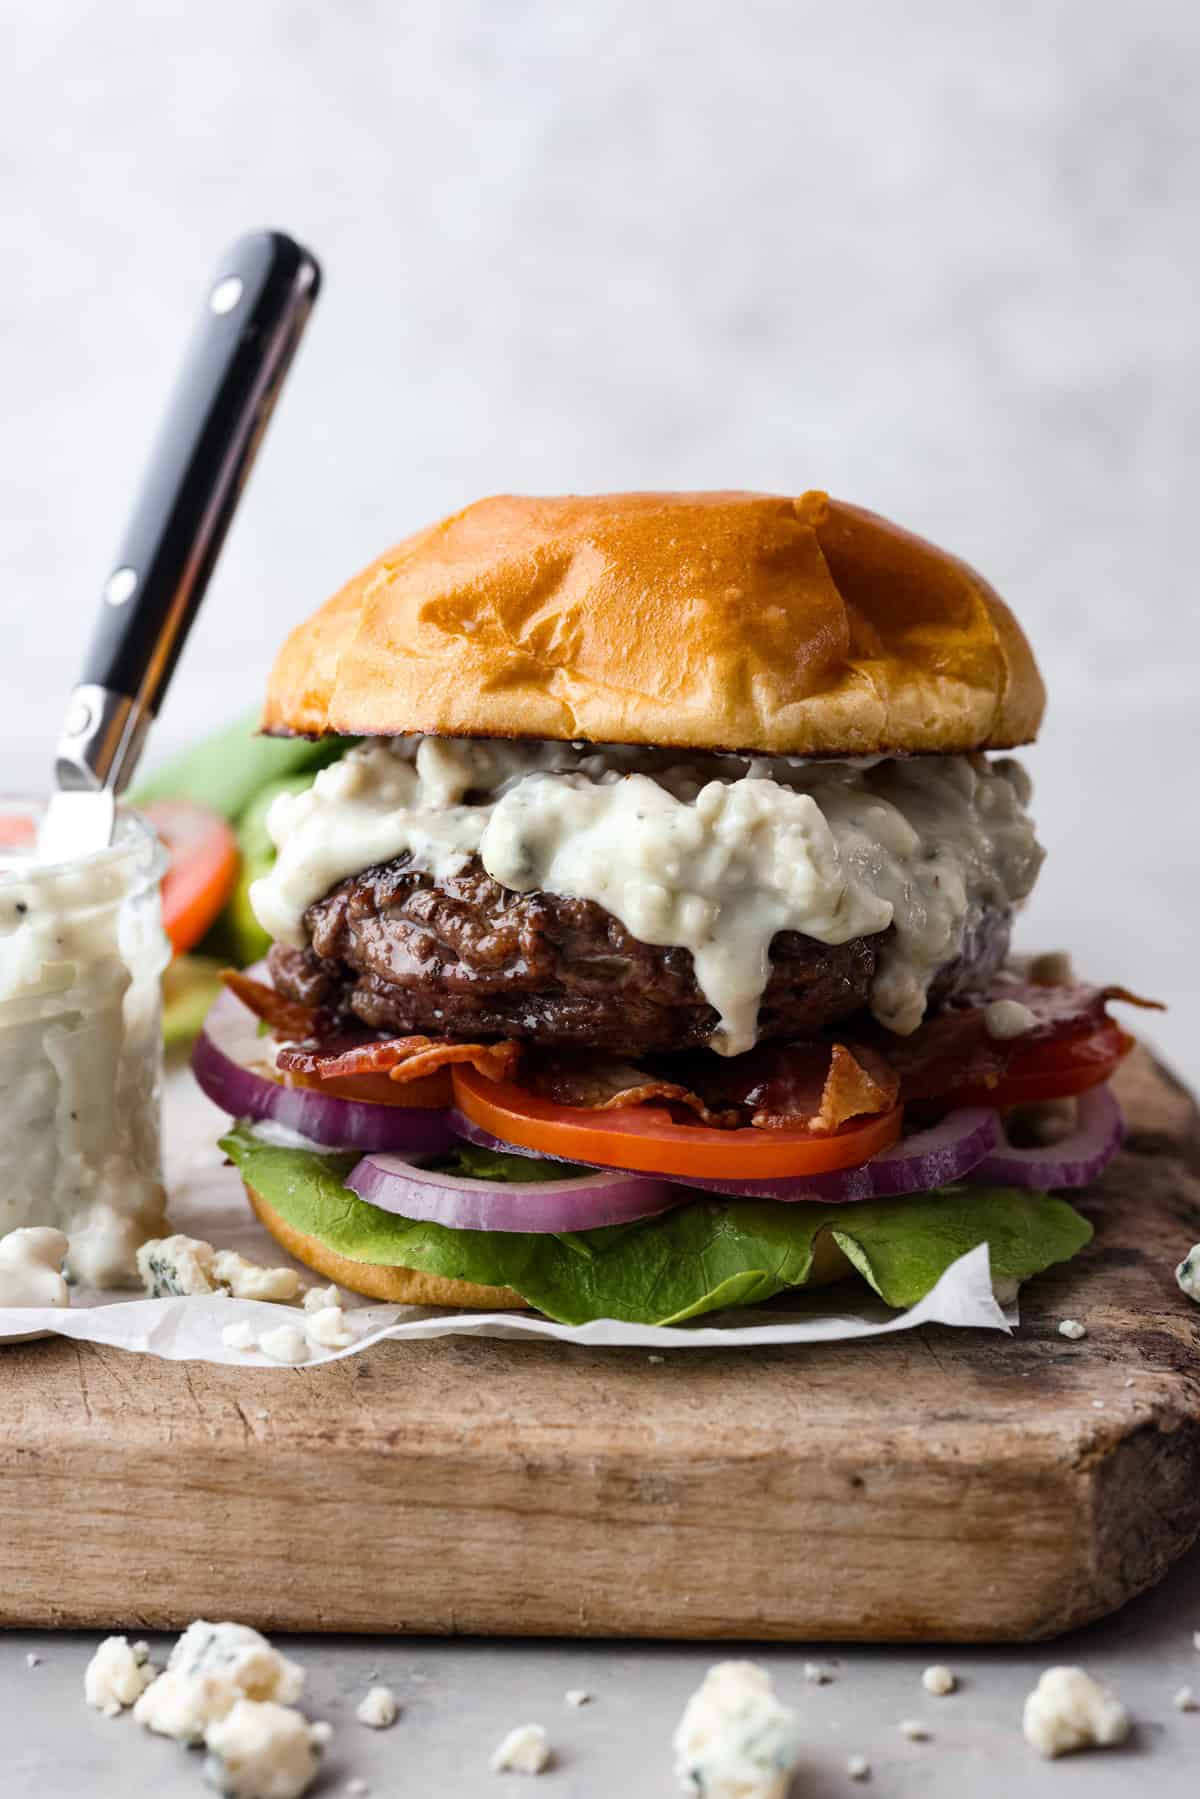
Get ready to be blown away by this Blue Cheese Burger! It’s thick, juicy, and filled with flavor. If you love blue cheese dressing, this recipe is for you! That unique tangy flavor is the perfect addition to the juiciest patty ever.
I love creating new and different burgers at home! They turn out even more delicious than what you can get at your local burger joint. If you’re looking to switch things up, try these recipes next: smash burgers, mushroom Swiss burgers, or Oklahoma fried onion burgers!

Here is everything you’ll need to make this amazing blue cheese burger recipe. Grab some basic ingredients like ground beef, blue cheese, bacon, buns and your favorite fixings. Serve them up with some In-N-Out Animal-Style Fries for a complete meal! You can find the exact measurements below in the recipe card.

These blue cheese burgers are super easy to make! Start by mixing the blue cheese topping, then cook the meat and assemble. Follow the simple step-by-step instructions and you’ll have juicy burgers in no time!


Here are some tips to keep in mind when you are making blue cheese burgers, and also some ways to customize them to your taste preference.

These Blue Cheese Burgers obviously taste the best fresh, but it never hurts to have a few extra patties on hand to reheat and eat over the next few days!

Blue cheese burgers are great on their own or just with a pickle and some chips on the side. However, if you really want to enhance your burger experience, try making some of these easy sides!
Appetizers
30 minutes
Pin this now to find it later
Pin It
]]>
Bowls packed with teriyaki tofu that gets shredded and caramelized in a sweet and garlicky sauce! A fast and easy weeknight dinner that’s high in texture and flavor!

Remember the tofu from the ramen bowls? I can’t stop making it. I shared this bowl combo on Instagram the other day and got lots of requests to write up the recipe, which brings us to this moment!
Lately what I’ve been doing is:
If you do nothing else with this, just make the teriyaki tofu. That shreddy tofu is so good. It gets coated and caramelized with a teriyaki sauce (store-bought, no prob) and laced with just enough fresh garlic to make your house smell like a restaurant, so, yeah, I’m pretty into it.
It’s a high-flavor, fast and easy dinner recipe, topped with a creamy-mouthfeel-kinda sauce, that’s conveniently also packed with fiber and protein. I sound like a salesperson right now and if that’s my legacy for these teriyaki tofu bowls, so be it!
Hope you love this combo!

Print
Bowls packed with teriyaki tofu that gets shredded and caramelized in a sweet and garlicky sauce! A fast and easy weeknight dinner that’s high in texture and flavor!
Teriyaki Tofu:
Kimchi Mayo:
Bowls:
Keywords: shredded tofu, crispy tofu, tofu bowls, teriyaki bowls, vegetarian teriyaki
October 22, 2025

I’m Lindsay and I ♡ FOOD. I used to be a teacher, and now making food and writing about it online is my full-time job. I love talking with people about food, and I’m so glad you’re here.
Did you make a recipe? Tag @pinchofyum on Instagram so we can find you!
]]>
These Keto Donut Bites are a delightful way to enjoy your favorite morning pastry without all the sugar. Tender and sweet and perfectly poppable!

Craving old fashioned glazed donuts? You can’t do better than these adorable Keto Donut Bites. These super tender mini muffins will quickly become one of your favorite keto snacks!

A good mini muffin pan is a must-have piece of bakeware in my professional opinion. It’s ever so useful for making bite-sized treats and keto appetizers. I use mine with relative frequency, especially when I need to make something that feeds a crowd. They work for savory recipes like Keto Taco Bites, as well as mini desserts like Keto Cheesecake Bites.
And if you miss donut holes, a mini muffin pan can help you enjoy them once again. These Keto Donut Bites remind me of Tim Bits, the little donut holes from the famous Canadian coffee chain Tim Horton’s.
As an aside, my late father always used to call my husband Tim Bits. Yes, his name is Tim, but at 6’7” he’s definitely not what you’d call bite-sized! That little memory warms my heart because it reminds me of the affection and respect they had for each other.
Have I convinced you yet? Get yourself a good mini muffin pan and let’s get baking!


I recommend lining your mini muffin pan with silicone or parchment liners. These are really tender and can break apart if they stick to the pan. As always, make sure you let them cool properly before trying to remove them!
The glaze needs to be thin enough that you can dip the donut bites easily. How much water you need to add depends very much on what kind of powdered sweetener you use. Erythritol based sweeteners will take more water to thin out than allulose.
Start with just a teaspoon or two of water and add more as needed. The glaze should be easy to drizzle but not too watery.
You can use your favorite bulk sweetener in both the donuts and the glaze. Do keep in mind that allulose based sweeteners may cause the donut bites to darken more quickly so keep your eye on them in the oven.

I do not recommend eating conventional donuts on a low carb or keto diet. Donuts made with flour and sugar should be avoided completely. However, you can enjoy all sorts of low carb and sugar-free donuts that are made with alternative flours and sweeteners. I highly recommend my keto chocolate donuts for an easy recipe!
You can store these donuts in a covered container on your counter for up to 3 days or in the fridge for up to a week. You can also freeze the donuts for several months.
This keto donut bites recipe has 4.0g of carbs and 1.7g of fiber per serving. That comes to 2.3g net carbs for 2 donut bites.


Servings: 12 servings
These Keto Donut Bites are a delightful way to enjoy your favorite morning pastry without all the sugar. Tender and sweet and perfectly poppable!
Prevent your screen from going dark
Preheat the oven to 350ºF and line a mini muffin pan with parchment or silicone liners (24 cavity pan).
In a large bowl, whisk together the sour cream, eggs, water, and vanilla extract. Add the sweetener and stir until well combined.
Stir in the almond flour, whey protein, baking powder, and salt. If the batter is overly thick, add a little more water to thin to a scoopable consistency.
Divide evenly among the prepared muffin cups. Bake 15 to 20 minutes, until turning golden brown and firm to the touch. Remove and let cool completely in the pan.
In a medium bowl, whisk together the sweetener and cream. Start with 2 to 3 tablespoons of water, and stir in more until a thin glaze consistency is achieved.
Dip the tops of the donut bites into the glaze and place on a waxed paper lined baking sheet to set.
Serving: 2donut bites | Calories: 128kcal | Carbohydrates: 4g | Protein: 6.5g | Fat: 10.1g | Saturated Fat: 1.9g | Fiber: 1.7g
Categories:
Appetizers & Snacks,
Muffins & Scones,
Nutritional Disclaimer
Please note that I am not a medical or nutritional professional. I am simply recounting and sharing my own experiences on this blog. Nothing I express here should be taken as medical advice and you should consult with your doctor before starting any diet or exercise program. I provide nutritional information for my recipes simply as a courtesy to my readers. It is calculated using MacGourmet software and I remove erythritol from the final carb count and net carb count, as it does not affect my own blood glucose levels. I do my best to be as accurate as possible but you should independently calculate nutritional information on your own before relying on them. I expressly disclaim any and all liability of any kind with respect to any act or omission wholly or in part in reliance on anything contained in this website.
Sign up for your favorite recipes delivered straight to your inbox plus get our FREE bonus: Secrets to Keto Baking!
]]>
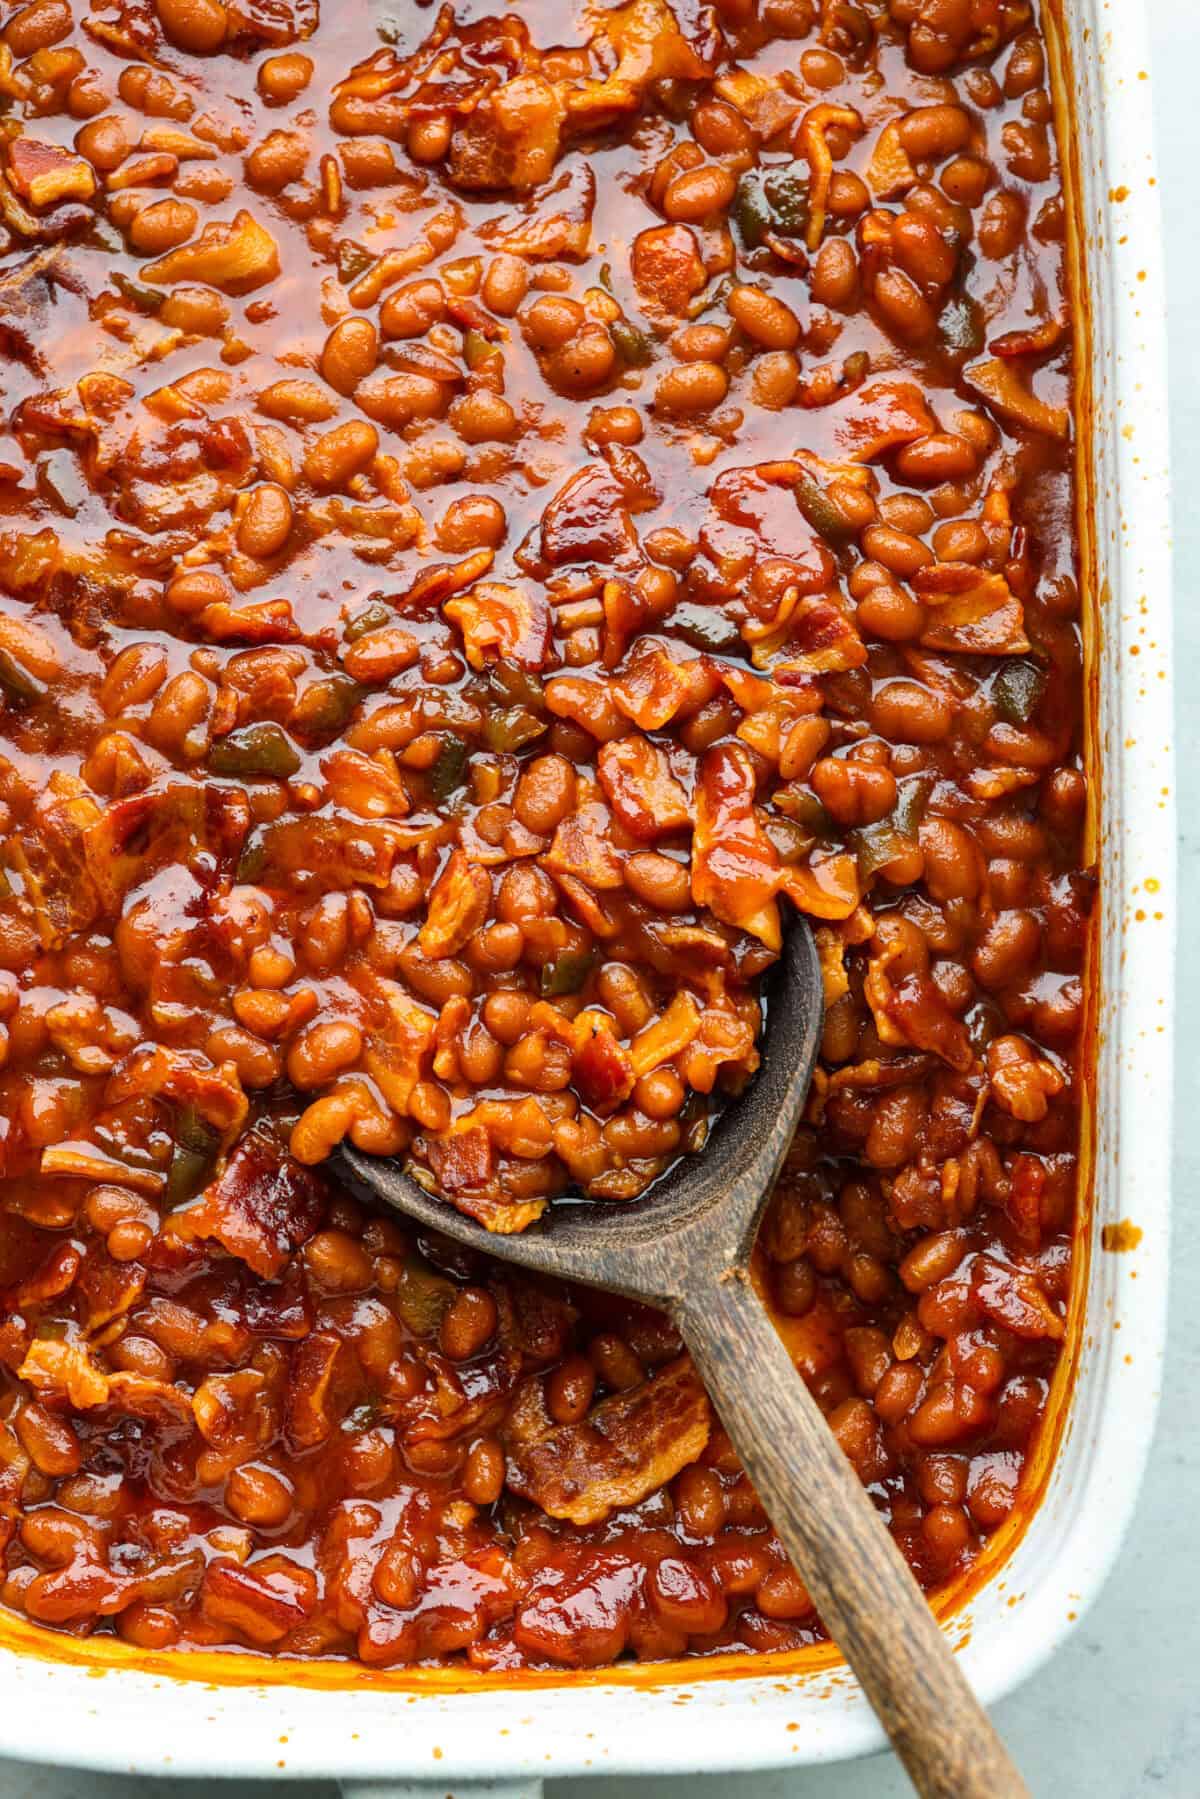
This butter beans recipe is inspired by shrimp saganaki, a Greek dish that features shrimp (or prawns) cooked in a rich tomato sauce with garlic, onions, and plenty of feta cheese. The word “saganaki” actually refers to the type of pan used to cook the dish. A saganaki is a two-handled frying pan traditionally made of heavy materials like cast iron or copper. In Greek cuisine, “saganaki” can refer to any dish cooked in this type of pan, but it’s most famously associated with fried cheese (like in cheese saganaki) or seafood dishes like shrimp or mussels saganaki.
In this version, I used tender canned butter beans, which I cooked in a rich tomato sauce, garlic, and onion, then topped with briny Kalamata olives and creamy feta cheese. Fresh dill and parsley add a burst of vibrant herby flavor, making this dish not only hearty but also incredibly refreshing. Seriously, for something so simple, this dish is sooooo tasty and was a hit even with my non-bean-loving partner!
Oh, and I used my oven-proof sauté pan, which happens to be two-handled so this dish is as close to saganaki as I am going to get!
Greek butter beans is a perfect cosy dinner, easy enough for a weeknight meal. Serve it with crusty bread to soak up every last bit of the flavorful tomato sauce. It’s equally good the next day so you can enjoy it for breakfast with some fried or poached eggs or simply spread over toasted sourdough. And don’t forget to pop some in your lunchbox for a satiating, nutritious protein kick.
You might also enjoy these Mediterranean recipes: eggplant & chickpea salad, Greek roasted potatoes, herby and lemony chickpea soup, Persian salad, Greek quinoa breakfast bowl, or this couscous salad. You will also find some fun ideas in this healthy chickpea recipes roundup.
Here is what you’ll need for this Greek butter beans recipe. Find the full measurements in the recipe card below.
Find the full recipe and nutritional information below. Here are some handy step-by-step photos.
Serve this butter bean saganaki with crusty bread or pita bread to soak up the sauce. It also pairs well with grilled fish, rice, or a fresh side salad. For breakfast, I love the leftovers with some fried or poached eggs and I will often spread some of these butter beans on toasted sourdough as a quick protein snack. Don’t forget to add these to your lunchbox, too!
If you’ve tried this butter beans recipe or any other recipe on the blog then don’t forget to rate the recipe and let me know how you got on in the comments below, I love hearing from you! You can also FOLLOW ME on Instagram, Facebook, Pinterest, YouTube and or sign up to my Newsletter to see more of my delicious food.
Want to Save This Recipe?
Enter your email & I’ll send it to your inbox. Plus, get great new recipes from me every week!
By submitting this form, you consent to receive emails from Cooked & Loved
This Greek butter beans recipe is inspired by the traditional Greek shrimp saganaki. The beans are cooked in a rich and flavourful tomato sauce with refreshing notes of dill and parsley and the salty finish of feta cheese. Enjoy as a vegetarian main or as a side dish, spread it on toast or serve with eggs for a Mediterranean breakfast.
Sauté Vegetables: Heat olive oil in an oven-safe skillet over medium heat. Add diced onion and season with ½ teaspoon of salt. Cook until soft (about 7 minutes), then add sliced garlic and cook for another 1 minute until fragrant.
Make the Sauce: Add crushed red pepper flakes, paprika, dried oregano, honey and cherry tomatoes. Cook for 30 seconds to a minute, stirring through. Add diced canned tomatoes and season with another ½ teaspoon of salt. Stir and simmer (uncovered) for 8-10 minutes until some liquid evaporates and the tomato sauce thickens a bit.
Combine and grill: Fold in the butter beans and olives, then add a few sprigs of dill. Top with crumbled feta and place the skillet under the hot broiler (grill in the oven) for about 5 minutes until the cheese melts and browns slightly. This step is optional as the beans are technically ready to eat and you can serve with feta without grilling the top.
Serving: 6servings | Calories: 150kcal | Carbohydrates: 13g | Protein: 4g | Fat: 10g | Saturated Fat: 3g | Polyunsaturated Fat: 1g | Monounsaturated Fat: 5g | Cholesterol: 17mg | Sodium: 799mg | Potassium: 329mg | Fiber: 3g | Sugar: 7g | Vitamin A: 936IU | Vitamin C: 31mg | Calcium: 155mg | Iron: 2mg
Butter beans are large, creamy beans also known as lima beans. They have a smooth, buttery texture that’s perfect for soaking up flavors. If you can’t find butter beans, you can substitute them with cannellini beans, great northern beans, or even chickpeas for a slightly different texture and taste.
The traditional recipe is vegetarian since it includes feta cheese. To make it vegan, simply omit the feta or replace it with a vegan cheese alternative. Also, substitute honey with maple syrup or agave nectar if used in the recipe.
‘Saganaki’ refers to a variety of Greek dishes that are prepared in a small, two-handled frying pan of the same name. The most famous saganaki dish is the fried cheese appetizer, but the term is also used for other dishes like shrimp saganaki and this butter beans version, all typically featuring a rich tomato-based sauce.
Absolutely! Spinach, bell peppers, zucchini, or eggplant make great additions and can enhance the nutritional value and flavor complexity of the dish. Add them during the sautéing stage to ensure they’re cooked properly.
Yes, you can use fresh tomatoes. You’ll need about 4-5 medium-sized ripe tomatoes, chopped. Keep in mind that fresh tomatoes may make the sauce lighter and may require a longer cooking time to break down and thicken properly.
This website may contain affiliate links and advertising so that we can provide recipes to you. Read my disclosure policy.
Sticky, sweet, and totally irresistible, this honey butter chicken brings golden brown perfection to your dinner table. One pan, picky-eater approved, and guaranteed to have everyone begging for seconds.


This honey butter chicken recipe is quick, easy, and packed with sticky, sweet goodness that clings to every crispy bite. Add a side of mashed potatoes or green beans for extra comfort food vibes.


Ziplock Bag Tip: Trust me on this! The BEST and easiest way to coat the chicken with cornstarch is with a ziplock bag. Shake well to separate and coat each piece of chicken.
Pin this now to find it later
Pin It

For a similar recipe with a little kick, try my sweet chili chicken next. Here are some more 30-minute chicken recipes!

Dinner
30 minutes
]]>
This Greek pasta salad recipe is fresh, colorful, and made with the most irresistible homemade dressing. Perfect for summer entertaining and potlucks!
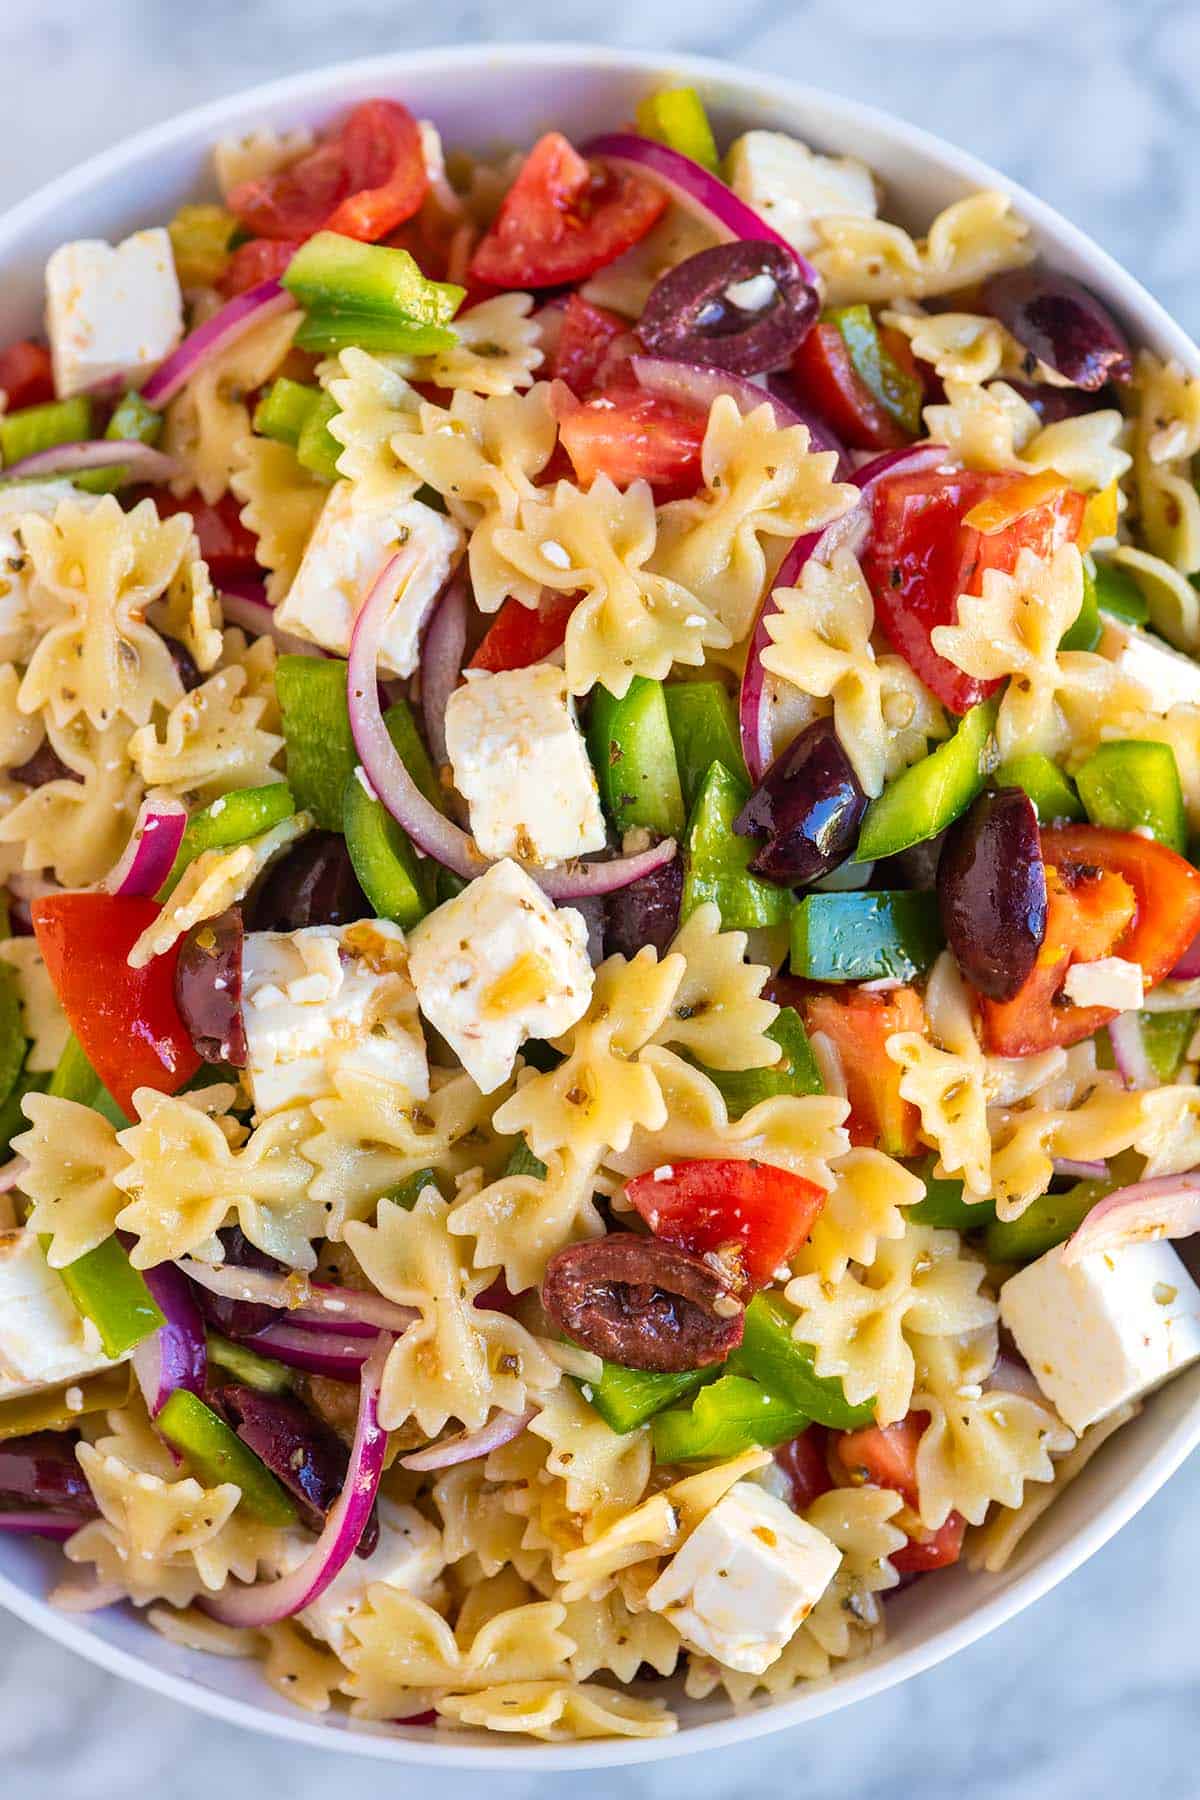
Inspired by our favorite Greek salad, this easy pasta salad combines fresh tomatoes, red onion, olives, and creamy feta cheese. It’s simple to shop for, comes together quickly, and always tastes like summer.
Serve it as a side dish, or make it a full meal by topping it with grilled chicken, shrimp scampi, or your favorite protein. For an Italian twist, try our Italian pasta salad with salami. It’s just as easy and just as delicious.
Find the full recipe with measurements below.
Tip 1: Make everything in one bowl. I’m always looking for ways to reduce the number of dirty dishes, so I make this pasta salad directly in the serving bowl. Start by whisking the dressing in the bottom, then add the cooked pasta and other ingredients on top. Toss it all together, and you’re done.

Tip 2: Let it sit. This pasta salad actually gets better as it rests. Let the pasta and veggies sit in the dressing for at least 30 minutes before serving so the flavors have time to mingle. It makes a big difference.
This Greek salad is perfect for bringing to your next get-together. It’s fresh, colorful, and tasty. I’ve also been enjoying it myself as a base for something else. Add chickpeas, poached salmon, baked tofu, or juicy chicken breasts for a complete meal.
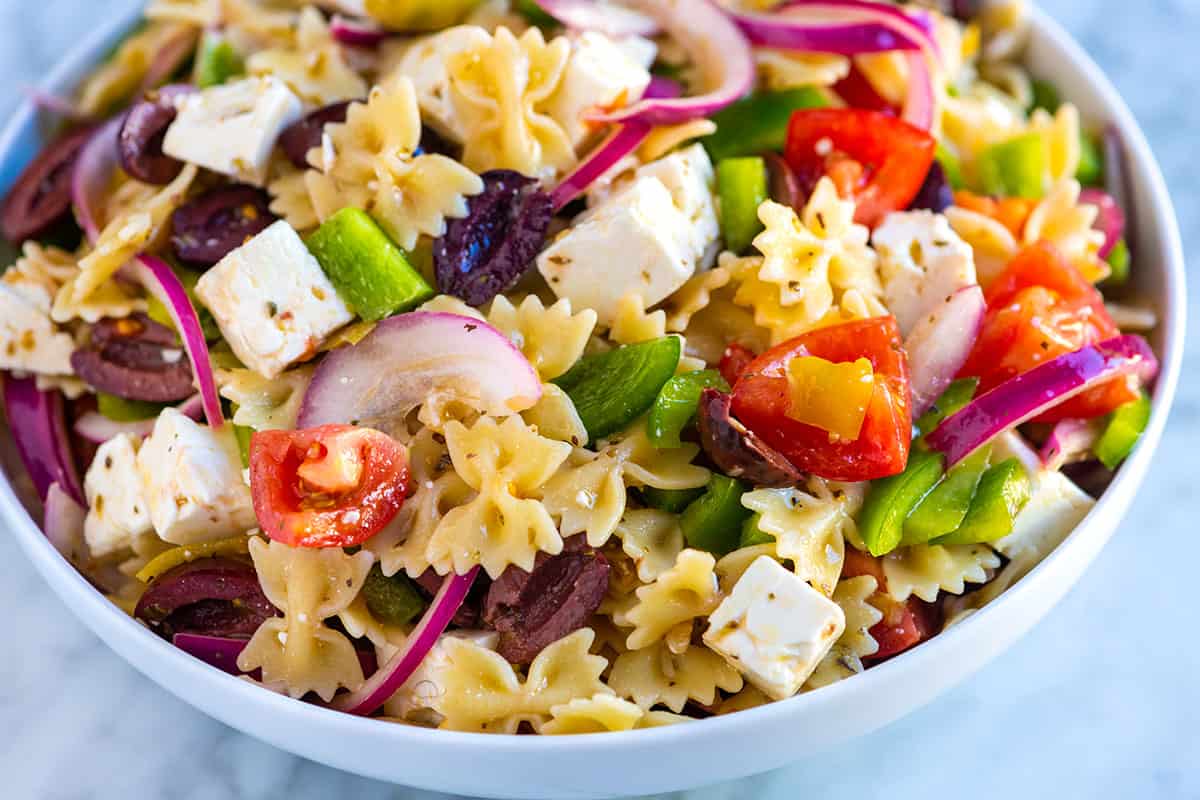
To make this Greek pasta salad really flavorful, we use brine in two ways. First, we add a few tablespoons of juice from a jar of pepperoncini peppers, which adds a touch of spice. Second, we use feta cheese packed in brine and stir a couple of tablespoons of that cloudy, salty liquid into the dressing.
6 Servings
Greek Pasta Salad
8 ounces short-cut pasta, such as bow-tie, fusilli, or penne (226g)
1/2 cup thinly sliced red onion
3 small tomatoes, chopped, 1 ¼ cups
1 green bell pepper, chopped
1 ¼ cups Kalamata olives, pitted and halved
8 ounces feta cheese, cut into ½-inch cubes (226g)
4 pepperoncini peppers, thinly sliced, optional
Salad Dressing
1/4 cup extra-virgin olive oil (60ml)
1/4 cup red wine vinegar (60ml)
2 tablespoons brine from jar of pepperoncini peppers or use fresh lemon juice (30ml)
2 tablespoons brine from feta, optional (30ml)
1 ½ teaspoons dried oregano
1/4 teaspoon fine sea salt plus more to taste
1Place the sliced onion in a small bowl and cover with cold water. Set the bowl aside for 10 minutes so that the raw flavor of the onion calms a little. Drain and rinse the onions before adding them to the salad.
2Bring a large pot of salted water to a boil. Add pasta and cook until tender, 6 to 10 minutes (check the package for recommended cook time). Drain and rinse well under cold water.
3While the pasta cooks, in the bottom of a large bowl, make the dressing. Whisk the olive oil, red wine vinegar, pepperoncini brine, feta brine, oregano, salt, and black pepper until well blended.
4Add the drained and rinsed pasta to the dressing and mix well.
5Stir in the drained and rinsed red onion, tomatoes, bell pepper, olives, feta cheese, and sliced pepperoncini peppers.
6Taste for seasoning and adjust with salt and pepper as needed. Serve or, for the best results, cover and refrigerate for at least 30 minutes and up to 5 days.
Nutrition Per Serving
Serving Size
1/6 of the recipe
/
Calories
381
/
Total Fat
21.2g
/
Saturated Fat
7.5g
/
Cholesterol
33.6mg
/
Sodium
661.4mg
/
Carbohydrate
37.4g
/
Dietary Fiber
4.2g
/
Total Sugars
5.5g
/
Protein
11.7g

We are Adam and Joanne Gallagher, the creators of Inspired Taste. Established in 2009, Inspired Taste grew from a childhood dream into one of the internet’s most trusted recipe sites with hundreds of reliable recipes, step-by-step videos, and expert tips.More About Us
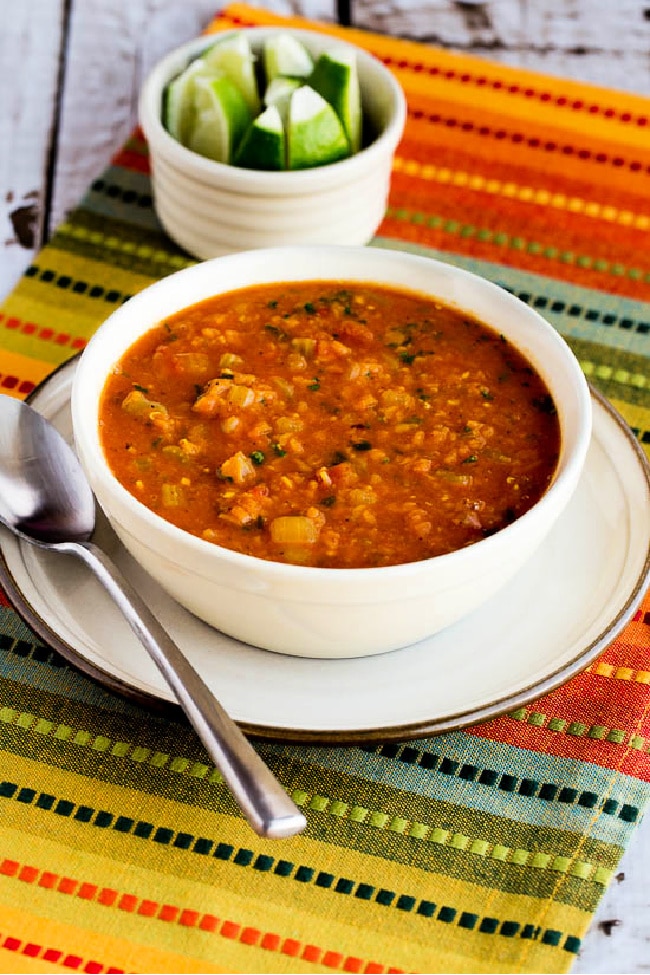
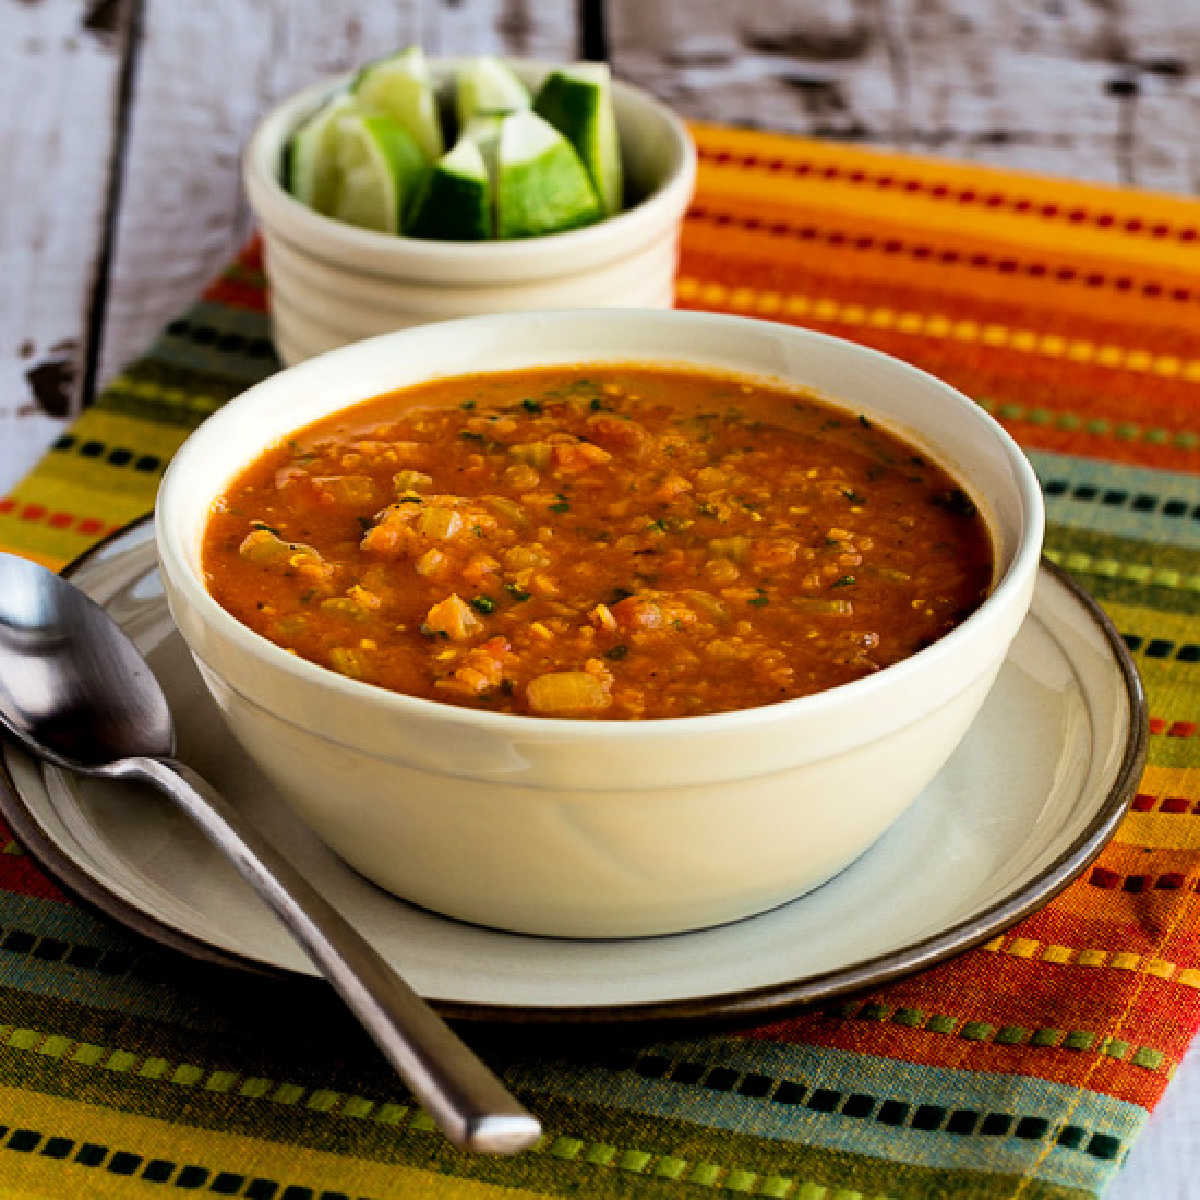
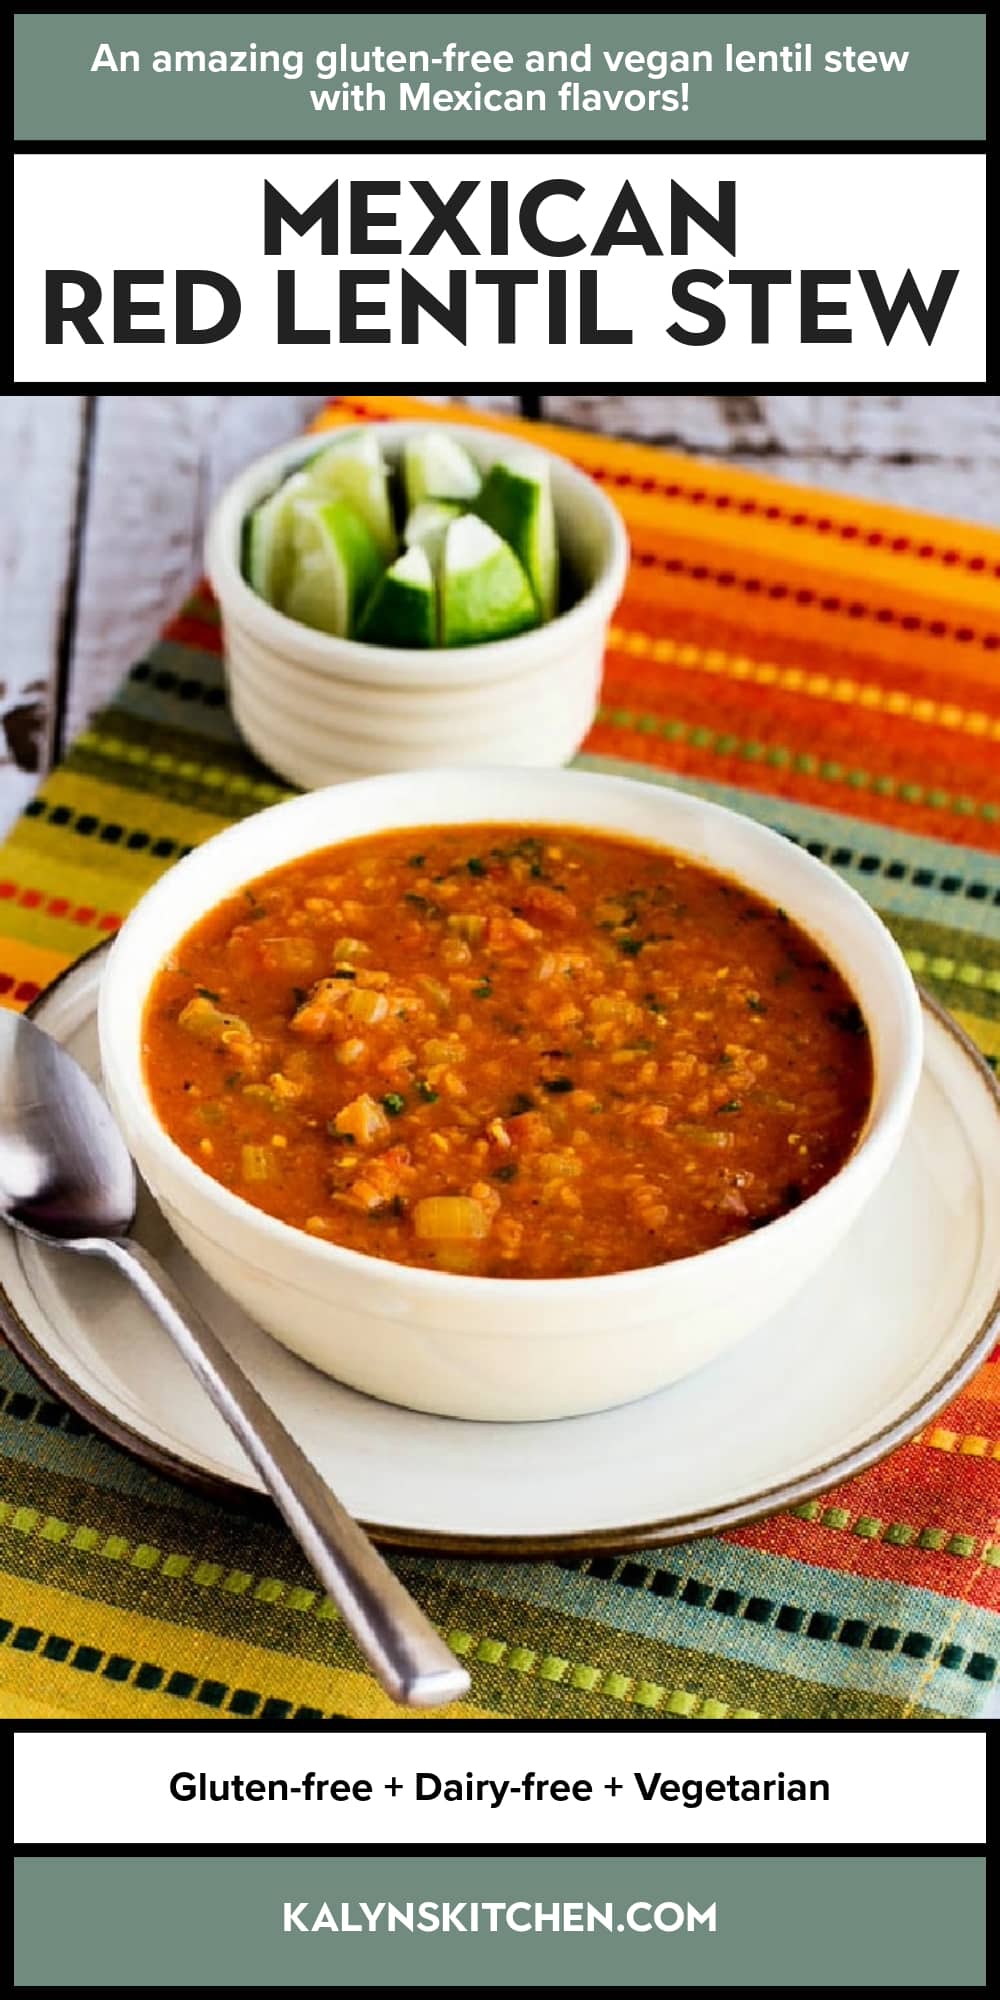
Mexican Red Lentil Stew is an easy recipe that’s always a hit, and this delicious red lentil stew is vegan and gluten-free! Of course lentils have some carbs, but they also have fiber so if you check the nutritional information this might be lower in net carbs than you’re thinking.
PIN this tasty Red Lentil Stew to make it later!
This amazing Mexican Red Lentil Stew is a dish I made regularly when I used to have a soup party every year, and everyone would gobble it up and go back for more. And even though I didn’t mind the original photos for this dish, recently I was glad to update them with better ones when I had the chance.
When I looked at the notes for the original post, I noticed the soup was adapted from this recipe from Budget Bytes, who adapted it from Andrea Meyers, so you can tell the recipe has had a lot of fans!
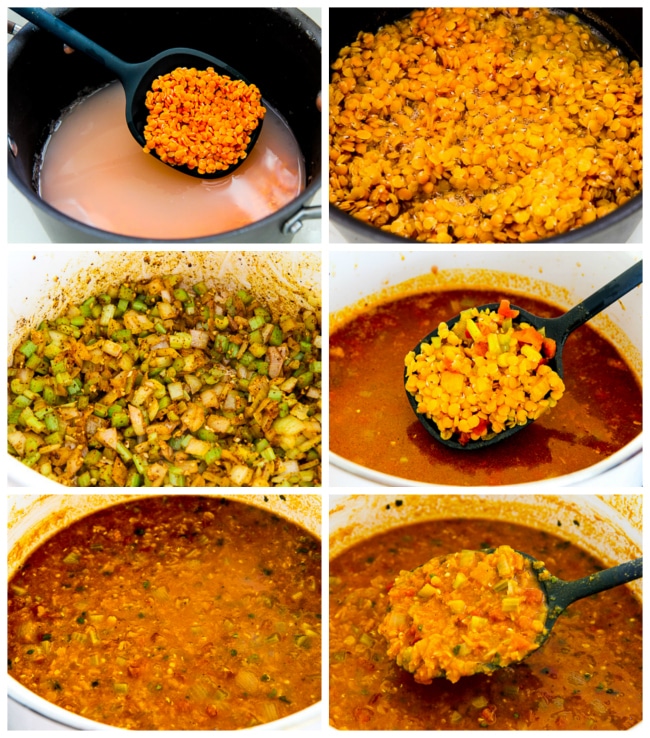
I love red lentils in soup because they cook quickly and dissolve into the soup more quickly than regular lentils, and in this soup the lentils are seasoned with turmeric, ground cumin, and chile powder. Those spices plus the combination of lime and cilantro makes this soup a winner for me.
I eat mine with a dollop of sour cream, but if you skip the sour cream this tasty soup is vegan. I hope you’ll try it if you like these ingredients!
(This is only a list of ingredients; please scroll down for complete printable recipe. Or if you use the JUMP TO RECIPE link at the top of the page, it will take you directly to the complete recipe.)
I encourage you to use red lentils for this stew, both for the flavor but also for the way they dissolve much more quickly than regular brown or green lentils when they’re used in soup. But if that’s just not happening at your house, I’m sure regular brown lentils will still be tasty.
Ground cumin, ground Ancho chile peppers, Green Tabasco Sauce, and lime juice all give this lentil stew a Mexican vibe!
I do understand that cilantro doesn’t taste good to some people, and if you’re someone with the anti-cilantro tastebuds I would use thinly-sliced green onion instead.
(This is only a summary of the steps for the recipe; please scroll down for complete printable recipe. Or if you use the JUMP TO RECIPE link at the top of the page, it will take you directly to the complete recipe.)

You can get by with less garlic, but I like a lot of garlic in this. I like petite dice tomatoes for soup.
Use any hot sauce of your choice if you don’t have Green Tabasco Sauce (affiliate link). You may want less if you use a different brand.
Use the juice of 2-3 limes, or less if you’re not that into lime. You can use less cilantro, or use thinly-sliced green onion if you’re not a cilantro fan.
Recipe adapted from Mexican Lentil Stew at Budget Bytes and Spicy Red Lentil and Tomato Soup at Andrea Meyers.
6
1
Amount Per Serving
Calories 162Total Fat 3gSaturated Fat 0gUnsaturated Fat 3gCholesterol 0mgSodium 372mgCarbohydrates 26gFiber 5gSugar 3gProtein 9g
Nutrition information is automatically calculated by the Recipe Plug-In I am using. I am not a nutritionist and cannot guarantee 100% accuracy, since many variables affect those calculations.
Low-Carb Diet / Low-Glycemic Diet / South Beach Diet Suggestions:
This Mexican Red Lentil Stew recipe is a great main dish for any phase of the original South Beach Diet, although dried beans and lentils are limited to a small serving for Phase One. It’s a bit high in carbs for a traditional low-carb diet plan, but lentils do have some fiber so the net carbs might be lower than you think; check the nutritional information above.
Find More Recipes Like This One:
Use Soup and Stew Recipes to find more recipes like this one. Use the Diet Type Index to find recipes suitable for a specific eating plan. You might also like to follow Kalyn’s Kitchen on Pinterest, on Facebook, on Instagram, on TikTok, or on YouTube to see all the good recipes I’m sharing there.
Historical Notes for this Recipe:
This red lentil stew with Mexican flavors was first posted in 2010. The recipe was last updated with more information in 2023.
We are a participant in the Amazon Services LLC Associates Program, an affiliate advertising program designed to provide a means for us to earn fees by linking to Amazon.com and affiliated sites. As an Amazon Associate, I earn from qualifying purchases.
]]>